
A jammed shifter can ruin your ride, but fixing it is easier than you think. Most problems come down to dirt, rust, worn cables, or misaligned components. This guide breaks down the causes, symptoms, and step-by-step solutions to get your bike shifting smoothly again. Here’s the quick fix:
- Common Causes: Dirty or rusted cables, bent derailleur hangers, misadjusted limit screws, or worn-out shifter parts.
- Symptoms: Sluggish shifting, stiff levers, chain skipping, or gears not engaging.
- Fixes: Adjust cable tension, clean and lubricate components, replace worn cables and housing, or realign your derailleur.
Pro Tip: Regular maintenance, like cleaning cables and replacing them annually, prevents most issues. If cleaning doesn’t help, it could be time for new cables or even a shifter replacement.
Read on for detailed steps to diagnose and repair your drivetrain, ensuring smooth and reliable gear changes.
How To Fix Shifter Not Catching/Clicking – Won’t Shift
sbb-itb-9d75ae1
Diagnosing Jammed Shifter Issues
Bike Shifter Problem Diagnosis Guide: Symptoms and Causes
Signs Your Shifter Is Jammed
If your bike’s shifter isn’t working smoothly, the signs are usually pretty obvious. You might notice sluggish shifting, where it takes multiple clicks to get the chain to move, or a delayed response altogether. If the lever feels stiff or requires too much effort to operate, it’s time to take a closer look. Sometimes, the lever might click like normal, but the derailleur doesn’t respond, leaving the chain stuck in place. Another common issue is a "dead" or mushy feeling when shifting, which often points to worn-out internal ratchets. As Oscar Huckle from BikeRadar puts it:
"The ratchet mechanism in Shimano shifters is the equivalent of a Swiss watch and instead requires replacement."
More serious problems include the chain skipping gears, grinding noises, or even the chain falling off the cassette completely. According to Park Tool:
"A dry chain will feel sluggish when shifting and will make excessive noise when pedaling."
How to Diagnose the Problem
Start by inspecting the cable system, as friction in this area is a frequent cause of jammed shifters. Shift into the lowest gear without pedaling to slacken the cable, then remove the housing from its stops and slide it along the cable. If it doesn’t move freely or feels stuck, dirt or rust is likely the issue.
Next, check the derailleur hanger by looking at it from behind. It should align perfectly with the wheel and cassette. To check for chain wear, measure 12 inches from pin to pin. If the chain stretches beyond 12‑1/16 inches, it’s time for a replacement. Adjust the barrel adjusters by turning them in half-turn increments – counter-clockwise for larger cogs, clockwise for smaller ones. Also, make sure the limit screws are properly set to prevent the chain from shifting into the spokes or the frame. While back-pedaling, watch for stiff links that don’t move smoothly through the derailleur pulleys.
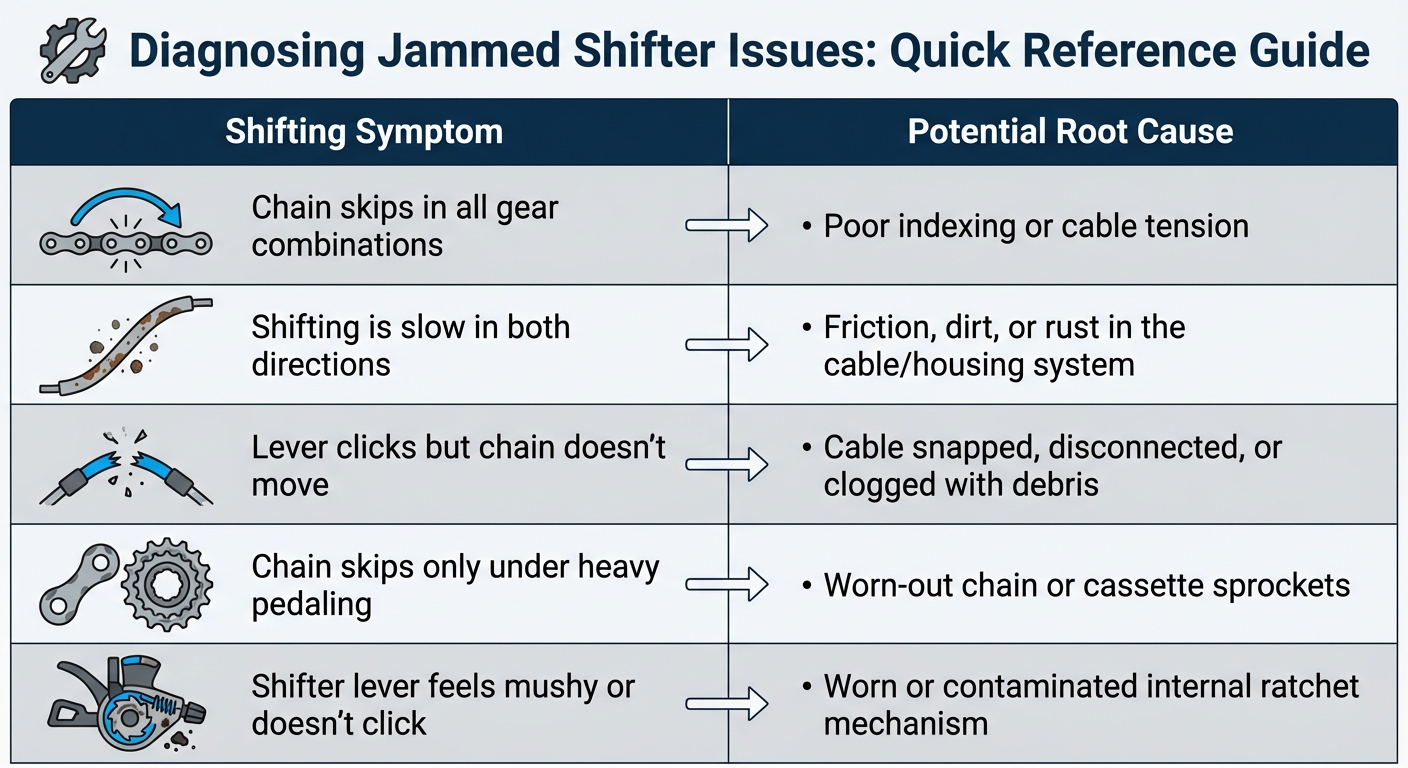
Here’s a quick reference table to help diagnose common issues:
| Shifting Symptom | Potential Root Cause |
|---|---|
| Chain skips in all gear combinations | Poor indexing or cable tension |
| Shifting is slow in both directions | Friction, dirt, or rust in the cable/housing system |
| Lever clicks but chain doesn’t move | Cable snapped, disconnected, or clogged with debris |
| Chain skips only under heavy pedaling | Worn-out chain or cassette sprockets |
| Shifter lever feels mushy or doesn’t click | Worn or contaminated internal ratchet mechanism |
Use these observations to pinpoint the issue and tackle repairs in the upcoming section.
Fixing Common Shifter Problems
Adjusting Cable Tension
The barrel adjuster plays a key role in fine-tuning cable tension. You’ll typically find it on the shifter (for mountain bikes), on the rear derailleur (for road bikes), or inline with the cable housing.
Start by shifting to the smallest rear cog and ensuring the shift lever is in its starting position. If the chain hesitates when moving to a larger cog (inboard), turn the barrel adjuster counter-clockwise in small increments (1/4 to 1/2 turns) to increase cable tension. This adjustment helps guide the derailleur toward the larger cogs. On the other hand, if shifting to smaller cogs feels sluggish, turn the adjuster clockwise to reduce tension.
"If you are experiencing slow shifting from a smaller cog to a larger cog (inboard shifting), turn the shifter’s barrel adjuster counter-clockwise in 1-click increments until shifting is correct."
– SRAM
After every 1/4- or 1/2-turn adjustment, test the shifting. If the barrel adjuster reaches its limit, you’ll need to reset the system. Loosen the cable anchor bolt on the derailleur, manually pull the cable tight, and start fresh. When installing a new cable, turn the barrel adjuster out 3–4 turns counter-clockwise before tightening. This leaves room for future fine-tuning.
| Shifting Symptom | Likely Cause | Adjustment Direction |
|---|---|---|
| Hesitation shifting to a larger cog | Cable tension too slack | Counter-clockwise |
| Hesitation shifting to a smaller cog | Cable tension too tight | Clockwise |
| Chain over-shifts (skips a gear) | Cable tension too tight | Clockwise |
| Chain rubs on the outer derailleur cage | Cable tension too slack | Counter-clockwise |
Once the tension is set, clean and lubricate your shifter to keep everything running smoothly.
Cleaning and Lubricating Your Shifter
After adjusting cable tension, cleaning often resolves shifting issues caused by debris buildup. Dirt and grime can create friction, so regular maintenance is essential – especially if your derailleur and cables are in good condition. Avoid fully disassembling the shifter, as reassembly can be tricky.
For road bikes, pull back the rubber hoods to access the shifter mechanism. On mountain bikes, you can usually remove a bottom plate with a screwdriver to expose the internals. Use a degreaser to clean the shifter while cycling through the gears to remove old grease and dirt. Once the degreaser runs clear, apply lubricant to the moving parts and grease any accessible internals before reassembling.
Don’t forget the cable housings. Remove them from their stops and spray degreaser through one end until it flows out clean on the other side. At least once per season, unscrew the barrel adjusters and cable anchor bolts to lubricate their threads. If the shifter still feels stiff after cleaning, inspect the derailleur system for damage.
If cleaning doesn’t solve the problem, it may be time to replace the cables and housing.
Replacing Cables and Housing
When cleaning and lubrication don’t restore smooth shifting, worn or damaged cables and housing are often the culprits. Replace shifter cables if you notice fraying, rust, or kinks, and swap out the housing if it’s cracked, cut, or bent. Dirt and grease buildup inside the housing can also cause friction. As a general rule, replace cables annually and housing every two years.
To replace the cable, shift to the smallest rear cog to release tension. For Shimano STI or Campagnolo Ergopower levers, push the return lever multiple times (at least nine) to expose the cable head. Before installing new housing, cut it to the required length and file the ends to remove jagged edges that could obstruct the cable.
Mountain Bike Action Magazine offers a helpful tip:
"Shifter housing has a plastic inner liner to help lubricate the cable. This liner will more than likely be crushed during the cutting process. Using a scriber, dental pick or sharpened spoke to open up that liner will reduce friction and improve shifting performance."
Before securing the new cable, reset the barrel adjuster by turning it fully in, then out one full turn. Pull the cable taut to remove slack, and tighten the anchor bolt. Ensure the housing slides freely over the cable. If the shifter remains stiff after replacing cables and cleaning, the internal ratchet mechanism could be worn, which means you may need to replace the shifter entirely.
Testing and Fine-Tuning After Repairs
Testing Your Gear Shifts
After completing repairs, it’s crucial to test your bike’s gear shifts to ensure everything is functioning as it should. If you’ve replaced cables or cleaned the shifter, each click of the shifter should result in a smooth, precise gear change. Start by shifting through all the gears while the bike is on a repair stand or lifted off the ground. Pay close attention to the first three cogs – if these shift smoothly, the rest of the cassette is likely in good shape as well.
Check both upshifts and downshifts to make sure they are equally responsive. If you notice any hesitation or lag, this may indicate the cable tension needs fine-tuning. While gently pedaling, move the derailleur across its full range to confirm the chain stays in place and doesn’t drop into the spokes or off the smallest cog.
For front derailleurs, shift into the lowest gear without pedaling to slacken the cable. Then, move the housing back and forth to ensure smooth movement without any grit or resistance. A properly adjusted drivetrain should run quietly – any grinding, clicking, or rubbing sounds mean further adjustments are required. Once everything feels smooth, proceed to fine-tune the indexing for precise gear alignment.
Adjusting Shifter Indexing
After confirming smooth gear shifts, focus on indexing to ensure the derailleur aligns perfectly with each cog. Proper indexing ensures that one click of the shifter equals one gear change. The barrel adjuster will be your go-to tool for this. Turning it counter-clockwise increases cable tension, which pulls the derailleur toward the larger cogs. Turning it clockwise decreases tension, moving the derailleur toward the smaller cogs.
Begin at the smallest cog. Shift up one gear. If the chain doesn’t move to the next cog, turn the barrel adjuster counter-clockwise in small increments (about a quarter-turn each time) until the shift is accurate. If the chain overshoots the second cog or rubs against the third, turn the adjuster clockwise to reduce tension. Work through the entire cassette, making minor adjustments as needed.
Here’s a quick reference table for common shifting issues and their fixes:
| Shifting Symptom | Likely Cause | Adjustment Action |
|---|---|---|
| Hesitant shifting to a larger cog | Cable tension too low | Turn barrel adjuster counter-clockwise |
| Hesitant shifting to a smaller cog | Cable tension too high | Turn barrel adjuster clockwise |
| Grinding noise in largest rear cog | B-gap too small | Tighten B-tension screw to increase gap |
| Chain jumps off cassette into spokes | Low (L) limit screw loose | Tighten L-limit screw immediately |
Once you’ve completed testing on the stand, take the bike for a short ride. Shift gears under load to ensure the chain stays steady and doesn’t skip, even when pedaling hard. If you feel a skip every few pedal rotations, it might be due to a stiff chain link. To fix this, grab the chain on either side of the stiff spot and flex it gently in a "Z" shape to loosen the side plates. With the indexing dialed in, your drivetrain should be ready for smooth and reliable performance until your next maintenance check.
Preventing Future Shifter Jamming
Regular Cleaning and Maintenance Schedule
Once your shifters are working smoothly, keeping up with regular maintenance is the key to preventing future jams. A good rule of thumb is to inspect your cables and housing every 500 miles or once a month. Check for any signs of fraying, kinks, or rust – these can lead to increased friction inside the shifter body. After riding in wet or muddy conditions, make it a habit to lubricate the cables to ward off corrosion and keep grit from building up in the shifter’s ratchet mechanism. Grit and corrosion can cause the internal pawls to stick, leading to shifting issues.
Don’t overlook the cable guides beneath your bottom bracket. Dirt and wear in these areas can create friction that feels just like a jammed shifter, even if the shifter itself is working fine. To keep everything running smoothly, plan to replace your shifter cables at the end of each riding season and swap out the cable housing every two seasons for reliable performance.
When to Upgrade Components
If regular maintenance doesn’t fix stiffness in your shifter, it might be time to upgrade. Persistent stiffness, even after cleaning and lubrication, is often a sign that the internal mechanism is worn out. Another red flag is when the shifter no longer produces that satisfying "click" during gear changes – this usually points to failing internal springs or pawls. As one expert puts it:
If you cleaned a twist shifter and replaced the cable, but it’s still tough to shift… Replace the shifter. It’s worn out.
For riders who frequently face wet or muddy trails, upgrading to high-quality sealed cables and housing is a smart move. These components are better at keeping dirt and moisture out, reducing the chances of future issues.
Proper Bike Storage
Proper storage can also play a big role in keeping your drivetrain in top shape. Always store your bike in a dry, temperature-controlled space. If you’re storing it for an extended period, shift into the lowest gear to ease cable tension. Humidity can accelerate corrosion inside the shifter mechanism and cable housing, so taking precautions is essential. Using a bike cover can help keep dust and grime from settling into critical components. Before your next ride, give the cables a quick wipe and test the shifters to make sure everything is moving smoothly. Small steps like these can make a big difference in extending the life of your shifters.
Conclusion
Fixing a jammed shifter begins with identifying the root cause – whether it’s a bent derailleur hanger, friction from dirty cables, or misaligned indexing. As Oscar Huckle from BikeRadar aptly says:
A silent and smooth-running drivetrain can make all the difference to your ride and fixing your bike’s gears is something that even the most mechanically inexperienced can handle.
Once the problem is pinpointed, most shifting issues come down to cable tension and friction. A quick quarter-turn adjustment can often resolve hesitation in the gears, while cleaning out grit from the cable housing removes that annoying sticky sensation. Don’t forget to check your limit screws – they’re essential for preventing the chain from dropping into your spokes or jamming against the frame, which could lead to costly repairs or even accidents.
Routine maintenance is your best defense. Small, regular adjustments, thorough cleaning, and replacing cables and housing when needed can stop most shifting problems before they start. Keeping your drivetrain degreased and free of buildup ensures smooth operation over the long haul.
It’s also important to keep an eye on the condition of your components. Frayed cables, stretched chains, and bent hangers aren’t issues you can fix by tweaking – they need to be replaced. And if your shifter refuses to click or stays stiff despite cleaning and adjustments, it’s probably time to upgrade to a new one.
FAQs
What can I do to keep my bike shifter from jamming?
To keep your bike shifter working smoothly and avoid frustrating jams, regular upkeep is essential. Start by cleaning and lubricating the drivetrain and shifter components. This simple step ensures everything moves freely and reduces wear over time.
Don’t forget to check your cables. Look for signs of wear, fraying, or improper tension – damaged or loose cables are a common culprit behind shifting problems. It’s also a good idea to inspect your derailleur. Make sure it’s properly aligned and adjusted to maintain optimal performance.
With consistent care and attention to these details, you’ll minimize shifter issues and enjoy a smoother, more dependable ride.
How can I tell if my bike shifter needs to be replaced?
If you’re dealing with gear shifting problems, like a chain that slips or skips, or persistent misalignment even after making adjustments, it might be a sign that your shifter needs replacing. Other red flags include the shifter feeling loose, unresponsive, or failing to engage as it should. Tackling these issues early can save your bike’s drivetrain from further wear and tear.
Why does my bike chain slip when I pedal hard?
When your bike chain slips during intense pedaling, it’s usually due to worn-out drivetrain components like the chain, cassette, or chainrings. These parts naturally degrade or stretch over time, making it difficult for the chain to grip properly under pressure. Another common culprit is a misaligned or poorly adjusted derailleur, which can throw off the chain’s movement.
To avoid this problem, make it a habit to check for wear and tear on these components and replace them as needed. Also, ensure your derailleur is correctly aligned and adjusted. A little routine maintenance can keep your bike performing at its best.


