When biking in freezing temperatures, keeping your water from turning into ice is crucial for staying hydrated and safe. Cold weather can trick your body into ignoring thirst, while frozen bottles and hydration tubes make drinking a challenge. Here’s how to keep your water drinkable:
- Start with hot water: Fill bottles with hot (but not boiling) water to delay freezing. Preheat bottles by rinsing with boiling water for a minute.
- Use insulated gear: Vacuum-insulated stainless steel bottles or neoprene sleeves work best. Store bottles upside down to prevent caps from freezing.
- Add electrolytes or salt: These lower the freezing point slightly, keeping water liquid longer.
- Leverage body heat: Keep bottles close to your body or inside your pack, surrounded by clothing.
- Protect hydration tubes: Insulate hoses with neoprene sleeves and blow air back into the tube after drinking.
For longer rides, vacuum-insulated bottles retain heat for hours, while burying water in snow or storing it in sleeping bags can help overnight. By preparing ahead and using the right tools, you can stay hydrated even in freezing conditions.
How to Carry Water While Winter Cycling
sbb-itb-9d75ae1
Preparing Your Water Before the Ride
Getting your water ready before heading out is your best shot at keeping it from freezing during those winter rides. One simple trick? Start with hot water. It has to cool all the way to 32°F before it even begins to freeze. Using insulated stainless steel bottles can make a big difference here. In tests conducted in 30°F weather, these bottles kept water around 120°F even after three hours. However, don’t overdo it – avoid filling them with liquids hotter than 180°F. Why? The pressure buildup could cause scalding water to spray out when you open the bottle. If you’re using plastic insulated bottles, stick to water temperatures below 140°F to prevent the plastic from warping or releasing chemicals into your drink.
Start with Warm or Hot Water
A quick way to prep your bottle is to preheat it. Just rinse the inside with boiling water for about a minute before filling it with your hot beverage. Wide-mouth bottles, like those made by polyethylene brands such as Hunerdorf or Relag, are especially good for this because they handle quick temperature changes better than narrow-neck designs. If you’re using a hydration bladder, filling the reservoir with hot water can help keep the main supply from freezing. That said, the thin hose will still be the most vulnerable part.
Once you’ve taken care of keeping the water warm, you can go a step further by tweaking the water’s freezing point.
Add Salt or Electrolytes to Lower the Freezing Point
Mixing in salt or electrolytes can help prevent ice from forming by lowering the freezing point of the water. Products like electrolyte powders (e.g., Liquid I.V. or Hammer) or tablets work well for this purpose. Plus, they come with the added bonus of keeping you better hydrated. According to Liquid I.V.:
"There’s some research that indicates water with added nutrients and flavor often has a lower freezing point than pure water, based on the chemical makeup of the water and the additives".
While the effect isn’t huge – usually just a couple of degrees – it can make all the difference when temperatures are hovering near freezing . If you’re using table salt, keep the ratio low – no more than 1:3 (salt to water). Too much salt can lead to dehydration and an unpleasant taste.
Steer clear of alcohol-based solutions like vodka or rum. You’d need at least a 10% alcohol concentration to lower the freezing point to 25°F, and alcohol can actually increase your risk of hypothermia by lowering your core body temperature . A safer option is food-grade glycerol. It adds a sweet flavor and provides a bit of extra freezing protection (about 1°C–1.5°C), though it’s generally less effective than electrolytes.
Using the Right Gear for Insulation
Winter Water Bottle Insulation Methods Comparison Chart
Once your water is ready, the next step is ensuring it stays drinkable during those frosty winter rides. Proper insulated gear can make all the difference in preventing freezing.
Insulated Bottle Covers and Parkas
If you’re using standard water bottles, neoprene or foam bottle parkas are a practical solution to add insulation. Brands like Forty Below provide neoprene sleeves that can keep your water from freezing for about 2–3 hours, while more affordable options from Nalgene are great for shorter rides. These covers typically cost between $15 and $45 and weigh around 100–150 grams (3.5–5.3 oz).
To maximize insulation, store your bottle upside down in the parka or cage. Why? Water freezes from the top down, so this trick helps prevent the cap and nozzle from freezing shut. On especially chilly days, slipping a wool sock over the bottle before placing it in the parka adds an extra barrier against the cold.
For extended rides or harsher conditions, you might want to upgrade to stainless steel bottles for better heat retention.
Insulated Stainless Steel Bottles
Vacuum-insulated stainless steel bottles are the gold standard for keeping liquids warm in extreme cold. In performance tests, options like the Elite Deboyo Race bottle excelled at retaining heat, while CamelBak Podium Steel and Bivo Insulated Trio also performed well, keeping liquids at drinkable temperatures.
These bottles are heavier than plastic alternatives, weighing between 250 and 400 grams (8.8–14.1 oz) compared to the 110 grams (3.9 oz) of insulated plastic bottles. They’re also rigid, so look for models with high-flow nozzles and vent tubes for easier drinking. For winter use, bottles with nozzle shields are a smart choice – they help keep road grime, slush, and ice from clogging the drinking valve.
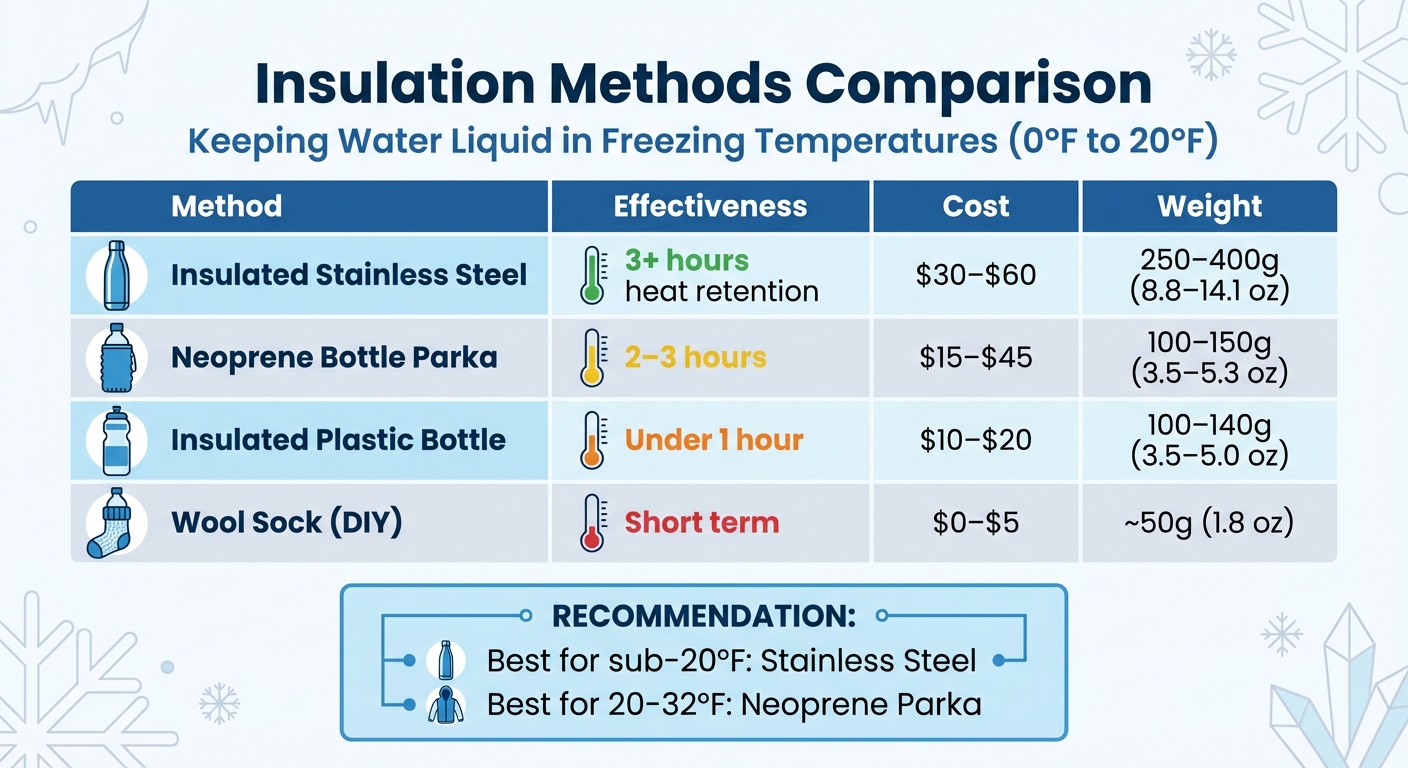
Comparison of Insulation Methods
Here’s a quick overview of different insulation options:
| Method | Effectiveness (0°F to 20°F) | Approx. Cost | Weight |
|---|---|---|---|
| Insulated Stainless Steel | 3+ hours heat retention | $30–$60 | 250–400g (8.8–14.1 oz) |
| Neoprene Bottle Parka | 2–3 hours | $15–$45 | 100–150g (3.5–5.3 oz) |
| Insulated Plastic Bottle | Under 1 hour | $10–$20 | 100–140g (3.5–5.0 oz) |
| Wool Sock (DIY) | Short term | $0–$5 | ~50g (1.8 oz) |
While stainless steel bottles offer the best heat retention, their added weight might be a drawback for longer rides. For shorter outings in moderate cold (20°F–32°F), a neoprene parka over a regular bottle works well. However, for temperatures below 20°F or rides lasting over two hours, a vacuum-insulated stainless steel bottle is a worthwhile investment.
Where to Place Bottles and Packs
Positioning your water bottles wisely can make a big difference in keeping your water from freezing. Even top-notch insulated gear won’t do much if it’s exposed to biting winds and freezing temperatures.
Keep Bottles Close to Body Heat
Your body is like a natural heater, especially when you’re active, even in the coldest conditions. This warmth can help prevent your water from freezing. Storing a hydration pack or a soft flask under your jacket or fleece layer takes advantage of that heat to keep your fluids in liquid form. For hard-sided bottles that are too bulky to wear under clothing, place them in the middle of your backpack, surrounded by insulating layers like extra clothes.
"Body heat is the best way to keep things from freezing if you plan to be outside for a long time in the cold." – ntm1973, MTBR Forum Member
If you’re biking and using frame-mounted bottles, store them upside down so the drinking spout stays accessible and less likely to freeze. Bottles in external side pockets can generally stay warm for about 2–3 hours, but those tucked inside a pack with clothing can last much longer.
Insulate Hydration Pack Hoses and Bladders
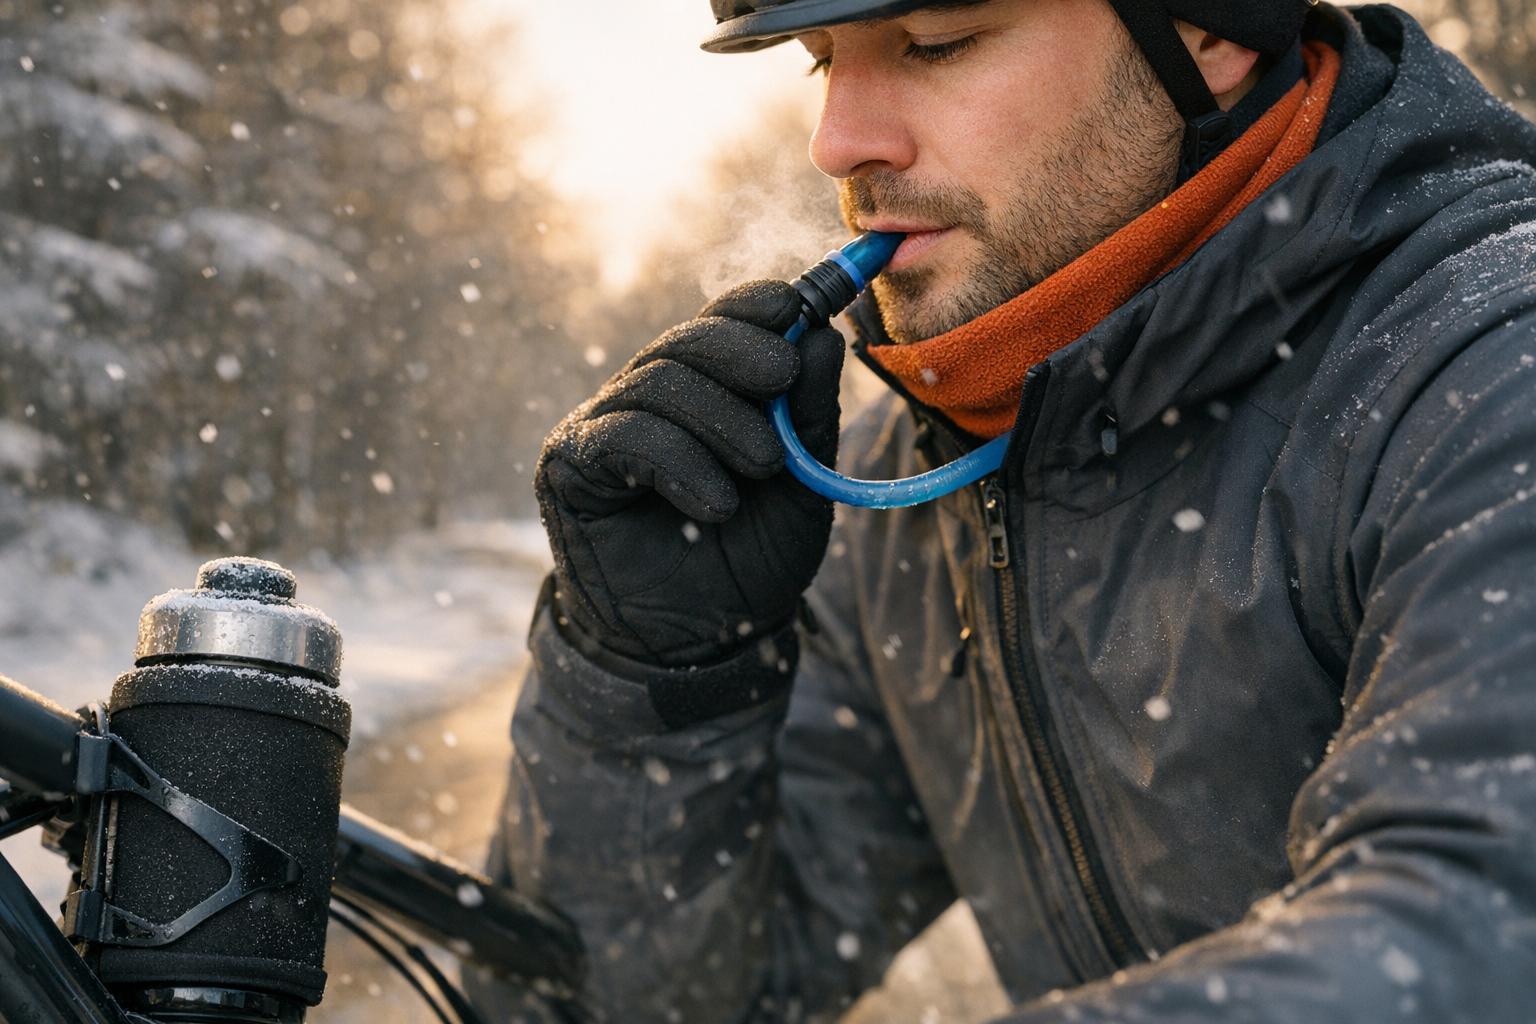
Hydration tubes and bite valves are particularly vulnerable to freezing since they hold small amounts of water and have a lot of surface area exposed to the cold. To combat this, keep the tube close to your body by running it under your armpit or through pit zips to shield it from the wind. When you’re not sipping, tuck the bite valve inside your jacket collar or under your arm to keep it warm.
Another trick: after drinking, blow air back into the tube to push water into the insulated reservoir. If blowing air feels awkward, lift the tube above your head and squeeze the bite valve to let gravity do the work. For added protection, consider investing in neoprene or foam tube sleeves ($7–$12) or thermal control kits ($20–$30) to insulate hoses and valves.
Tips for Longer Rides and Overnight Adventures
Use Thermoses for Multi-Hour Rides
When tackling multi-hour rides in freezing temperatures, vacuum-insulated stainless steel bottles are your best bet for keeping beverages hot. Tests show that the Elite Deboyo Race bottle can maintain a temperature of 161.2°F even after three hours in sub-freezing conditions.
To maximize heat retention, fill your bottle with hot water (below 180°F) and save the hottest bottle for later in your ride – this allows for gradual cooling. Opt for bottles with nozzle shields or caps to protect against road salt and slush clogging the valve. Also, make sure the bottle fits snugly in your cage since metal bottles lack the flexibility of plastic ones.
For rides that stretch into overnight adventures, you’ll need extra strategies to prevent your water from freezing.
Overnight Water Storage Tips
Keeping water from freezing overnight requires a bit of creativity. One effective method is placing your water bottles at the foot of your sleeping bag. Your body heat will help keep the water liquid, but make sure to store the bottles in a waterproof bag to avoid soaking your gear if a leak happens.
Another clever trick is to bury your full water bottles in snow. Snow acts as an insulator, as Philip Werner, founder of SectionHiker.com, explains:
"Snow is an excellent insulator, and it will prevent your water from freezing overnight".
For added protection, store bottles upside down. Since water freezes from the top down, this prevents the cap and threads from freezing shut. Wide-mouth bottles like those from Nalgene or Hunersdorf are particularly useful – they’re less likely to freeze at the neck and are easier to open while wearing mittens.
To boost insulation further, prefill bottles with boiling water and wrap them in wool socks or extra layers of clothing. This creates an additional thermal barrier, helping your water stay liquid even during the coldest nights.
Conclusion
To keep water from freezing in cold conditions, start with hot water, use insulated gear like vacuum-insulated stainless steel bottles or neoprene sleeves, and position bottles where they can benefit from your body heat. Storing bottles close to your body – inside your jacket or among spare layers in your pack – takes advantage of natural warmth to keep your water drinkable. Additionally, clearing hydration hoses after each sip prevents ice blockages. These strategies not only ensure access to water but also improve your safety on the trail.
Cold air can cause unnoticed moisture loss, increasing the risk of hypothermia. Philip Werner, Founder of SectionHiker.com, highlights the dangers of dehydration in winter:
"Dehydration accelerates hypothermia, which you want to avoid, in part because it impairs decision-making. Bad decision-making and winter hiking don’t mix well".
Hydration is essential – not just for comfort, but for maintaining clear thinking and avoiding hypothermia.
Simple steps like pre-hydrating and using wide-mouth bottles can make a big difference. Whether you’re heading out for a short hike or a longer adventure, having access to liquid water is key to staying safe and performing well. By incorporating these methods, you can confidently tackle winter conditions without the worry of dehydration.
Prepare ahead, layer your defenses against the cold, and you’ll stay hydrated no matter how low the temperature gets.
FAQs
How cold is too cold for a hydration bladder?
When temperatures dip below freezing (32°F), a hydration bladder can become unusable as the water inside may freeze, blocking the tube or valve. To avoid this issue, make sure to insulate the bladder. You can also store it inside your jacket or backpack to help keep it warm during your ride.
Will hot water damage my bottle or hydration pack?
Hot water is safe to use in most bottles or hydration packs, but steer clear of pouring in boiling water – it can damage or distort the material. Instead, opt for warm water, which works well to prevent freezing. For winter rides, try pairing warm water with insulation or run the hydration tube under your clothing to keep it from freezing.
What’s the easiest setup for a 2-hour winter ride?
To keep your water from freezing during a 2-hour winter ride, try using an insulated water bottle or a hydration pack. Insulated bottles help slow down heat loss, and you can add extra protection by keeping them inside your jacket or wrapping them in foam. Storing bottles upside down is another trick – it keeps the cap from freezing. Opt for wide-mouth bottles, as they’re less likely to crack in freezing temperatures.
If you’re using a hydration pack, wear it close to your body. This way, your body heat helps keep the water from freezing.


