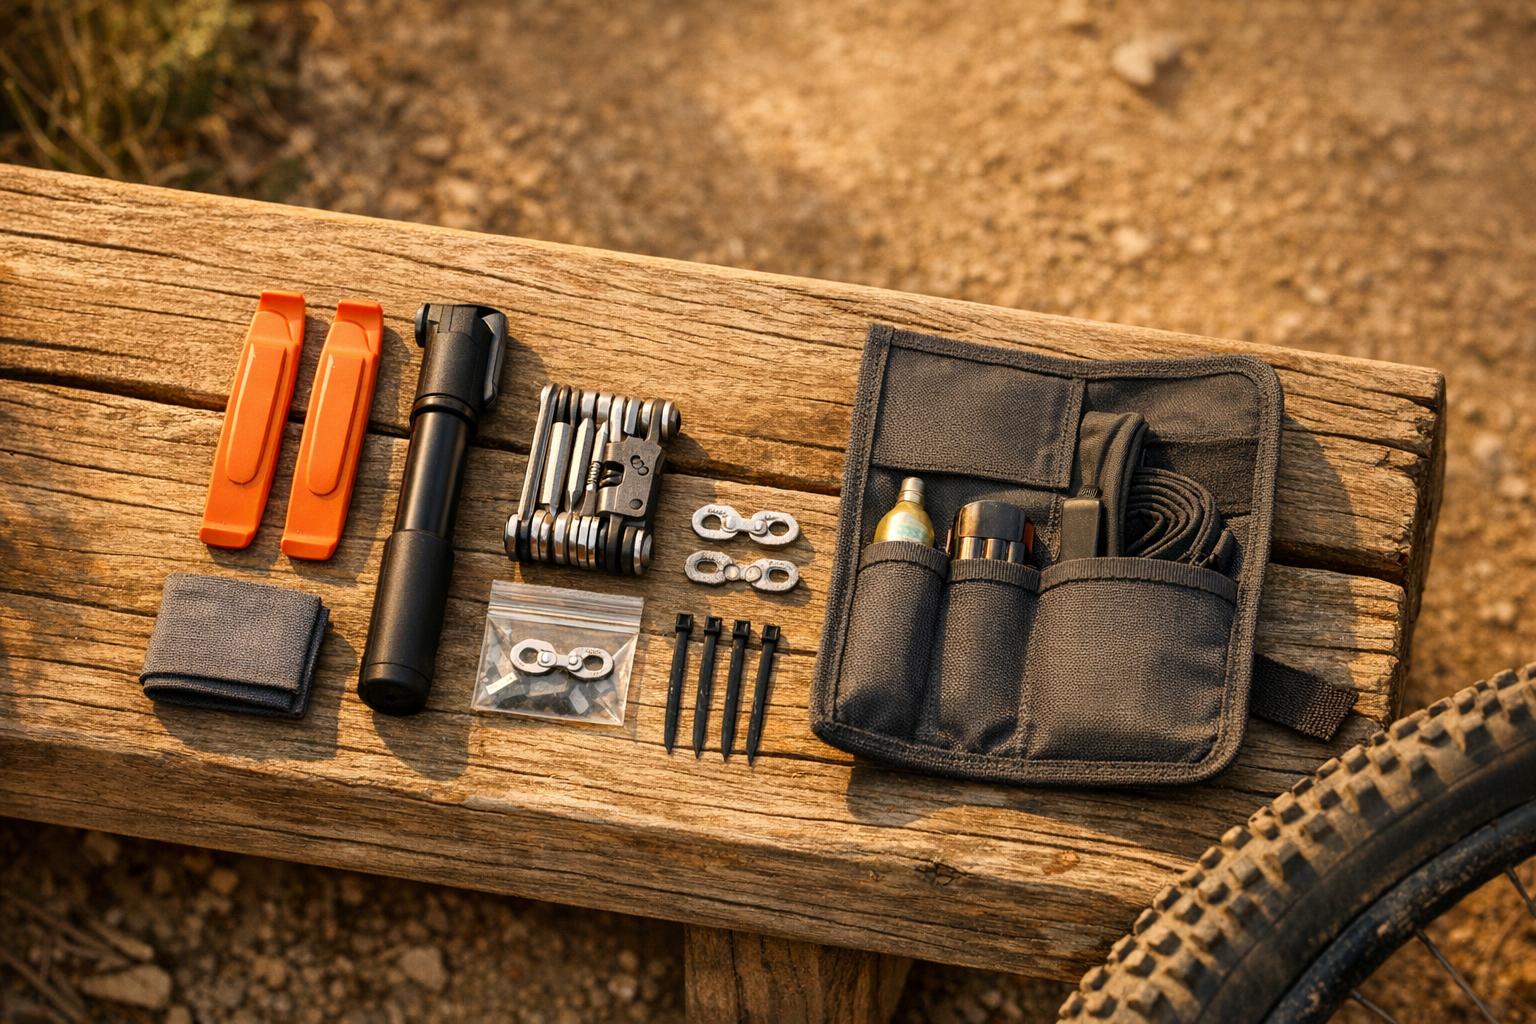
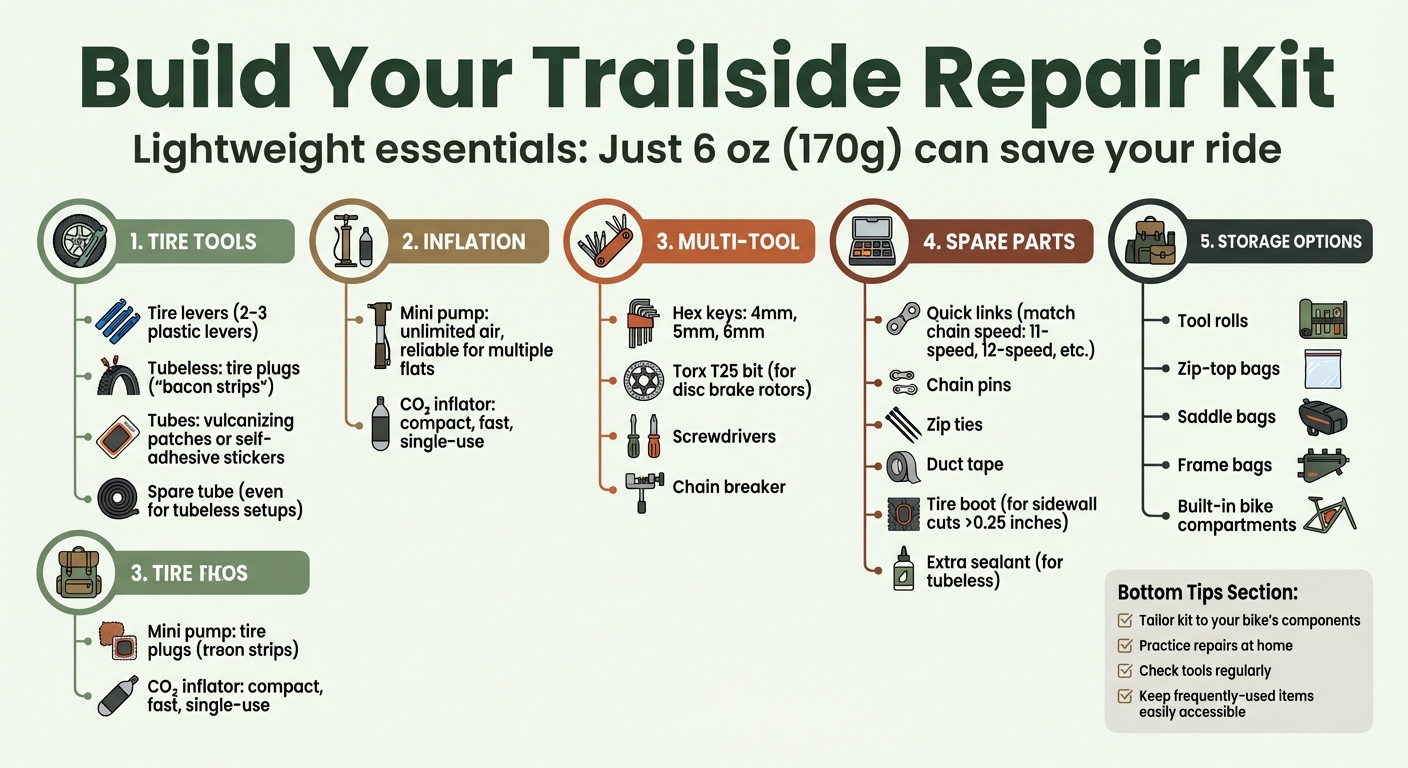
When you’re mountain biking, mechanical issues like flat tires, broken chains, or loose bolts can quickly derail your ride. A lightweight repair kit – just 6 oz (170g) – can save you from a long walk home. Here’s what you need to pack:
- Tire Tools: Tire levers, patch kits (for tubeless or tubes), and a spare tube.
- Pump or CO₂ Inflator: Mini pumps offer unlimited air; CO₂ inflators are compact but single-use.
- Multi-Tool: Include hex keys (4mm, 5mm, 6mm), a Torx T25 bit, screwdrivers, and a chain breaker.
- Spare Parts: Quick links, chain pins, zip ties, duct tape, tire boots, and extra sealant for tubeless setups.
- Storage Tips: Use tool rolls, zip-top bags, or built-in bike compartments to keep gear organized.
Tailor your kit to your bike’s components and the trails you ride. Practice repairs at home and regularly check your tools to ensure they’re ready. With the right preparation, you’ll stay confident and ride-ready.
Essential Mountain Bike Trailside Repair Kit Checklist
Backcountry Bike Repair Episode 2: The Repair Kit
sbb-itb-9d75ae1
Tools You Need for Trailside Repairs
When you’re out on the trail, a lightweight and versatile repair kit can be a lifesaver. Most mountain bike bolts require 4mm, 5mm, and 6mm hex keys for common adjustments. Here’s what to pack to handle typical trail repairs.
Tire Levers and Patch Kits
Flat tires are one of the most frequent issues you’ll face on the trail. Tire levers make removing stubborn tires much easier without risking damage to your rims or tubes. Pack 2–3 sturdy plastic levers – they’re light, durable, and save you the hassle of wrestling with tight tire beads.
For patch kits, choose based on your setup:
- Tubeless tires: Carry tire plugs (often called "bacon strips") to quickly seal punctures.
- Traditional tubes: Bring vulcanizing patches or self-adhesive stickers for quick fixes.
Even if you ride tubeless, include a spare tube for larger cuts or rim damage that plugs can’t handle.
Portable Tire Pump or CO2 Inflator
After fixing a flat, reinflating your tire is the next step. Mini pumps are reliable and provide unlimited air, making them great for multiple flats. CO2 inflators, on the other hand, are compact and fast but only work for single-use situations. As Loppet explains:
"A CO2 cartridge is quicker, but you never run out of air with a mini pump. Both are equally effective at getting you running again."
No matter which option you choose, make sure to support the pump head while inflating to avoid damaging the valve stem.
Multi-Tool with Chain Breaker
A solid multi-tool is a must-have for any trail kit. Look for one that includes 4mm, 5mm, and 6mm hex keys, a Torx T25 bit (for disc brake rotors), screwdrivers, and a chain breaker. Josh Patterson from BikeRadar emphasizes:
"The best bike multi-tools have built-in chain tools, so consider investing in one to remove the need to carry a separate chain tool with you."
This tool is vital for tightening bolts, fixing chains, and handling other quick adjustments. Before heading out, double-check that the bits on your multi-tool match your bike’s bolts, especially if your bike uses Torx fasteners.
With these tools, you’ll be ready to tackle most trailside challenges.
Spare Parts and Supplies to Carry
Having tools is essential, but they’re only part of the equation. The right spare parts can be the difference between continuing your ride or walking your bike back home. A snapped chain or a torn tire can derail your adventure, but with a few compact essentials, you’ll be ready for common repairs on the go. Here’s what to keep in your kit to handle unexpected trailside issues.
Quick Links and Chain Pins
Chains can snap, especially when tackling tough terrain. A quick link (also called a master link) is a lifesaver, letting you reconnect a broken chain in minutes. Just make sure the quick link matches your chain’s speed – like a 12-speed link for a 12-speed chain. Some brands, such as SRAM or Shimano, may have specific requirements, so double-check compatibility before heading out. Carrying a few spare chain links is also wise, as it prevents you from shortening your chain too much, which could strain your derailleur. A small kit with quick links, bolts, and a tool roll can weigh as little as 6 ounces.
Zip Ties and Duct Tape
Zip ties and duct tape are the ultimate problem-solvers. Zip ties are incredibly versatile – they can secure a broken saddle rail, keep a loose bottle cage in place, or even replace a missing brake pad retaining pin. Duct tape, on the other hand, is perfect for fixing sidewall tears, stabilizing loose spokes, or patching up torn gear. Chris Gibbs from Mountain Bike Worldwide sums it up well:
"Cable ties and duct tape… can get you out of all kinds of trouble. I use them all the time."
To save space, wrap a few layers of duct tape around your pump or a small bottle instead of carrying a full roll.
Tire Boot and Sealant
A sidewall cut larger than 0.25 inches can spell trouble, but that’s where a tire boot comes in. This patch acts as a barrier between the tube and the tire, stopping the tube from bulging out. While commercial tire boots are reliable, you can improvise with items like a folded dollar bill, an empty energy gel packet, or even a gum wrapper in a pinch. For riders using tubeless setups, carrying extra sealant is essential – it can help reseal a tire after a significant leak.
With these spare parts in your pack, you’ll be ready to tackle most mechanical hiccups and keep rolling.
How to Pack and Organize Your Repair Kit
Selecting the Right Storage Option
The type of storage you choose depends on how long you’ll be riding and the terrain you’ll tackle. For shorter rides, saddle bags are a compact and convenient choice. If you’re planning a gravel route or a longer journey, frame bags help distribute weight evenly. For extended adventures, backpacks or hip packs offer more capacity and flexibility.
Many modern bikes now include built-in storage options. These can range from steerer tube systems like the OneUp EDC or Bontrager BITS to handlebar-end compartments like the Wolf Tooth EnCase. Some even feature internal frame storage for a clean, balanced setup. To maintain stability, place heavier items low and close to the bike’s center, such as near the bottom bracket or in the down tube.
Tool rolls are another great way to keep your gear organized. Options like the Topeak Burrito Pack (about $54.95) or the more affordable Lezyne Roll Caddy (around $17.95) bundle your tools neatly and lay flat for quick access. As Rainer, editor at bike-components, puts it:
"It’s important that in the rush and confusion of a breakdown, you know where to find the necessary tools."
After securing your tools in your chosen storage, make sure they’re arranged for quick and easy access.
Arranging Tools for Easy Access
Keep your most frequently used tools, such as a multi-tool or tire plugs, in outer pockets or cockpit compartments where they’re easy to grab. Use zip-top bags to store small items like quick links, patches, and valve cores – this keeps them both visible and dry. Spare bolts can be taped inside your pack, while wrapping tools in a microfiber cloth helps prevent noise and protects your bike frame. You can also wrap some duct tape around your pump shaft to save space, and storing spare tubes in an old sock ensures they won’t damage other tools.
One rider from Pedal Power Gear Up shares a handy tip:
"My best tip is always keeping gear in the same pocket so I can grab it quickly without dumping everything out mid-trail."
Adapting Your Repair Kit to Your Bike
Once you’ve got the basics down, it’s time to fine-tune your repair kit to suit your bike’s specific needs and the conditions you typically ride in.
Including Bike-Specific Tools and Parts
Your bike isn’t quite like anyone else’s, and your repair kit should reflect that. For example, quick links need to match your chain’s speed – an 11-speed quick link won’t work on a 12-speed chain. Using the wrong parts can leave you stranded, so double-check your drivetrain’s speed rating before buying anything.
Another crucial part to consider is the derailleur hanger. These are designed to break as a fail-safe to protect your derailleur. As Liv Cycling explains:
"Your derailleur hanger is the small piece of metal that connects your frame to your derailleur. This bike part is made of soft aluminum on purpose – so your derailleur hanger will bend or break BEFORE your derailleur."
Carrying a spare derailleur hanger (usually under $20) can save you from a long walk home if yours breaks.
Make sure all tools and parts in your kit are compatible with your bike. For instance, confirm that your multi-tool fits all the critical bolts on your bike, whether they’re at pivot points, brake rotors, or suspension adjustments. If your bike uses disc brakes, check if you need a T25 Torx wrench for the rotors. For brake systems, bring pads that match your caliper model, especially if you’re riding in muddy or gritty conditions, where brake pads can wear out faster.
Once you’ve got the bike-specific essentials, you can customize even further based on where and how you ride.
Adjusting for Terrain and Ride Length
The terrain you ride on plays a big role in what you’ll need. For rocky trails, sharp edges can easily slash tire sidewalls or cause punctures. If you’re running tubeless tires, carry bacon strip plugs and a tire boot. Don’t have a commercial tire boot? No problem – something as simple as a folded dollar bill or an energy bar wrapper can work in a pinch.
Long-distance or backcountry rides call for a more robust kit. Consider adding spare spokes (sized to your wheels), a spoke wrench, shift cables, and extra tubeless sealant. Even if sealant failures are rare, they’re worth preparing for when you’re far from help. Also, pack chain lube, especially for wet conditions, since water crossings or rain can wash away lubrication and leave your chain vulnerable to rust.
For shorter, local rides, you can keep things simple. A multi-tool, pump or CO₂ inflator, tire levers, a spare tube, and a quick link should cover most situations.
Conclusion
Putting together a trailside repair kit isn’t about packing every tool under the sun – it’s about carrying the right tools for your bike and the trails you ride. A smartly chosen kit can turn a potential disaster into a manageable fix, saving you from an exhausting walk back. With modern mountain bikes featuring highly specific components – like different chain widths and unique derailleur hangers – relying on borrowing parts from others isn’t always an option.
To recap the key items: start with the basics. A reliable multi-tool with a chain breaker, tire levers, a pump or CO₂ inflator, and a spare tube or patch kit are non-negotiable. Beyond that, tailor your kit to your bike’s specific needs and consider extras for longer or more remote rides.
Equally important is keeping your tools organized. Use tool rolls or zip-top bags to keep everything secure and easy to find during a repair. As Val Vanderpool wisely states:
"Knowing how to do fundamental repairs will help you become a more confident and self-sufficient, and will help you avoid the dreaded walk of shame out of the woods!"
Preparation is key. Spend time practicing with your tools – especially your chain breaker and CO₂ inflator – so you’re ready to use them when it counts. Regularly check your kit to ensure everything is in good condition: make sure zip ties are still flexible, tubes remain intact, and inflator threads are functional. After each ride, replace any used items so your kit is always trail-ready.
With a well-organized, lightweight kit – some weighing as little as 6 oz (170 g) – you can hit the trails with confidence, ready to handle whatever challenges come your way.
FAQs
What should I pack for a short local ride vs. a backcountry ride?
For a short local ride, it’s best to keep things light and straightforward. Pack the basics: a spare tube, tire levers, a small pump, and a multi-tool. These essentials should cover minor hiccups along the way.
For a backcountry ride, you’ll need to gear up for more self-reliance. In addition to the basics, bring extra spare tubes, a patch kit, a larger pump, chain links, a tire boot, and specialized tools like spoke wrenches or pliers. Being prepared for unexpected challenges is key when you’re far from help.
Do I really need a spare tube if I run tubeless?
Yes, carrying a spare tube is a smart move, even if you’re using tubeless tires. Why? Because not all punctures can be sealed by the tire’s sealant – especially larger ones or tears that damage the tire beyond repair. A spare tube gives you a reliable backup plan, ensuring you’re ready for unexpected tire troubles. This is particularly important if you’re riding in remote areas where getting stranded could turn into a real hassle.
How do I make sure my multi-tool and quick link fit my bike?
When picking a multi-tool, make sure it includes the right sizes for your bike’s bolts – commonly 4, 5, and 6 mm Allen keys. If your bike uses Torx bolts, check for those as well. For quick links, match them to your chain’s specifications. Pay attention to the chain’s width and brand to ensure the quick link fits perfectly. This way, both the multi-tool and quick link will work seamlessly with your bike.


