When your brake levers are set up correctly, you’ll brake more effectively, reduce wrist strain, and avoid hand fatigue. This guide covers the essentials:
- Position levers so your index finger naturally rests on the curved hook.
- Set lever angle to align your arm, wrist, and finger in a straight line.
- Adjust reach to ensure your finger comfortably pulls the lever without overextending.
- Fine-tune bite point and cable tension for responsive braking.
Whether you’re using mechanical or hydraulic brakes, small tweaks can improve control and safety on the trail. Gather basic tools like Allen keys, stabilize your bike, and follow these steps for better performance.
Quick Tip: For hydraulic brakes, check for a spongy feel – this may indicate air in the system and require a bleed. For mechanical brakes, adjust cable tension regularly to account for wear.
PRO TIP: Get Your Brake Levers Super Dialed! / Mechanic Mondays – EP2
sbb-itb-9d75ae1
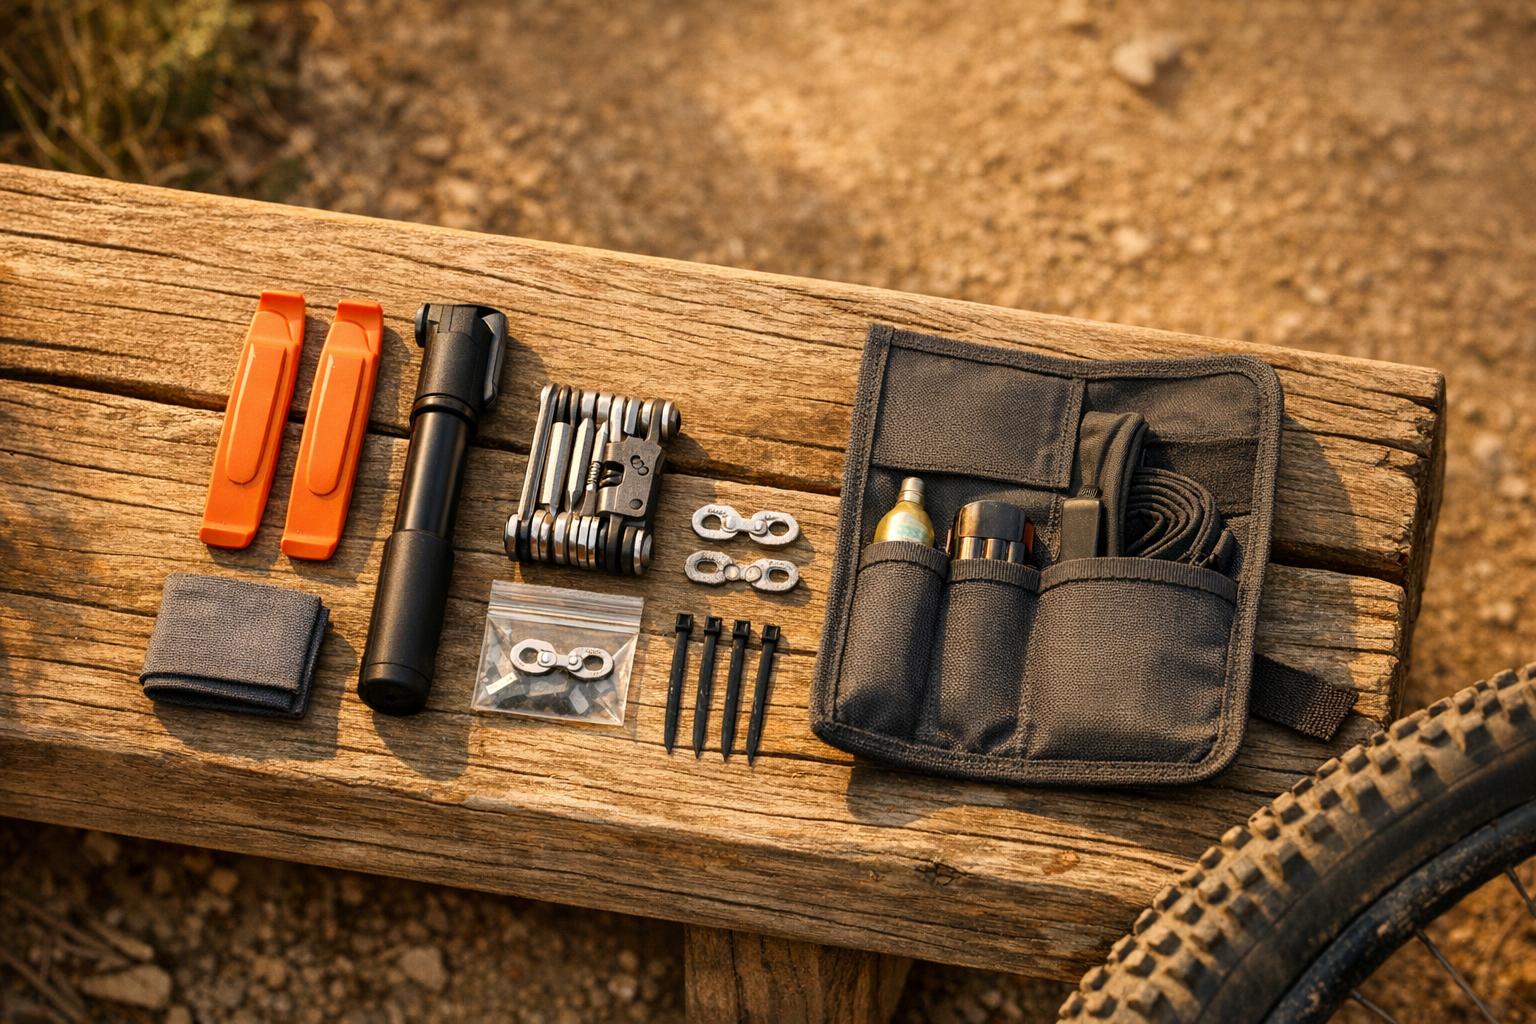
Tools and Preparation
Getting your brake levers adjusted starts with the right tools and a properly prepped bike. These steps ensure better control and smoother rides.
Required Tools for Brake Lever Adjustment
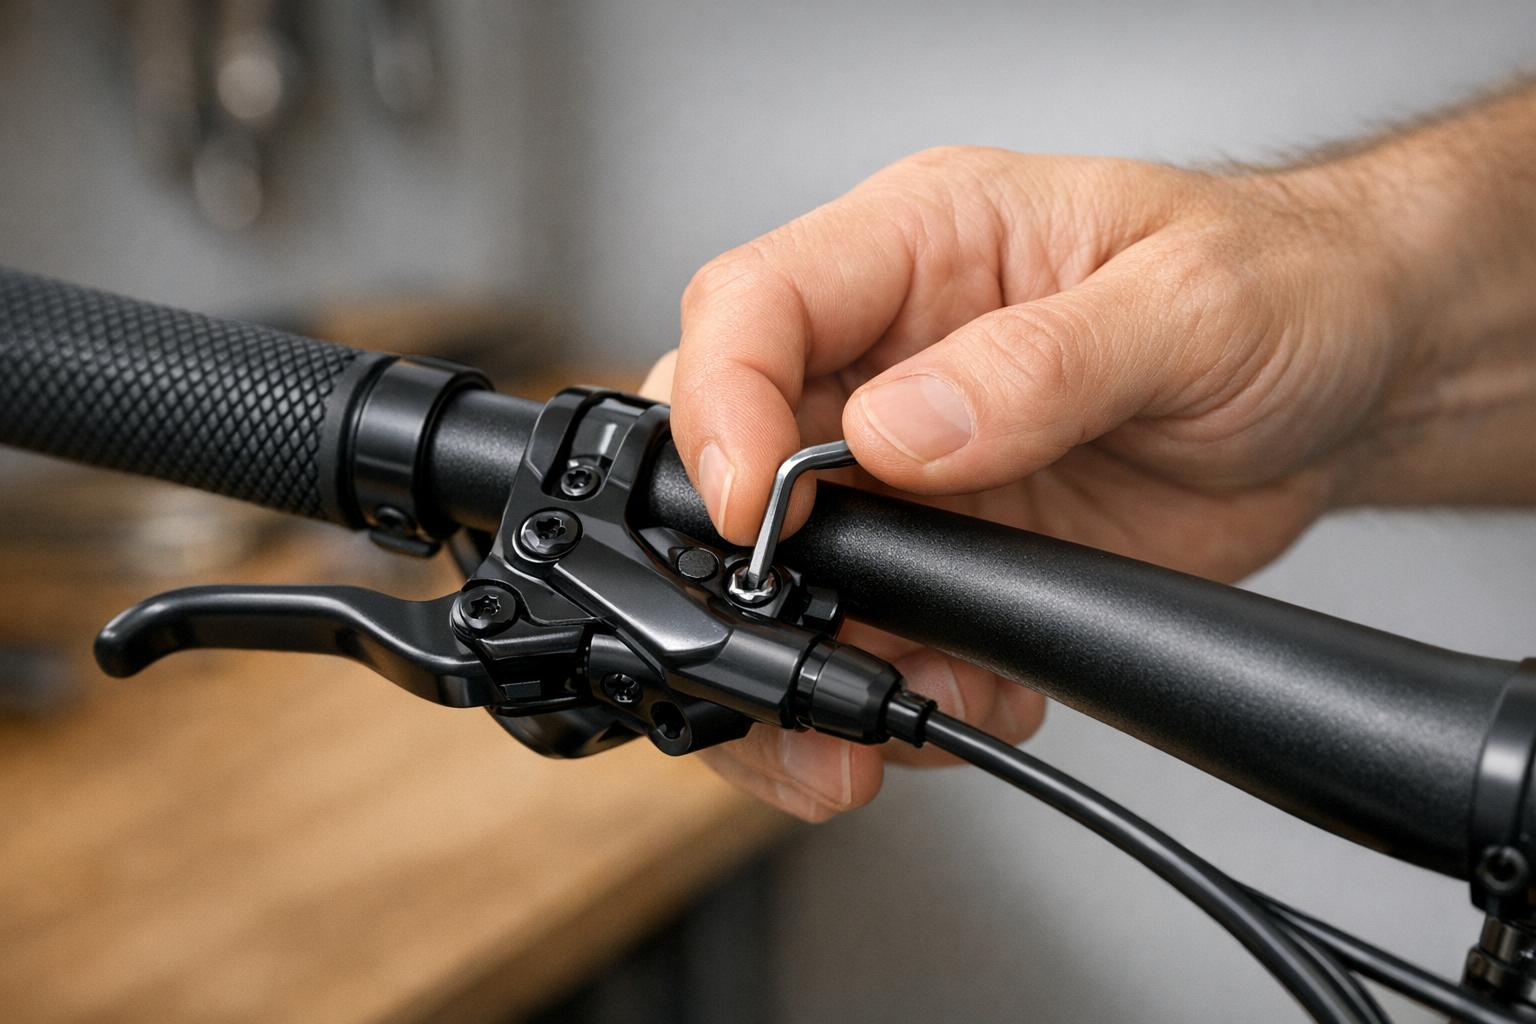
You don’t need an elaborate toolkit to adjust brake levers – just a few basics will do the job. A set of Allen keys, ranging from 2mm to 5mm, is a must. The smaller 2mm key usually works for reach adjustment screws, while 4mm or 5mm keys handle the lever clamps on your handlebars.
If your bike has carbon handlebars, a torque wrench is highly recommended to avoid damaging the carbon or stripping aluminum threads. As Matt Miller, Managing Editor at Singletracks, explains:
"You shouldn’t need more than 4-6Nm of torque for the proper amount regardless of bar material."
Some riders prefer to leave the lever clamps slightly loose – tight enough to stay in place during regular rides but loose enough to rotate during a crash. This can help prevent damage to the lever or master cylinder.
For mechanical brakes, needle-nose pliers are handy for tightening cable slack. Depending on your brake model, you might also need a Phillips or flathead screwdriver for specific adjustments. If you’re working with SRAM components, having a T25 Torx bit is a good idea for mounting bolts.
Once you’ve gathered these tools, you’re ready to prep your bike for adjustments.
Preparing Your Bike
Setting up your bike correctly is just as important as having the right tools.
Start by stabilizing your bike. A repair stand can save you a lot of hassle by keeping the bike at a comfortable working height. To fine-tune lever reach and angle, sit on the saddle in your usual riding position.
Clear your workspace by removing any handlebar accessories – like lights, bells, or computer mounts – that might block access to the lever clamps. You may also need to slide shifters or dropper post triggers closer to the stem for better access. Lastly, give your handlebars a quick clean to remove dirt or grease. This helps prevent scratches and ensures the levers grip securely once tightened.
How to Adjust Brake Levers
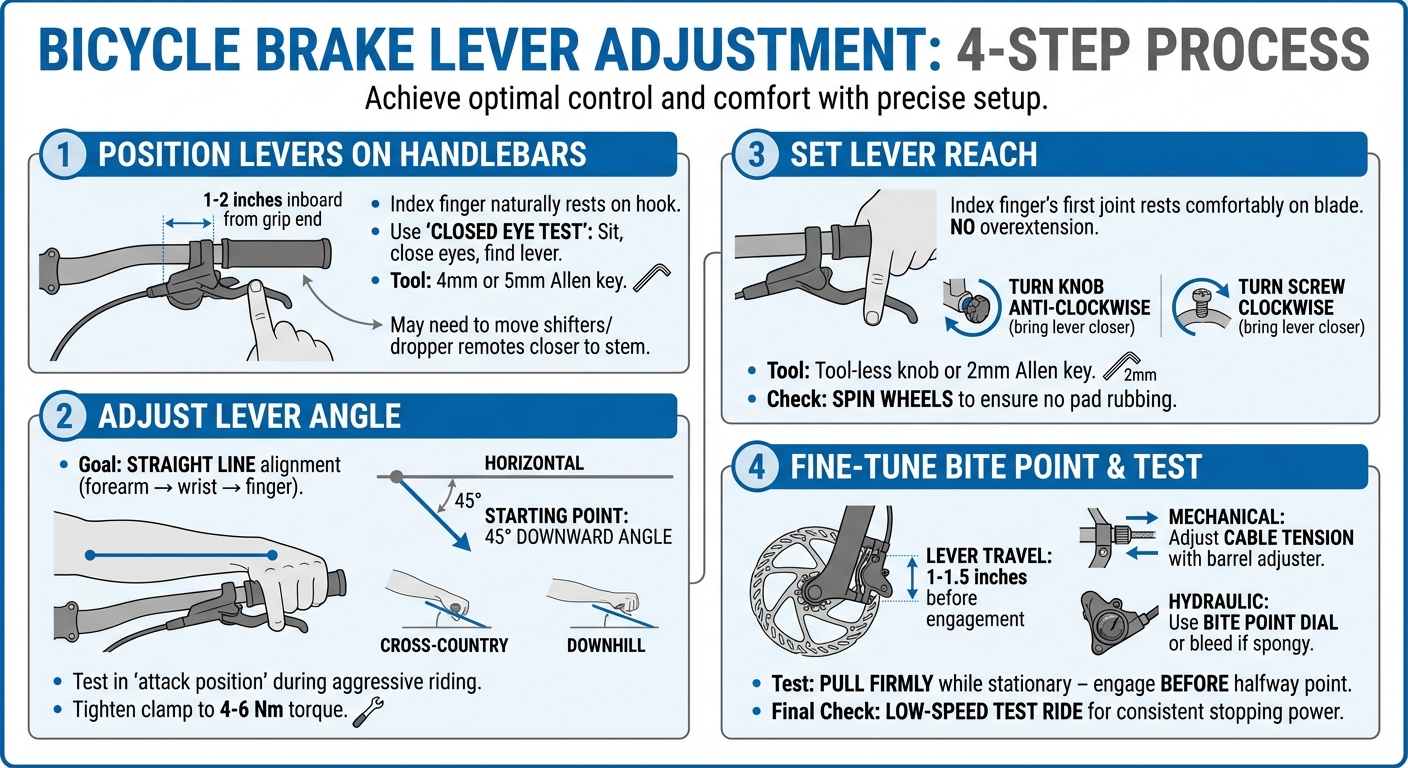
4-Step Brake Lever Adjustment Process for Mountain Bikes
Getting your brake levers just right can make a huge difference in control and comfort while riding. There are three main steps to this process: positioning the levers on the handlebars, setting the angle, and fine-tuning the reach.
Positioning Levers on the Handlebars
Start by positioning the levers about 1–2 inches inboard so your index finger naturally lands on the lever’s curved hook.
To check this, try the "closed eye" test: sit on your bike, close your eyes, and see if your index finger naturally finds the hook of the lever. If it doesn’t, loosen the clamp using a 4mm or 5mm Allen key and slide the lever inboard. You might also need to move your gear shifters or dropper post remotes closer to the stem to make space.
Adjusting Lever Angle
A good lever angle helps prevent wrist strain by aligning your forearm, wrist, and fingers in a straight line. A 45-degree downward angle from horizontal is a great place to start for most riders. As Christian Pek from Mountain Bikes Apart explains:
"The goal is to have the lever in a straight line with your finger, palm and arm. This creates a relaxed position and prevents your wrist from bending too much."
You can tweak this angle based on your riding style – steeper for cross-country and flatter for downhill. Test the angle in your "attack position" to ensure it feels natural during aggressive riding. Once you’re happy with the angle, tighten the clamp to 4–6 Nm.
Setting Lever Reach
Lever reach should be adjusted so your index finger’s first joint rests comfortably on the lever blade without overextending.
Most hydraulic brakes come with a tool-less adjustment knob, but some may require a 2mm Allen key. For hydraulic brakes, turning the knob anti-clockwise usually brings the lever closer to the handlebar. For mechanical or cable brakes, turning the adjustment screw clockwise often achieves the same effect. After adjusting, lift your bike and spin the wheels to make sure the brake pads aren’t rubbing the rotor, and check that the lever doesn’t hit the grip when pulled firmly.
| Brake Type | Adjustment Tool | Direction to Bring Lever Closer |
|---|---|---|
| Flat Bar Hydraulic | Knurled Knob / 2mm Allen Key | Anti-clockwise |
| Flat Bar Cable | 2mm Allen Key / Screwdriver | Clockwise |
| Drop Bar Hydraulic | Allen Key | Anti-clockwise |
| Drop Bar Cable | 2mm Allen Key / Screwdriver | Clockwise |
Once you’ve got the position, angle, and reach sorted, you can move on to fine-tuning the bite point and cable tension.
Fine-Tuning Your Brake Levers
Adjusting Bite Point and Cable Tension
The bite point is the moment when your brake pads make contact with the rotor or rim. Setting this correctly ensures your brakes respond quickly without the lever traveling too far toward the handlebars.
For mechanical (cable) brakes, you can adjust the cable tension using the barrel adjuster. Turn it counterclockwise to tighten the cable and bring the pads closer, or clockwise to loosen it. Once you’ve got the tension where you want it, secure the lock nut on the brake body. If the barrel adjuster is already maxed out, you’ll need to make a bigger adjustment at the caliper. To do this, loosen the pinch bolt (typically with a 5 mm hex key), pull the cable tighter, and then retighten the bolt. Before working on the caliper, make sure the barrel adjuster is almost fully screwed in.
Hydraulic brakes, on the other hand, are mostly self-adjusting. However, some high-end models include a bite point adjustment dial or screw. Christoph Bayer from Know-How Workshop explains it well:
"The bite point is where the brake power is applied after you have pulled on the levers… Ideally you should adjust the brakes so that the maximum power can be generated with your hands."
If your hydraulic brake lever feels spongy or inconsistent, even after using the adjustment dial, it might be time for a professional bleed to remove air bubbles. Ideally, the lever should travel about 1 to 1.5 inches before the brake engages firmly, and it should never pull back far enough to touch your fingers.
Once you’ve made your adjustments, it’s time to test and ensure everything is working properly.
Testing and Safety Check
Start by pulling the brake levers firmly while the bike is stationary. The lever should engage well before reaching the halfway point of its travel. This ensures the system is firm and prevents the lever from coming too close to the handlebars.
Next, lift the bike and spin each wheel. Listen for any scraping sounds, and use a piece of white paper under the caliper to check that the pads are aligned properly with the rotor. Finally, ensure all critical bolts – like lever clamps and caliper mounting bolts – are tightened to 4–6 Nm.
Take a low-speed test ride to confirm that your brakes provide consistent and reliable stopping power. If you’ve installed new or recently cleaned pads, ride for about 5–10 miles to bed them in for optimal performance.
Mechanical vs. Hydraulic Brake Lever Adjustments
Fine-tuning your brake levers is just the start – getting familiar with the differences between mechanical and hydraulic systems can take your setup to the next level.
Mechanical brakes rely on a steel cable to pull the caliper, while hydraulic brakes use pressurized fluid to move pistons. This fundamental difference shapes everything from the tools you’ll need to the maintenance process itself.
With mechanical brakes, regular adjustments are necessary to account for cable stretch and pad wear. On the other hand, hydraulic brakes are self-adjusting. As the pads wear down, the fluid automatically compensates by pushing the pistons further out. If a hydraulic lever starts feeling spongy, it’s usually a sign of air in the system, meaning you’ll need to perform a brake bleed using the correct kit and fluid.
The tools required for each system also vary. For mechanical brakes, you’ll need Allen keys (commonly 2 mm, 4 mm, and 5 mm), screwdrivers, and pliers. Hydraulic systems, however, require those same Allen keys but also demand a bleed kit, syringes, and brake fluid specific to your model. Many modern hydraulic levers now come equipped with tool-less adjustment knobs for reach and bite point, letting you make quick changes on the go.
Even lever designs differ to suit each system’s mechanics. Mechanical levers are often built with a 3- to 4-finger blade to provide the leverage needed for pulling cables. Conversely, hydraulic levers are designed for one- or two-finger operation, minimizing hand fatigue during long rides.
Comparison Table: Mechanical vs. Hydraulic
| Feature | Mechanical (Cable) Brakes | Hydraulic Brakes |
|---|---|---|
| Primary Adjustment | Cable tension via barrel adjuster or pinch bolt | Fluid bleeding (if spongy) |
| Wear Compensation | Manual adjustment required | Self-adjusting as pads wear |
| Required Tools | Allen keys, screwdrivers, pliers | Allen keys, bleed kit, syringes, brake fluid |
| Lever Blade Size | 3–4 fingers | 1–2 fingers |
| Reach Adjustment | Reach screw on the lever body or under the hood | Tool-less knob or small Allen screw under the blade |
| Bite Point Adjustment | Rare; managed through cable tension | Common on mid-to-high-end models |
| Advantages | Simple field repairs, affordable, reliable | Maximum power, consistent feel, less hand fatigue |
| Disadvantages | Cable stretch, friction issues, requires more force | Complex maintenance, higher cost, fluid-specific |
| Typical Torque Spec | 4–6 Nm (approximately 3–4 ft-lbs) for lever clamps | 4–6 Nm (approximately 3–4 ft-lbs) for lever clamps |
Conclusion
With your brake levers adjusted to hit that sweet spot, you’re ready for better performance and control on the trails. These small tweaks only take a few minutes but can make a big difference in safety and handling. Position the levers slightly inboard so your index finger naturally hooks onto the blade. Set the angle to maintain a straight line from your forearm to your finger, adjust the reach so your finger’s first joint rests comfortably on the lever, and fine-tune the bite point if your hydraulic system allows.
Modern hydraulic disc brakes are designed to provide powerful stopping with just one finger – when set up correctly. This setup ensures you’re ready for those critical moments when you need full braking power. Tighten lever clamps to 4–6 Nm, but keep them loose enough to rotate if they take a hit. And before hitting the trails, always test your brakes in a safe setting.
Looking for more ways to ride safely and confidently? Check out Intermountain Bikes for more tips and guides.
FAQs
How do I know my lever angle is correct while riding?
Your brake lever angle is spot on if your fingers can comfortably reach and operate the levers without needing to stretch or strain. The best setup keeps your lower arms, palms, and fingers aligned in a straight line while riding, giving you both ease and control.
Why does my brake lever feel spongy after adjusting it?
A brake lever that feels spongy after adjustment usually points to air trapped in the hydraulic system or an issue with the bleeding process. Even if you’ve topped off the brake fluid, this problem can persist. To fix it, make sure the system is thoroughly bled to eliminate any air pockets and regain a firm, responsive lever feel.
What should I do if I run out of barrel adjuster on cable brakes?
If your barrel adjuster is maxed out on cable brakes, you can still fine-tune the cable tension directly at the caliper. Here’s how: grab an Allen key or wrench to loosen the bolt on the brake caliper. Once it’s loose, manually adjust the cable to the desired tension. Afterward, tighten the bolt securely. This quick fix helps restore proper brake performance.