The rear derailleur ensures your bike shifts gears smoothly. If it’s not adjusted properly, you’ll face issues like skipping gears, chain noise, or even damage to your bike’s components. Fixing this is simple with the right tools and a step-by-step process:
- Tools Needed: Phillips screwdriver, hex wrenches, needle-nose pliers, cable cutters, and a bike stand.
- Preparation: Stabilize your bike, clean the drivetrain, inspect cables, and reset the barrel adjuster.
- Key Adjustments:
- High Limit Screw: Align the derailleur with the smallest cog.
- Low Limit Screw: Prevent the chain from hitting the spokes.
- B-Tension Screw: Set the gap between the pulley and cassette.
- Cable Tension: Secure and fine-tune the cable for precise shifts.
- Barrel Adjuster: Make final tweaks for smooth gear changes.
Regular derailleur adjustments keep your bike running efficiently and prevent costly repairs. Follow these steps to enjoy quiet, reliable shifting every ride.
Tools and Preparation
Required Tools
To get started, you’ll need a Phillips screwdriver for adjusting the limit and B-tension screws, as well as hex wrenches (usually 4mm and 5mm) for the cable anchor bolt. These sizes are standard for most Shimano and SRAM rear derailleurs, so having both on hand will save you time and hassle.
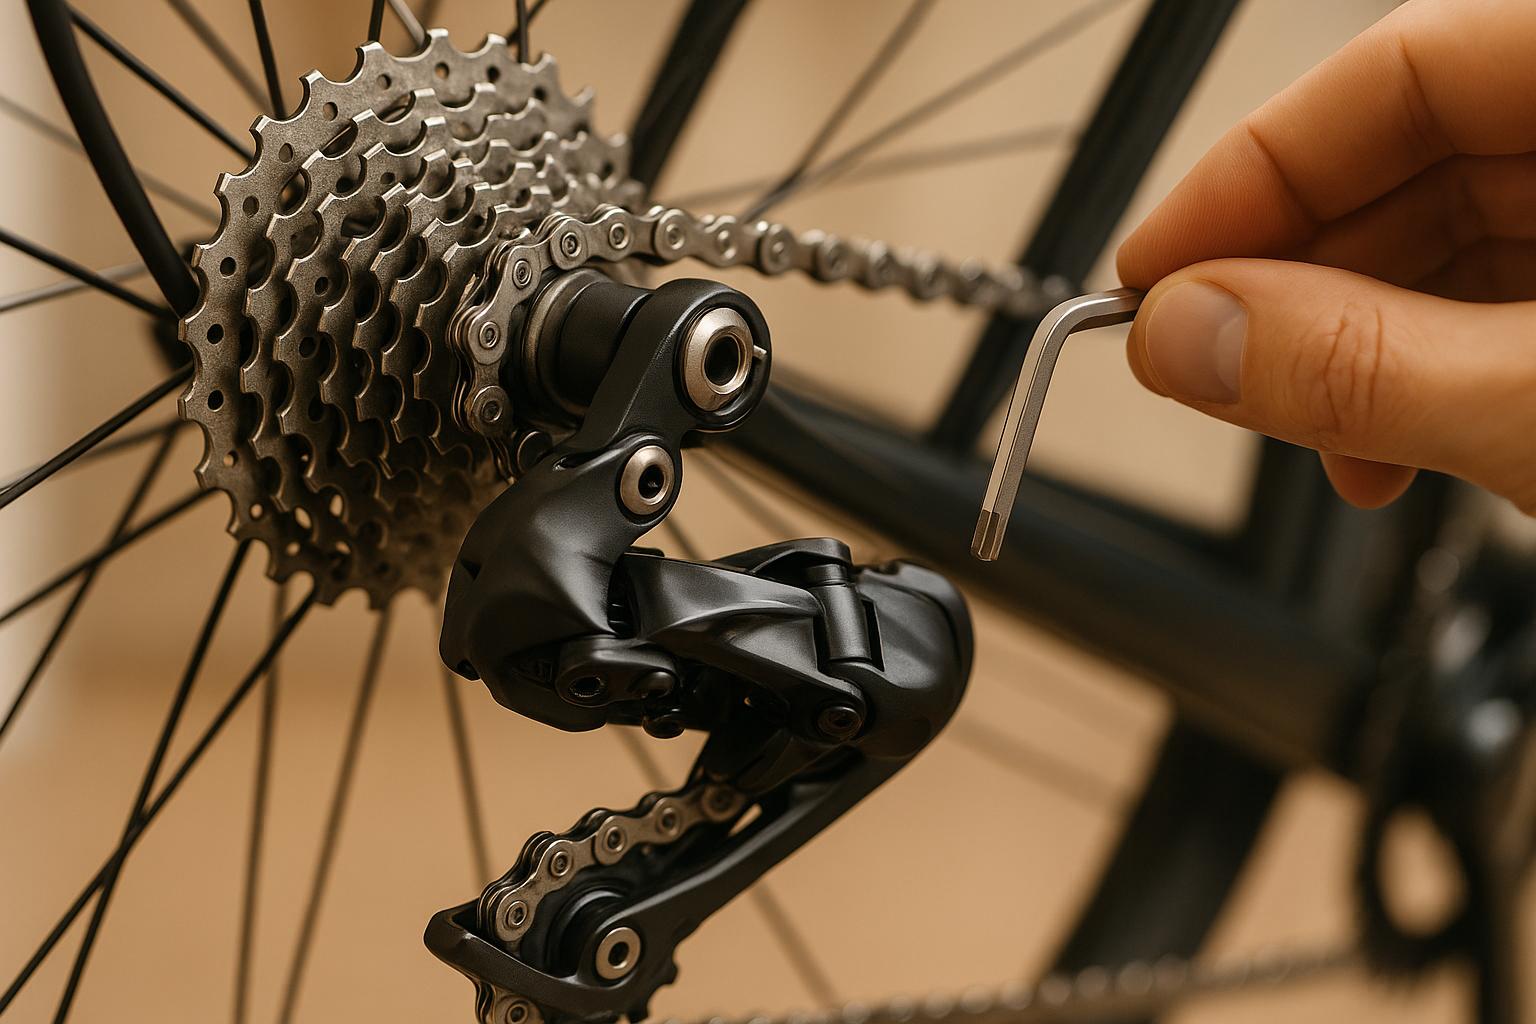
Needle-nose pliers are essential for pulling the cable tight during tensioning. Shimano recommends applying 11-22 lbs of force to properly secure the cable, and pliers provide the grip and leverage needed to do this effectively. Also, keep cable cutters and end caps nearby for trimming and securing the cable ends.
A bike stand can make the process much easier by keeping your bike stable while you work. If you don’t have one, you can flip the bike upside down or lean it securely against a wall – just make sure it’s steady and won’t tip over during adjustments.
Once all your tools are ready, it’s time to prep your bike for the adjustments.
Preparing Your Bike
Start by stabilizing your bike on a stand or another steady surface. This ensures you have easy access to the derailleur and can freely spin the rear wheel while making adjustments.
Next, clean the derailleur, pulleys, cassette, and chain thoroughly. Dirt and grime can interfere with smooth shifting and cause the chain to skip. Pay close attention to the jockey wheels, as buildup here can directly impact how well the chain moves between gears. A clean and well-maintained derailleur is the foundation for precise shifting.
Inspect the cable and housing for any signs of damage, such as fraying, rust, or kinks. A damaged cable won’t hold tension properly, which makes accurate adjustments impossible. If you notice any issues, replace the cable before moving forward.
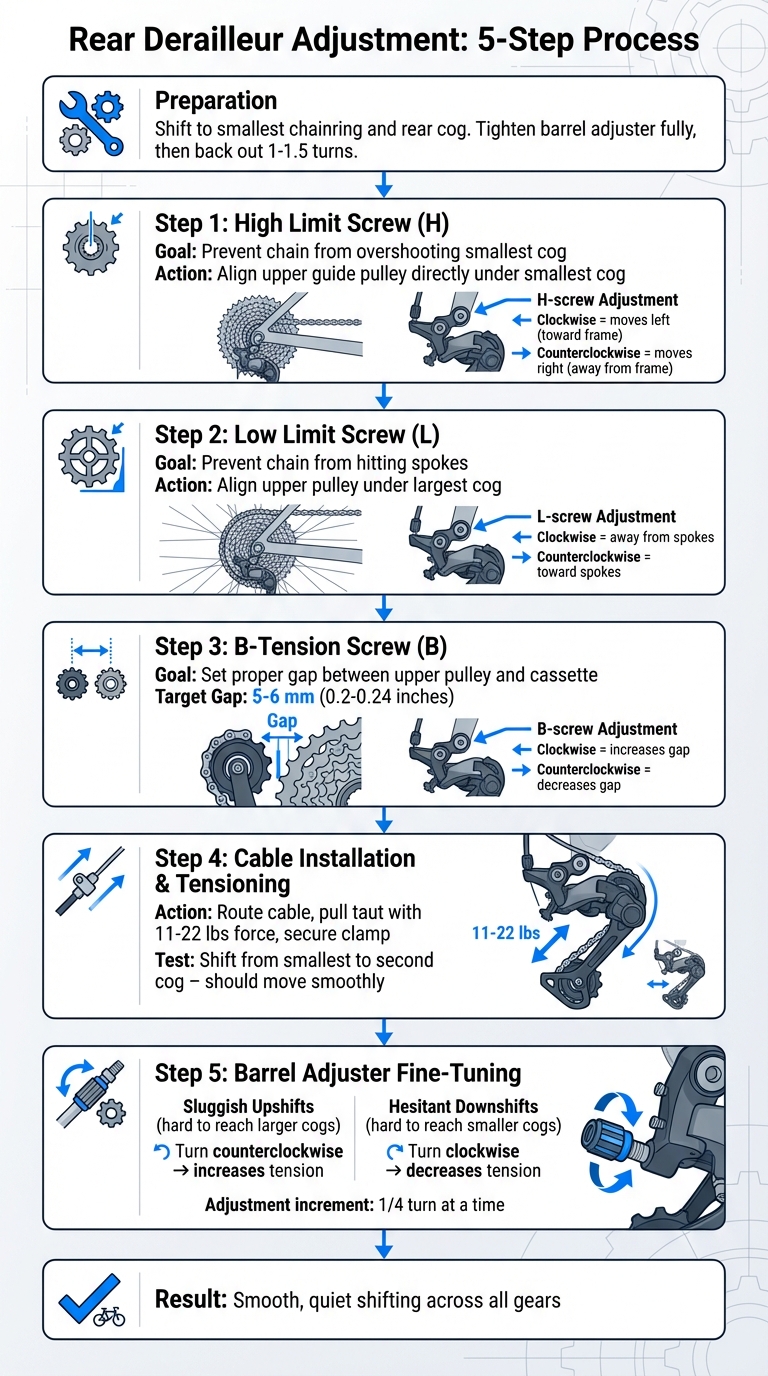
Finally, tighten the barrel adjuster (the part where the cable housing enters the derailleur) all the way, then loosen it by 1 to 1.5 turns. This gives you some leeway for fine-tuning the cable tension later on. With your bike clean, inspected, and stabilized, you’re ready to dive into the adjustment process.
Rear Derailleur Components
Main Derailleur Parts
Before diving into adjustments, it’s essential to understand the key components of a rear derailleur. These parts work together to control how the chain moves across the cassette.
Limit screws are crucial for keeping the derailleur aligned. You’ll find the high (H) and low (L) limit screws near the b-knuckle or on the front of the derailleur’s parallelogram linkage. They’re labeled "H" and "L" for easy identification. The H-limit screw prevents the chain from shifting off the smallest cog, while the L-limit screw stops it from overshooting the largest cog or derailing into the spokes.
The B-tension screw (also called the B-gap or body-angle screw) adjusts the spacing between the upper guide pulley and the cassette cogs. This screw is typically found on the derailleur body near the b-knuckle and may be marked with a "B." For Shimano and SRAM derailleurs, this screw fine-tunes the guide pulley height, while on Campagnolo models, a similar adjustment screw is located near the p-knuckle. Turning the B-tension screw clockwise increases the gap, while turning it counterclockwise reduces it.
The derailleur also includes two small wheels, known as jockey wheels or pulleys. The guide pulley ensures the chain stays on track, while the tension pulley keeps the chain taut. Keeping these pulleys clean is essential for smooth shifting. Lastly, the barrel adjuster is used to fine-tune cable tension for precise gear changes.
Once you’re familiar with these components, you’ll be ready to make the necessary adjustments for optimal shifting performance.
How to Adjust a Rear Derailleur – Limit Screws & Indexing
sbb-itb-9d75ae1
Adjustment Steps
5-Step Rear Derailleur Adjustment Process for Smooth Bike Shifting
Now that you’re familiar with derailleur components, let’s dive into the step-by-step process to get those gears shifting smoothly. Follow this sequence: high limit, low limit, B-tension, cable installation, and finally, barrel adjustment.
Start by shifting to the smallest chainring and rear cog to ease tension. Tighten the barrel adjuster fully, then back it out 1–1.5 turns for fine-tuning. Begin with the high limit screw adjustment and work through each step in order for the best results.
Adjusting the High Limit Screw
The high limit screw, marked "H", ensures the chain doesn’t overshoot the smallest cog (outermost cog) and hit the frame dropout. With the chain on the smallest cog and chainring, look directly from behind the bike. The derailleur’s upper guide pulley should line up perfectly under the smallest cog, as if a straight vertical line connects them.
Turn the "H" screw to adjust this alignment. A clockwise turn moves the pulley left (toward the frame), while counterclockwise moves it right (away from the frame). Make small, quarter-turn adjustments and check the alignment each time. The derailleur should not shift past the smallest cog. Shimano’s technical guides note that proper alignment reduces chain noise and prevents skipping.
If the chain struggles to shift into the smallest cog, loosen the "H" screw slightly. Once the alignment is spot-on, you’re ready to tackle the low limit screw.
Adjusting the Low Limit Screw
The low limit screw, marked "L", prevents the derailleur from pushing the chain into the spokes – a mistake that could cause serious damage. Shift to the largest rear cog and check that the upper pulley aligns directly beneath it. Adjust the "L" screw: turn clockwise to move the pulley away from the spokes, and counterclockwise to bring it closer.
To test, manually push the derailleur toward the wheel. It should stop before the pulley moves past the edge of the largest cog. If it doesn’t, tighten the "L" screw until the pulley halts in the correct position. With both limit screws set, move on to the B-tension adjustment.
Adjusting the B-Tension Screw
The B-tension screw controls the gap between the upper pulley and the cassette cogs, which influences shifting performance. You’ll find this screw near the derailleur’s b-knuckle, often marked with a "B".
Shift to the largest rear cog and measure the gap between the upper pulley and the cog. Turning the screw clockwise increases the gap; counterclockwise decreases it. Aim for a clearance of about 5–6 mm (roughly 0.2–0.24 inches). This spacing is close enough for smooth shifting but avoids rubbing. If shifts on the largest cogs feel slow or you hear grinding, adjust the B-tension in small increments and test after each change. Next, install and tension the cable.
Installing and Tensioning the Cable
Accurate cable installation is key for precise gear changes. Shift to the smallest cog, then loosen the cable clamp. Route the cable through its guides, pull it taut with about 11–22 lbs of force, and secure it by tightening the clamp to the recommended torque. Trim any excess cable and cap the end.
Test the setup by shifting up one gear from the smallest cog. The chain should move smoothly to the second cog. If it hesitates, adjust the cable tension before proceeding to barrel fine-tuning.
Fine-Tuning with the Barrel Adjuster
The barrel adjuster allows for small tweaks to cable tension, ensuring the derailleur shifts seamlessly. Shift through all gears, listening for noise or sluggish movement.
For slow upshifts (difficulty reaching larger cogs), turn the barrel adjuster counterclockwise to increase cable tension. For hesitant downshifts (trouble returning to smaller cogs), turn it clockwise to reduce tension. Make one-quarter turn at a time and test the gears after each adjustment. The chain should run quietly and align vertically on each cog, with no rubbing or skipping. Start with the highest gear, then check the second and third sprockets, fine-tuning as needed until everything runs smoothly.
| Adjustment Issue | Barrel Adjuster Direction | Effect |
|---|---|---|
| Sluggish upshifts (hard to reach larger cogs) | Counterclockwise | Increases cable tension |
| Hesitant downshifts (hard to reach smaller cogs) | Clockwise | Decreases cable tension |
Testing and Troubleshooting
Testing Your Shifts
To check your bike’s shifting, start by placing it on a repair stand or lifting the rear wheel off the ground. Pedal by hand and begin on the smallest chainring and cog. Shift through each gear on the cassette, moving toward the largest cog. Pay close attention to any hesitation or unusual noises. Then, shift back down to the smallest cog, ensuring the chain moves smoothly and engages each gear without delay or rubbing. For a more thorough test, repeat the process while riding, both seated and standing, to observe how the system performs under load. Watch for any hesitation, ticking, or grinding sounds that might signal the need for further adjustments.
Fixing Common Problems
If your test reveals issues like hesitation or noise, try these quick fixes:
- Chain hesitates moving to an easier gear: This usually means the cable tension is too low. Turn the barrel adjuster counterclockwise about a quarter-turn, then test again.
- Chain hesitates or overshifts to a harder gear: In this case, the cable tension might be too high. Turn the barrel adjuster clockwise to reduce the tension.
If you hear persistent ticking or rubbing, even with the limit screws correctly set, the derailleur pulley might be slightly out of alignment. A small adjustment using the barrel adjuster can often resolve this.
For more specific issues:
- Chain drops off toward the dropout when shifting to the smallest cog: Adjust the high limit (H) screw to prevent this.
- Chain overshoots the largest cog or scrapes against the spokes: Tighten the low limit (L) screw clockwise to keep the chain securely on the cassette.
After making any limit adjustments, manually push the derailleur to its extremes while pedaling to confirm the chain stays in place.
Finally, after a short test ride, recheck your gear indexing on the stand. If you notice new hesitation, it could be due to initial cable stretch. A small increase in barrel-adjuster tension should fix this. Also, double-check that the cable pinch bolt and derailleur mounting bolt are securely tightened, as loose bolts can cause misalignment or erratic shifting.
Conclusion
Adjusting your rear derailleur involves a straightforward process: start by setting the high and low limit screws to ensure the chain stays securely on the cassette. Then, adjust the B-tension to maintain proper pulley clearance. After that, install and tension the cable firmly. Finally, use the barrel adjuster to fine-tune until every shift feels smooth and precise. By following these steps, you can achieve reliable, quiet shifting.
These adjustments don’t just improve shifting immediately – they also enhance the long-term performance of your bike. Proper indexing prevents the chain from hitting the spokes and causing damage. Smooth shifting helps distribute wear evenly across your cassette and chain, which can save you from costly repairs down the line. Regular checks also keep cables tensioned and pulleys clean, prolonging the lifespan of your drivetrain components.
Incorporate derailleur checks into your routine maintenance alongside tasks like inflating tires to the correct psi, inspecting brake pads, and lubricating your chain. Keep essential tools handy for quick adjustments during rides.
For more tips on maintenance and gear setup, check out Intermountain Bikes for detailed guides on drivetrain care. Whether you’re navigating rugged trails or racking up miles on gravel roads, a properly tuned derailleur means less time fixing issues and more time enjoying the ride. Make these checks a part of your regular maintenance for a consistently smooth cycling experience.
FAQs
How can I tell if my rear derailleur needs to be adjusted?
If your bike isn’t shifting smoothly, skips gears without warning, or the chain struggles to move cleanly across the cassette, it’s likely time to adjust your rear derailleur. Fixing these problems quickly can make your rides smoother and help avoid unnecessary wear and tear on your drivetrain.
Why is my chain still skipping after I’ve adjusted the derailleur?
If your chain keeps skipping despite adjusting the derailleur, there are a few key areas to examine. Start with the derailleur hanger alignment – a bent hanger can disrupt proper shifting. Then, take a close look at the chain for any signs of wear or stretching, as these issues often lead to skipping. Also, double-check that the derailleur is properly adjusted and the cable tension is set correctly. If none of these solve the issue, it might be time to replace either the chain or the cassette, as worn components can make smooth shifting nearly impossible.
Can I adjust my rear derailleur without using a bike stand?
You can absolutely adjust your rear derailleur without a bike stand. Just flip your bike upside down or rest it securely against a sturdy surface. While this approach gets the job done, having a bike stand makes the process easier and helps you fine-tune the adjustments with more accuracy.