Using the wrong bike rack can lead to safety risks and vehicle damage. To avoid issues, you need to match the rack to your car’s specifications, weight limits, and attachment points. Here’s a quick guide to help you:
- Start with your vehicle’s details: Use your VIN to confirm the make, model, and year. Check for roof rails, hitch receivers, or trunk design.
- Inspect weight limits: Look at your owner’s manual for roof load and hitch tongue weight ratings. Overloading can damage your car or cause accidents.
- Choose the right mounting type: Options include roof, trunk, or hitch racks. Each has pros and cons – consider your car’s design and usage needs.
- Use manufacturer tools: Brands like Thule and Saris offer online guides to ensure compatibility.
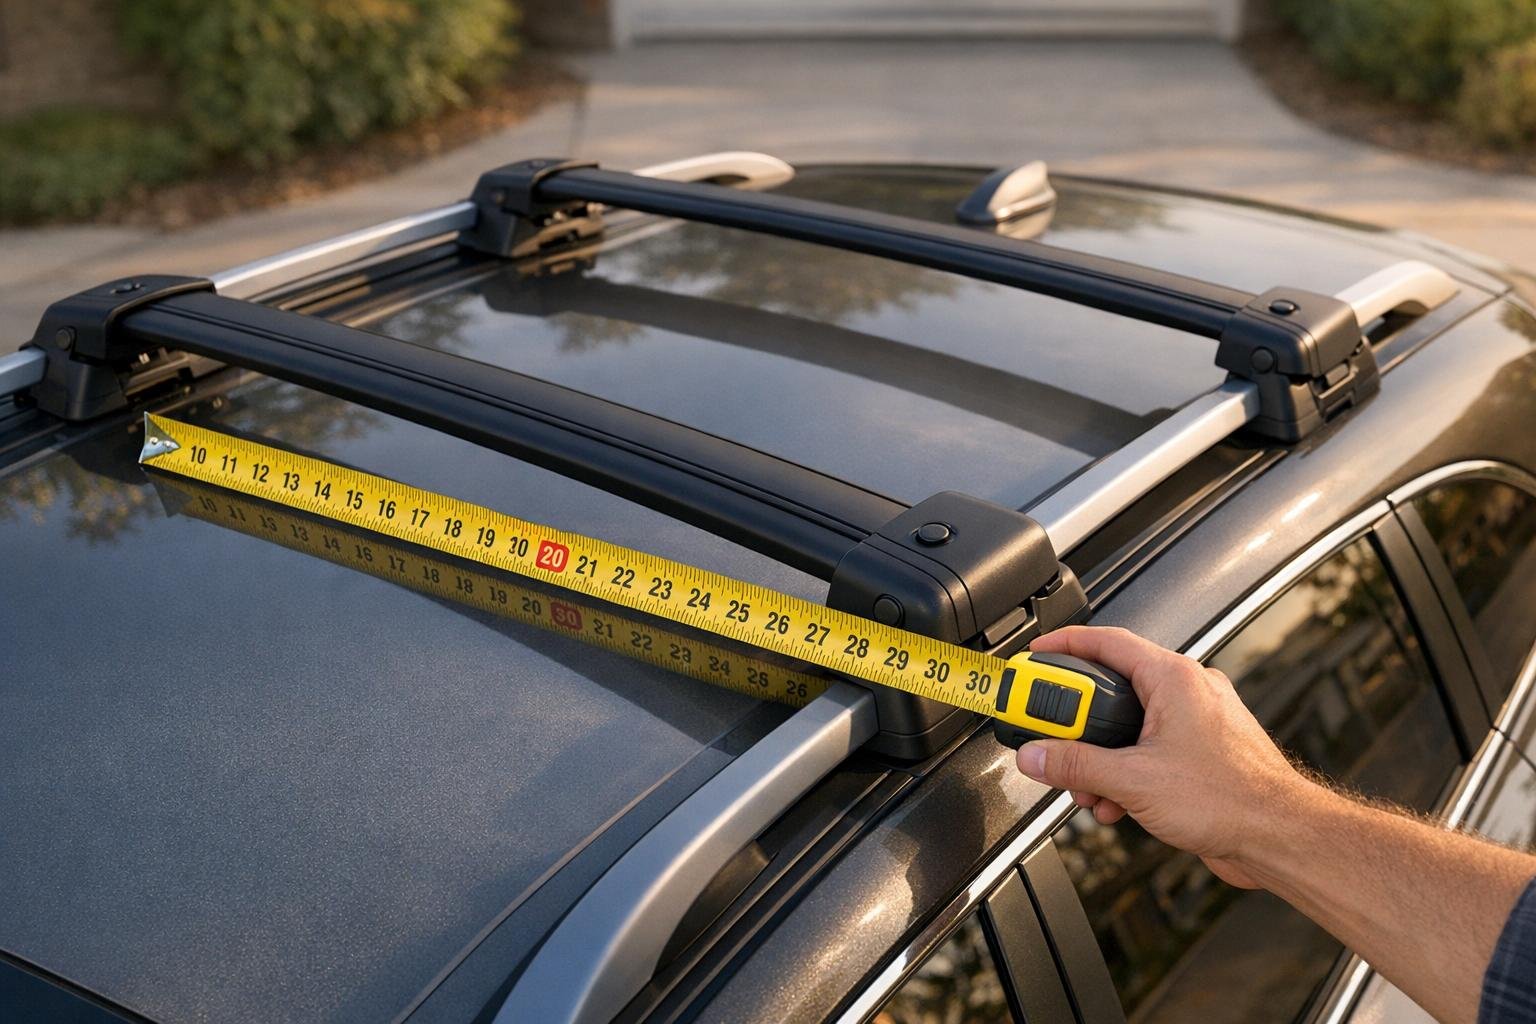
- Measure clearances: For hitch racks, check bumper distance. For roof racks, confirm crossbar spacing and hatch clearance.
Key Tip: Always double-check installation instructions and follow weight limits to protect your vehicle and bikes. Let’s dive into the details.
How to Choose the Best Bike Rack for Your Car
sbb-itb-9d75ae1
Know Your Vehicle’s Specifications
Before purchasing a bike rack, it’s essential to understand your vehicle’s specific details. Factors like the make, model, year, and available attachment points – whether roof rails, hitch receivers, or trunk design – play a crucial role in determining compatibility.
Your Vehicle Identification Number (VIN) is the most reliable way to confirm these details. This 17-character code acts as your car’s unique fingerprint. As Gooseneck Bill explains:
"The VIN is a unique 17-character alphanumeric code assigned to every vehicle produced. It’s like the car’s fingerprint, containing vital information about its origin, specifications, and, most importantly, its model".
The 10th character of the VIN reveals the model year, while characters 4 through 9 provide codes for the specific model and trim level. Once you’ve verified this information, cross-check it with your vehicle’s documentation and inspect its attachment points to ensure accuracy.
Find Your Vehicle Documentation
To locate your VIN, look on the lower driver’s side of the dashboard or the driver’s side doorjamb. The label on the doorjamb – officially called the Safety Compliance Certification Label – also includes the date of manufacture and weight ratings.
Your owner’s manual is another key resource, listing the maximum roof load and hitch tongue weight ratings. If the manual is missing, you can find your vehicle’s make and model details on the title, registration, or insurance documents. For even more detailed factory-installed equipment information, check the original window sticker or manufacturer build sheets.
Inspect Your Vehicle’s Attachment Points
Take a walk around your vehicle to identify its available attachment points, as these will dictate which bike rack options are compatible. For roof racks, determine whether your car has a bare roof, fixed points under plastic covers, raised rails with a visible gap, flush rails that lie flat against the roof, or track grooves. A quick test: slide your finger under the rail – if it fits, it’s a raised rail; if not, it’s flush.
For hitch receivers, measure the inner diameter of the square tube opening. The most common sizes are 1 1/4 inches (often found on smaller cars) and 2 inches (standard for SUVs and trucks). If you’re considering a trunk-mounted rack, examine your vehicle for features like a plastic spoiler, glass hatch, or large bumper. Saris notes:
"The fit of a trunk rack has to do with a handful of variables, including… the shape of the trunk and bumper size, the materials used to make the vehicle, and the design of the trunk, including the presence of spoilers".
Plastic spoilers, in particular, often can’t handle traditional rack straps. Specialized designs, such as the Saris Bones EX, are made to accommodate these features and fit 90% of the top-selling vehicles in the U.S., compared to 70% for standard models. Once you’ve gathered this information, you’ll be well-prepared to choose the right mounting option for your vehicle.
Choose the Right Mounting Type for Your Vehicle
Car Bike Rack Types Comparison: Roof, Trunk, and Hitch Mounted Options
Once you’ve identified your vehicle’s attachment points, the next step is picking the right mounting style to ensure a secure fit. The perfect choice depends on your vehicle’s design and how often you plan to transport your bike. There are three main options – roof, trunk, and hitch mounts – each with its own advantages and challenges. As Chris Ritchie, Director of Marketing at Thule, explains:
"We are noticing a significant shift in the way consumers are transporting their bikes in the past five years… at least in part due to the growth of the SUV market, as an SUV’s taller height makes it harder to load a bike onto its roof."
Nathan Grothe, Bike Accessories Merchandising Manager at REI, also highlights the importance of personal needs:
"Interest really depends on where you live, how much storage space you have, how big your car is, and what kind of riding you’re doing."
Here’s a closer look at each mounting type to help you decide.
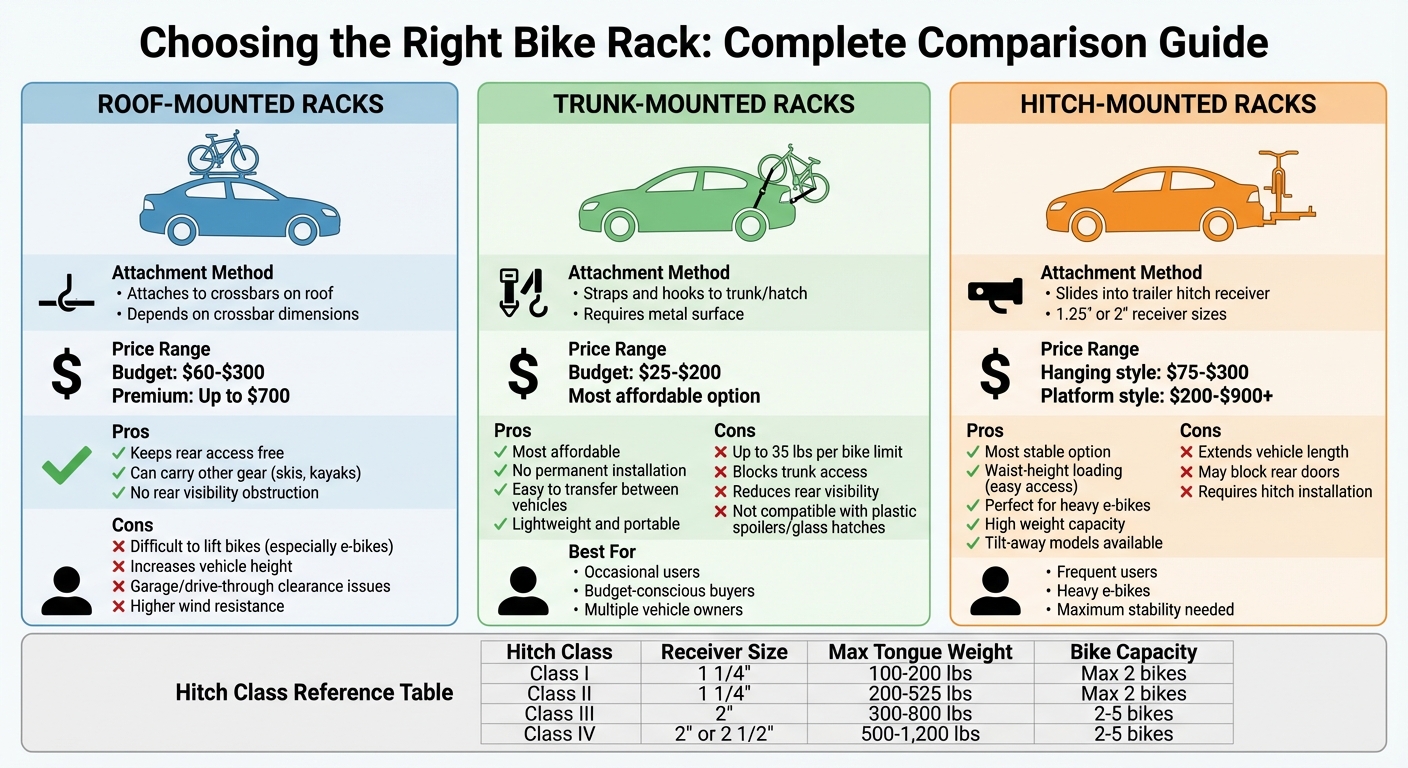
Roof-Mounted Racks
Roof racks attach to crossbars on your car’s roof. Since compatibility depends on crossbar dimensions (width, shape, and spacing), it’s important to confirm these details with the manufacturer. The biggest perk? They keep your rear access free and can carry other gear like skis or kayaks. However, lifting bikes onto the roof can be tricky – especially if you have a heavier e-bike or a tall SUV. Plus, roof racks increase wind resistance and add height to your vehicle, which could cause clearance issues in garages or drive-throughs. Prices range from $60 to $300, with premium systems costing up to $700.
If lifting bikes overhead isn’t practical for you, trunk-mounted racks offer a more budget-friendly solution.
Trunk-Mounted Racks
Trunk racks are secured to your car’s rear hatch or trunk lid using adjustable straps and hooks. They’re the most affordable option, with prices between $25 and $200, and they don’t require permanent installation. Their lightweight design makes them easy to transfer between vehicles, making them ideal for occasional use. However, they do have limitations. Trunk racks need a solid, metal surface for support, so cars with plastic trim or glass hatches (like those with large spoilers) may not be a good fit. They typically hold up to 35 lbs per bike and can block trunk access or rear visibility.
If you’re looking for maximum stability and the ability to carry heavier loads, hitch-mounted racks are the way to go.
Hitch-Mounted Racks
Hitch racks slide into the trailer hitch receiver that’s attached to your car’s frame. To ensure compatibility, check both the receiver size (1.25 inches or 2 inches) and the hitch class rating. Class I and II hitches, which use a 1.25-inch receiver, support up to 200–350 lbs of tongue weight. Class III and IV hitches, with a 2-inch receiver, handle 800–1,200 lbs. These racks are the most stable option and sit at waist height, making them easy to load – perfect for heavier e-bikes or frequent use. John Ibbotson, Chief Mechanic at Consumer Reports, points out:
"Any car, even smaller ones, can have a hitch installed on it."
Hitch racks come in a wide price range: $75 to $300 for hanging styles and $200 to $900 or more for platform designs. The main downside? They extend your vehicle’s length and may block rear doors, though tilt-away models can restore trunk access.
Verify Weight Capacity and Load Ratings
Once you’ve chosen the right mounting type, it’s crucial to ensure your vehicle’s load limits aren’t exceeded. Overloading can damage your car, lead to system failures, and compromise safety. The trick is simple: calculate the combined weight of the rack and bikes, then compare it to your vehicle’s specific load ratings.
Here’s how: Add the weight of the rack to the total weight of all the bikes you’re carrying. For instance, if your hitch rack weighs 50 lbs and you’re transporting two bikes weighing 30 lbs each, your total load comes to 110 lbs. This number must stay within the limits of your vehicle’s capacity – whether it’s the roof load limit or the hitch tongue weight rating. Always use the lower of the two ratings: your vehicle’s capacity or the hitch receiver’s rating.
Next, you’ll need to check both your roof and hitch load ratings to ensure safe transport.
Roof Load Capacity
For roof-mounted setups, refer to your owner’s manual under sections like "Loading" or "Roof Rack" to find the dynamic weight limit – this is the maximum weight your vehicle’s roof can handle while driving. Typical limits are around 100–125 lbs for sedans and 150–165 lbs for SUVs and wagons. This limit includes everything: the crossbars, the bike rack, and the bikes.
For example, if your rack system weighs 40.2 lbs and your vehicle’s roof limit is 165 lbs, you’re left with 124.8 lbs for the bikes. Don’t forget to account for any additional accessories like cargo boxes or ski mounts in your calculations.
If you’re using a hitch-mounted system instead, you’ll need to focus on the receiver’s weight rating.
Hitch Receiver Ratings
Hitch-mounted racks depend on your receiver’s tongue weight capacity. You can usually find this rating on a sticker on the hitch receiver itself, or in the "Towing" section of your owner’s manual if no sticker is present. Below is a breakdown of typical tongue weight limits by hitch class:
| Hitch Class | Receiver Size | Typical Max Tongue Weight | Common Bike Capacity |
|---|---|---|---|
| Class I | 1 1/4" | 100–200 lbs | Max 2 bikes |
| Class II | 1 1/4" | 200–525 lbs | Max 2 bikes |
| Class III | 2" | 300–800 lbs | 2–5 bikes |
| Class IV | 2" or 2 1/2" | 500–1,200 lbs | 2–5 bikes |
A good rule of thumb: aim to keep your total load at about half of the hitch’s rated tongue weight to maintain safe handling. For example, if you have a Class II hitch rated at 350 lbs, try to keep the combined weight of the rack and bikes under 175 lbs. Don’t forget to include the weight of any additional adapters or extensions when making your calculations.
Use Manufacturer Compatibility Tools and Guides
Once you’ve verified your vehicle’s specifications and load capacity, the next step is to confirm that the rack you choose is compatible with your car. This is where manufacturer fit guides come in handy. Leading brands like Thule, Saris, and Yakima offer online tools to match their racks to your vehicle. These guides are designed to take the guesswork out of the process, helping you avoid buying a rack that simply won’t fit.
These tools aren’t just about convenience – they’re based on safety testing to ensure the rack and vehicle work together securely. Ignoring fit notes or skipping required accessories can void the approved fit and compromise safety.
How to Use Online Fit Tools
To get started, you’ll need to input specific details about your vehicle. First, select the type of rack you’re interested in – roof racks, hitch racks, or trunk racks. Then, provide your vehicle’s year, make, model, sub-model (trim level), and body style (such as a 4-door sedan or SUV). For hitch-mounted racks, you’ll also need to know your hitch receiver tube size (commonly 1 1/4", 2", or 2 1/2") and hitch class (Class I through V). If you’re unsure, you can measure the receiver tube to confirm.
For roof racks, it’s important to specify your roof rail configuration and whether you already have crossbars installed. The tool will determine if your existing crossbars are certified to work with the rack you’re considering. Be cautious – using uncertified third-party crossbars can void warranties. Additionally, the system will flag any required accessories for vehicles with features like rear spoilers.
For hitch racks, you’ll also need to measure the distance from the center of the hitch pin hole to the outer edge of your bumper or spare tire. This ensures the rack will clear your vehicle without any interference. The fit guide also considers potential obstacles like spoilers, rear wipers, or externally mounted spare tires that might prevent proper installation.
Once you’ve entered all the necessary details, the tool will recommend compatible options. Be sure to review the installation notes for any additional guidance.
Read Installation Instructions and Fit Notes
After selecting a rack, take the time to read the "Vehicle Fit Notes" provided. These notes often include critical warnings about potential interferences or additional steps you’ll need to take. For example, you might need to disable your rear wiper while the rack is installed, position rack feet in specific areas (like the license plate well), or avoid opening the trunk while the rack is attached – even if it’s unloaded.
Fit notes also highlight required accessories. For instance, some trunk racks need specialized straps like "Hatch Huggers" to ensure a secure fit. A good example is the Saris Bones EX, which features an arched upper leg to clear plastic spoilers, making it compatible with 90% of top-selling vehicles in the U.S., compared to 70% for the classic Bones rack.
Pay close attention to weight limits, as they are non-negotiable. For example, a 2-bike rack rated for 70 lbs (35 lbs per bike) cannot safely carry three lighter bikes, even if the total weight is under 70 lbs. If you plan to transport e-bikes, confirm the per-bike weight capacity since many standard racks aren’t designed for their heavier frames. Similarly, if you have a carbon fiber bike, look for racks that secure the wheels instead of clamping the frame to avoid damage.
Check Physical Installation Requirements
Before purchasing a bike rack, make sure it fits your vehicle’s dimensions and clearances. Even if a manufacturer’s fit guide suggests compatibility, take the time to measure your vehicle and confirm everything will align properly. This avoids frustrating installation issues later.
Trunk and Spoiler Clearance
If you’re considering a trunk-mounted rack, the first thing to check is whether your vehicle has a plastic spoiler. Plastic spoilers cannot handle the weight or tension from a bike rack’s straps. Most trunk-mounted racks are designed to attach to metal surfaces, not plastic trim or large glass hatches.
"By keeping rack straps off the spoiler, the bike load can be distributed through the rack’s contact points as designed and tested. Weight from a bike-toting rack on a plastic spoiler may damage the vehicle." – Saris
For vehicles with rear spoilers, look for racks with specialized arched designs that can clear the spoiler. You should also ensure the lower straps can secure beneath the bumper. In some cases, accessories like "Hatch Huggers" may be necessary to attach straps to narrow gaps. Some manufacturers, such as Allen Sports, even allow you to send photos of your vehicle to confirm compatibility.
Once you’ve addressed trunk clearance, move on to verifying your roof setup.
Roof and Crossbar Fit
Roof-mounted bike racks require crossbars – they cannot attach directly to side rails. Before buying a roof rack, check if your vehicle has crossbars installed and confirm their shape (square, round, or aerodynamic/oval). Many racks are designed to fit only certain crossbar profiles, so this detail is crucial.
Measure the spacing between crossbars to ensure the rack hardware will fit. Also, consult your vehicle’s owner’s manual for the maximum roof weight limit, which includes the combined weight of the crossbars, rack, and bikes. Finally, make sure there’s enough clearance for your rear hatch or trunk to fully open without hitting the mounted bikes.
Once your roof dimensions are confirmed, check the hitch setup if you’re considering a hitch-mounted rack.
Hitch Alignment
For hitch-mounted racks, start by verifying the size of your hitch receiver. Common sizes include 1¼", 2", and 2½". The rack’s shank must match the hitch receiver’s diameter. Next, measure the distance from the center of the hitch pin hole to the outer edge of your rear bumper (or spare tire). This ensures the rack’s shank extends far enough to clear the bumper.
This measurement is critical because the rack’s mast must not contact your vehicle. Manufacturers often list this as "Measurement A", which refers to the distance from the rack’s hitch pin hole to its first contact point. Your bumper-to-hitch measurement should be less than the rack’s Measurement A. If you’re considering a tilting hitch rack, also check "Measurement B" – the distance from the hitch pin to the first contact point when the rack is tilted – to ensure it won’t hit your vehicle when folded.
Conclusion
Before purchasing a car rack, take the time to verify compatibility. Start by identifying your vehicle’s exact details – year, make, model, and body style – and determine if it already has roof crossbars, side rails, or a hitch receiver. For hitch racks, make sure to check your receiver size (1¼" or 2") and hitch class, as these specifications affect weight limits and bike capacity.
Your vehicle’s manual is an essential resource. It provides critical safety information, such as the maximum roof load or tongue weight capacity, which helps protect both your vehicle and your bikes.
Manufacturer fit guides from brands like Saris, Thule, or Yakima are also valuable tools. These guides offer vehicle-specific notes, highlighting any additional accessories needed or potential installation challenges, like interference from plastic spoilers.
Take extra care with measurements. For hitch racks, measure the distance from the hitch pin hole to your bumper or spare tire to ensure proper clearance. For roof racks, check the crossbar spacing and confirm that your rear hatch can open fully without hitting the bikes. These small details go a long way in preventing damage and ensuring a safe setup.
At Intermountain Bikes, we believe that setting up your gear correctly is just as important as picking the perfect trail. A properly fitted rack keeps your focus where it belongs – on the ride.
FAQs
Can I carry e-bikes on my current rack?
If your bike rack has a high weight capacity (at least 60 lbs per bike) and fits your e-bike’s size and frame, you can safely transport e-bikes. Hitch-mounted racks are often the go-to choice for e-bikes because they offer better stability and are easier to handle, especially for heavier models.
What measurements do I need before buying a hitch rack?
To check if your hitch setup is compatible, measure the distance from the center of your hitch pin hole to the outer edge of your bumper. If your vehicle has a spare tire mounted, also measure to the outer edge of the tire. Compare these measurements with the specifications for your hitch class to ensure everything fits properly.
Do I need crossbars to use a roof bike rack?
Not every roof bike rack needs crossbars. Certain models can connect directly to factory-installed roof rails or built-in mounting points. That said, the majority of racks are made to work with crossbars to ensure better support and stability. Before buying, make sure to review your vehicle’s roof configuration and the compatibility details of the bike rack.


