Transporting your bike safely is essential to avoid damage and ensure a hassle-free trip. Whether you’re using a bike rack, shipping it across the country, or fitting it inside your vehicle, proper preparation is key. Here’s a quick breakdown:
- Inspect Your Bike: Check tires, brakes, chain, and frame for issues. Tighten bolts and ensure everything is secure.
- Clean Thoroughly: Use a two-bucket system to clean your bike. Avoid high-pressure water to protect sensitive parts.
- Remove Accessories: Detach items like lights, GPS units, and water bottles. Pack small parts in labeled bags.
- Choose a Transport Method: Options include roof racks, hitch racks, or interior storage. Select based on your vehicle and bike type.
- Secure Your Bike: Use straps, foam padding, and spacers to prevent movement or scratches during transit.
- Final Checks: Inspect the setup before and during the trip. Stop periodically to adjust straps and ensure everything stays in place.
Following these steps protects your bike, vehicle, and others on the road. Ready your gear properly, and enjoy peace of mind on your next adventure.
6-Step Bike Transportation Safety Checklist
Preparing Your Bike for Transportation
Getting your bike ready for transport is all about protecting it from damage. Here’s how to make sure every part is secure and safe before the journey.
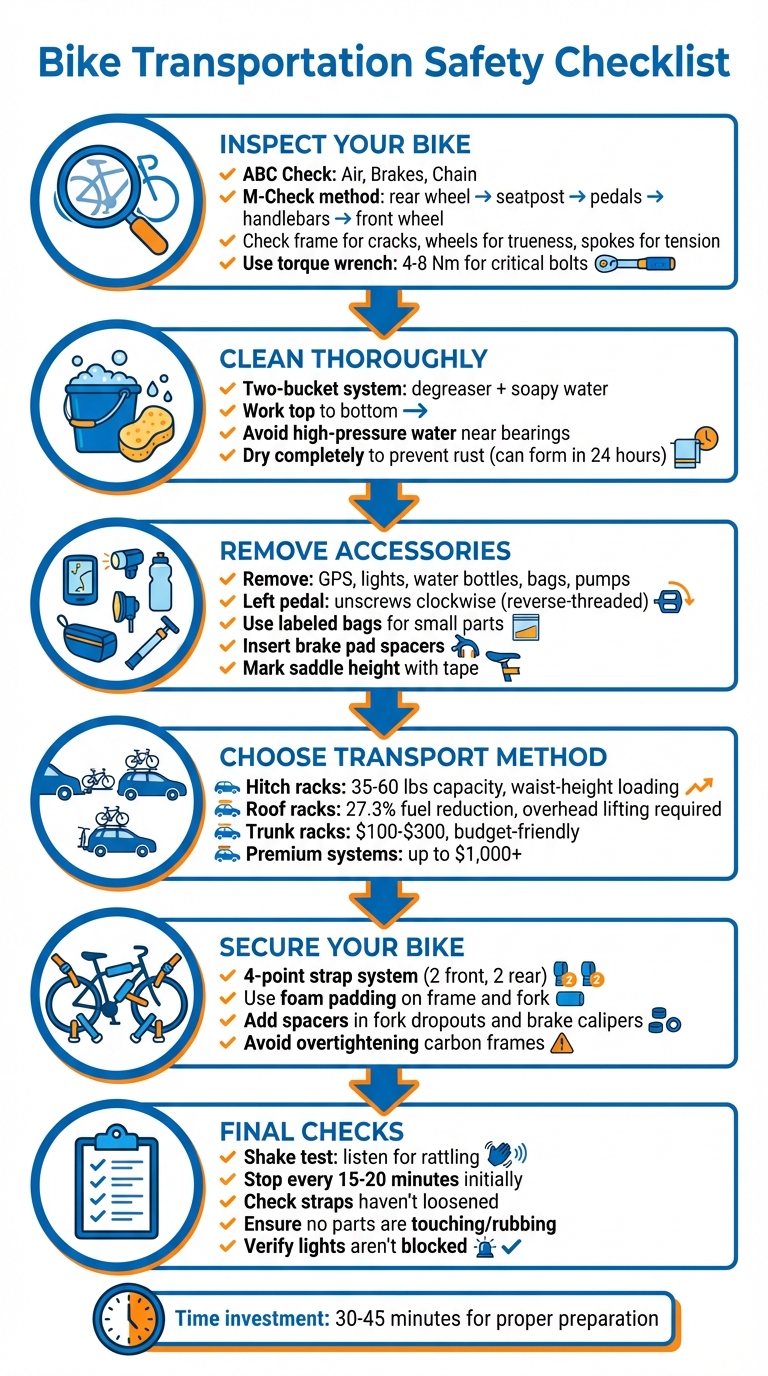
Inspect Your Bike
Start with the basics: the ABC Check – Air (tire pressure and condition), Brakes (engagement and pad wear), and Chain (lubrication and wear). Follow this up with the M-Check method, a systematic approach that begins at the rear wheel, moves to the seatpost, down to the pedals and cranks, up to the handlebars, and ends at the front wheel. This ensures no critical part is overlooked.
Take a close look at your frame and fork, especially around welds and the underside of the down tube. Watch for cracks, dents, or deformations. If you have a carbon frame, try the fingernail test: if your nail catches on a blemish, it could be a crack and should be checked by a professional.
Spin your wheels to check for trueness – there should be no wobbling from side to side. Tap each spoke; a clear "twang" indicates proper tension, while a dull sound may mean a loose spoke. Inspect your tires for sidewall cracks, bulges, or cuts that could fail during the trip.
For the drivetrain, check for worn teeth on cassettes and chainrings that look like "shark fins" – a sign of excessive wear. Ensure the derailleur hanger is straight. As Logan from Bikepacking.com notes:
"A slightly bent hanger will affect shifting performance, but a severely bent hanger will send the chain into your spokes, which could be a catastrophic situation."
Test the headset by holding the front brake and rocking the bike back and forth. If you feel movement or hear rattling, it needs adjustment. Finally, use a torque wrench to confirm that critical bolts – like those on the stem, handlebars, and seatpost – are tightened to the manufacturer’s specifications, typically between 4 and 8 Nm.
Clean Your Bike
A clean bike is easier to inspect and prevents dirt from causing scratches during transport. Use the two-bucket system: one bucket for degreasing the drivetrain, and another with soapy water for the frame and wheels.
Start with the dirtiest parts. Apply degreaser to the drivetrain and scrub away grime. Then wash the rest of the bike, working from top to bottom – handlebars, frame, seatpost, and wheels – with a soft sponge and warm, soapy water.
Skip the high-pressure hose, especially near bearings or suspension seals, as water forced into these areas can cause internal damage. Once cleaned, dry the bike thoroughly with clean rags. Packing a wet bike can lead to rust and corrosion, so make sure it’s completely dry before transport. After the chain is dry, apply fresh lubricant to each link and wipe off any excess to avoid attracting dirt during transit.
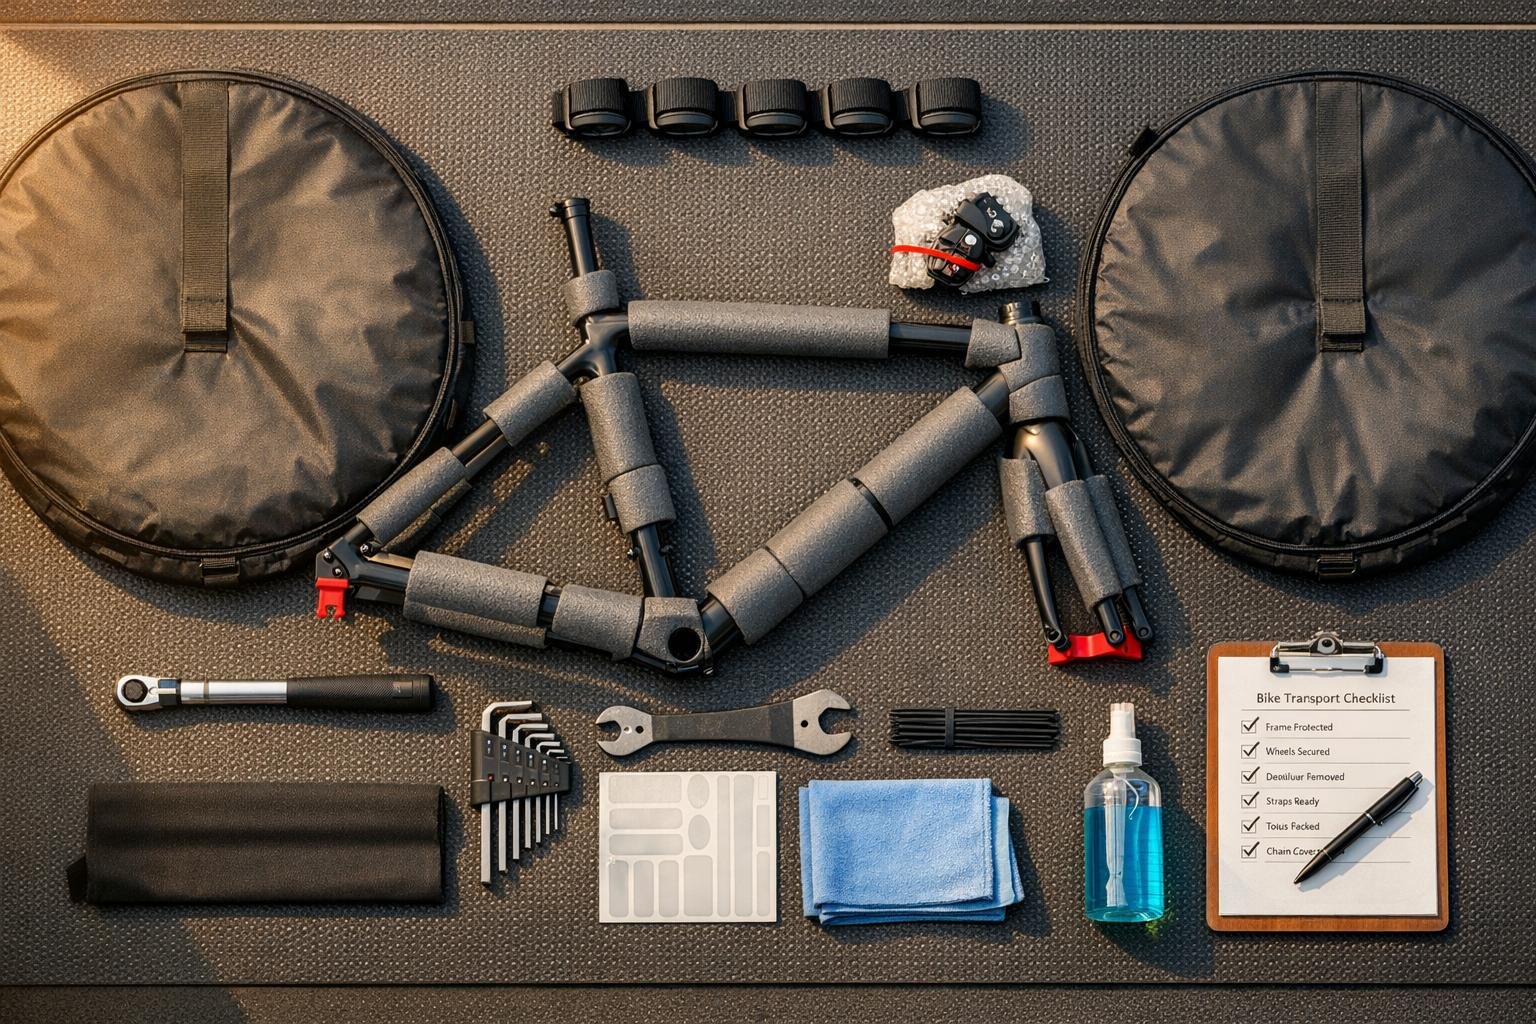
Remove or Secure Accessories
Once your bike is clean and inspected, secure or remove any accessories to protect them during travel. Items like GPS units, bike computers, lights, water bottle cages, saddlebags, frame bags, and mini pumps are better packed separately to avoid damage or loss.
If you’re taking the wheels off, remove the pedals too. Keep in mind: the left pedal is reverse-threaded and unscrews clockwise. Detach disc rotors and quick-release skewers as well.
Place all small parts – pedals, rotors, skewers, and bolts – in a labeled bag. Attach the bag to the frame with zip ties to avoid misplacing anything. For bolts, screw them back into their original holes on the frame or hub to keep them secure.
If the wheels are off, insert brake pad spacers between the disc brake pads and secure them with a zip tie to prevent the pads from closing if the brake lever is accidentally pressed. Reinstall thru-axles in the fork or frame to keep them from getting lost.
Before disassembling, mark your saddle height and handlebar position with tape or a marker. This will make reassembly faster and ensure your bike feels just right when you’re ready to ride. Use zip ties or Velcro straps to secure the chain and any loose parts to the frame, preventing them from moving around and scratching the paint during transit.
sbb-itb-9d75ae1
Choosing the Right Transportation Method
Picking the right way to transport your bike depends on your vehicle type, how often you travel, and the distances you cover. The method you choose will determine the equipment you’ll need and any adjustments required.
Bike Racks
Start by selecting a bike rack that works with both your vehicle and your bike. Does your car have a trailer hitch (usually a 1.25" or 2" receiver), roof crossbars, or just a trunk? These details are key to finding the right fit. For heavier bikes, hitch-mounted platform racks are a popular choice – they load at waist height, so there’s no need to lift your bike overhead.
Roof racks, while offering rear access to your vehicle, require heavy lifting and can reduce fuel efficiency by about 27.3%. They might also create clearance issues for garages or low overhangs. Trunk-mounted racks are often the most budget-friendly option (around $100 to $300), but they provide less security and could scratch your car’s paint.
If you own an e-bike or a bike with a carbon frame, pay close attention to weight limits and ensure the rack doesn’t make direct contact with the frame. Standard hanging racks typically support up to 35 pounds per bike, while platform-style hitch racks can handle up to 60 pounds. For carbon frames, always opt for a platform rack that holds the bike by its wheels to avoid damage. Chris Ritchie, Director of Marketing at Thule, highlights a growing trend:
"We are noticing a significant shift in the way consumers are transporting their bikes in the past five years… at least in part due to the growth of the SUV market, as an SUV’s taller height makes it harder to load a bike onto its roof."
Before purchasing a rack, confirm your hitch size. Smaller cars often use a 1.25" receiver, while SUVs and trucks typically have a 2" receiver. If you need rear access to your vehicle, look for a tilt-away or swing-away hitch rack. And for e-bikes, removing the battery before loading can make the process safer and reduce the weight.
Packing for Air or Train Travel
Traveling by air or train requires a bit more preparation and disassembly. Gather tools like hex wrenches, a T25 Torx wrench for disc rotors, zip ties, foam padding, and packing tape. One crucial step is removing the rear derailleur to prevent it from bending or breaking during transit.
Disassemble key parts, including pedals (remember, the left pedal unscrews clockwise), handlebars, and the seatpost. Remove disc rotors and insert spacers into the brake calipers to protect them. Wrap each frame tube in foam or bubble wrap and secure it with zip ties to prevent metal parts from rubbing together. Use spacers in the front fork and rear dropouts to shield the frame from compression. Tires should be partially deflated to handle pressure changes in cargo holds while still protecting the rims.
Becks Timbers, Founder of Two Wheeled Wanderer, offers a straightforward tip:
"Take the rotors off. You’ll thank me."
Once packed, shake the box gently to check for any rattling. If something moves, add more padding. It’s also a good idea to include your contact information and shipping label inside the box in case the exterior label gets lost. For first-timers, packing usually takes 30 to 60 minutes. Most airlines allow bike boxes weighing between 50 and 70 pounds before extra fees apply.
Transporting Bikes in a Truck or SUV
If you’re not using a dedicated rack, you can secure your bike inside your vehicle. For trucks, fork-mount racks provide a firm hold, though you may need to remove the front wheel. Tailgate pads are a quicker option – just lower the tailgate, rest the bikes against the pad, and strap them down. In SUVs, folding down the rear seats can create enough space for your bike, though smaller models might require you to remove the front wheel.
Always place the bike with the chain and derailleur facing upward to protect these components. Use ratchet or cam straps to anchor the bike inside the vehicle, but avoid overtightening, especially with carbon frames. Cover sharp edges with padding to prevent damage.
To protect the frame, wrap it in foam, bubble wrap, or heavy blankets – this is especially important when transporting multiple bikes. Remove any loose accessories like water bottles, bike computers, lights, and pumps to prevent them from rattling free during the trip. For longer journeys, make occasional stops to check that all straps are still secure.
Securing Your Bike During Transportation
Once you’ve chosen your transportation method, it’s crucial to secure your bike properly to avoid movement or damage during the trip.
Straps and Tie-Downs
Ratchet straps are a great choice for keeping your bike in place, thanks to their precise tension control. Opt for retractable versions to save time and avoid dealing with excess material. A four-point system – two straps at the front and two at the rear – works best to limit movement. Be sure to attach the straps to sturdy areas of the bike frame, and consider using soft, extensible loops to protect the finish. Avoid overtightening, as too much tension can harm the frame or compress the hydraulic suspension. For smaller components like handlebars, pedals, or wheels, Velcro straps or zip ties are effective options.
Padding and Protection
To safeguard your bike’s frame and fork, wrap them in dense foam or pipe insulation, securing it with zip ties or Velcro straps. For delicate parts like the rear derailleur, add an extra layer of foam and ensure they are firmly secured to prevent damage. Fill any empty spaces in the box with crumpled paper or foam to stop the bike from shifting during transit. Additionally, insert plastic spacers between the fork dropouts and rear axles, and place brake pad spacers in the disc calipers to prevent compression. Before sealing the package, give it a shake – if you notice any movement, add more padding.
Final Checks Before and During Transit
Pre-Trip Inspection
Before heading out, take a moment to carefully inspect your bike and its mounting system. Tighten crank bolts, pedal bolts, rack bolts, and stem bolts, and check for any looseness in the headset, hub bearings, and bottom bracket. Once the bike is secured to the rack, give everything a good shake – both the bike and the rack itself. Listen closely for any rattling, which could signal something is loose. This small step reinforces earlier efforts to ensure your bike is secure for the journey. Also, make sure the dropper post is fully extended and the drivetrain is positioned to avoid any chainring damage.
When securing the bike, verify that straps are tight but not squeezing carbon frames. Double-check that no part of the bike is making contact with your vehicle or another bike. Greg Heil, Managing Editor at Singletracks, emphasizes the importance of this:
"If your bikes are touching anything at all… the vibrations of driving down the interstate for thousands of miles will wear straight through the metal or (gasp) carbon that’s in contact".
Lastly, ensure that your bike and rack don’t block any vehicle lights. These final checks are essential for a safe and hassle-free trip.
Monitoring During Transit
Once your setup is secure, stay alert throughout your journey. For longer trips, stop every 15–20 minutes during the first leg to re-tighten straps and check for any movement. Straps can stretch or settle as you drive, so it’s important to adjust them early on. Inspect all contact points for signs of rubbing or wear.
Keep an ear out for unusual sounds while driving. Rattling or clinking noises could mean that parts are shifting or lack proper padding. If you hear anything concerning, pull over immediately to investigate. Regular checks along the way ensure that your bike remains safe, mirroring the care taken before departure. When you stop, lock your bike to the rack and try to park in a well-lit area for added security.
Once you reach your destination, check your tire pressure and suspension sag. As noted, "changes in elevation and air temperature can affect suspension sag and tire pressures". If your bike has been exposed to rain, snow, or road salt during the trip, give it a thorough wash and apply lubricant right away to prevent corrosion.
Conclusion
Transporting your bike safely requires thoughtful preparation and attention to detail. Whether you’re heading to a nearby trail or shipping your bike across the country, following these steps can help protect both your bike and your vehicle. Cleaning your bike beforehand removes abrasive dirt that could cause damage. Properly disassembling, padding, and securely mounting your bike ensures critical components like derailleurs, rotors, and carbon frames stay intact.
Once your bike is prepped, choosing the right transport method becomes essential. Whether you opt for a rack or an interior solution, even a small investment can make a big difference in protecting your gear. For example, bike racks range from under $100 for basic trunk mounts to over $1,000 for premium hitch systems. As SoCal Bike Tours puts it:
"Transporting mountain bikes safely and efficiently is an investment in your riding experience. The right transport solution frees you to explore new trails without worry about damage to your bike or vehicle".
Taking extra precautions like using spacers, performing a shake test, and thoroughly drying your bike can prevent expensive repairs. Keep in mind that rust can start forming within 24 hours if your bike is packed while wet. Set aside 30–45 minutes for proper preparation. Whether you’re securing your bike to a rack, packing it for air travel, or loading it into a truck bed, following these steps ensures it arrives in perfect condition. Safe transport now keeps your bike ready for countless adventures ahead.
FAQs
How can I safely transport a bike without using a rack?
If you need to transport your bike but don’t have a rack, you can safely place it inside your vehicle. Whether you’re using the trunk, back seat, or the cargo area of an SUV, a few simple steps can help protect your bike and your car.
Start by removing the front wheel – or both wheels and the pedals if space is limited. To prevent scratches, wrap the bike frame in a blanket or some padding. When positioning the bike, make sure the chain side faces up to protect the derailleur from damage. Finally, secure the bike with straps or zip ties to keep it from shifting while you’re on the move. These precautions will help ensure your bike arrives at its destination safe and sound.
What’s the best way to protect my bike’s frame during long-distance travel?
To protect your bike’s frame during long-distance travel, start with a durable box or a hard-shell case that offers plenty of cushioning. Wrap the frame tubes using foam pipe insulation or protective padding to shield them from scratches and absorb shocks. If foam isn’t handy, bubble wrap or thick cardboard can work just as well. Use zip ties or Velcro straps to secure the padding and keep everything in place.
Disassemble the bike by removing the pedals, front wheel, and handlebars. Wrap these parts individually to prevent any damage during transit. Place the frame upright in the box, and fill any empty spaces with packing materials like crumpled paper, foam, or towels to stop the bike from shifting around. Once packed, seal the box tightly with heavy-duty tape and clearly label it as "FRAGILE."
Before you’re done, double-check the packing to make sure all padding is snug, nothing is pressing against the frame’s paint, and the box is sealed properly. These steps will help ensure your bike reaches its destination in great shape, whether you’re shipping it or taking it along on a road trip.
What should I do if my bike gets wet while being transported?
If your bike gets wet during transport, acting promptly can save you from costly repairs later. Begin by wiping down the frame, chain, and other parts with a clean, dry cloth to remove moisture. Once everything is dry, clean the chain thoroughly and apply fresh lubricant to keep it running smoothly. Don’t forget to inspect the brakes, tires, and quick-release levers for any signs of rust, looseness, or wear. A little care now ensures your bike stays in great shape and ready for your next ride.


