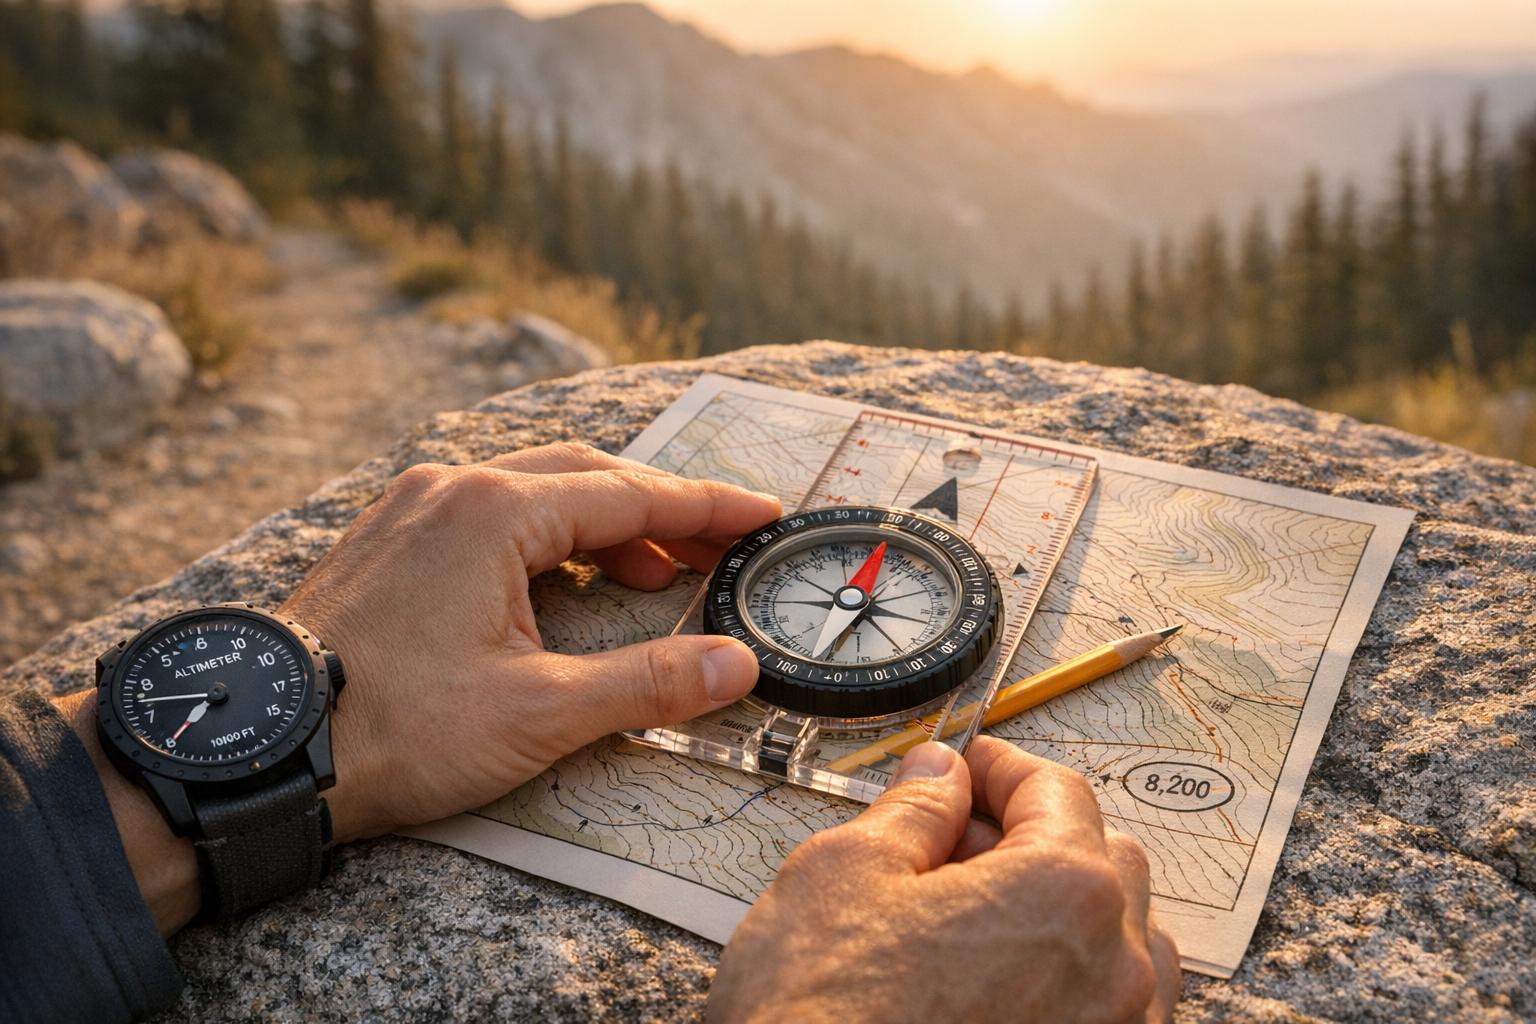
Want to navigate trails like a pro? Here’s what you need to know. A compass and altimeter can be lifesavers when GPS fails. These tools don’t rely on batteries or signals, making them reliable in remote areas. A compass keeps you on course, while an altimeter pinpoints your elevation on a map. Together, they help you avoid costly navigation mistakes and build confidence on the trail.
Key Takeaways:
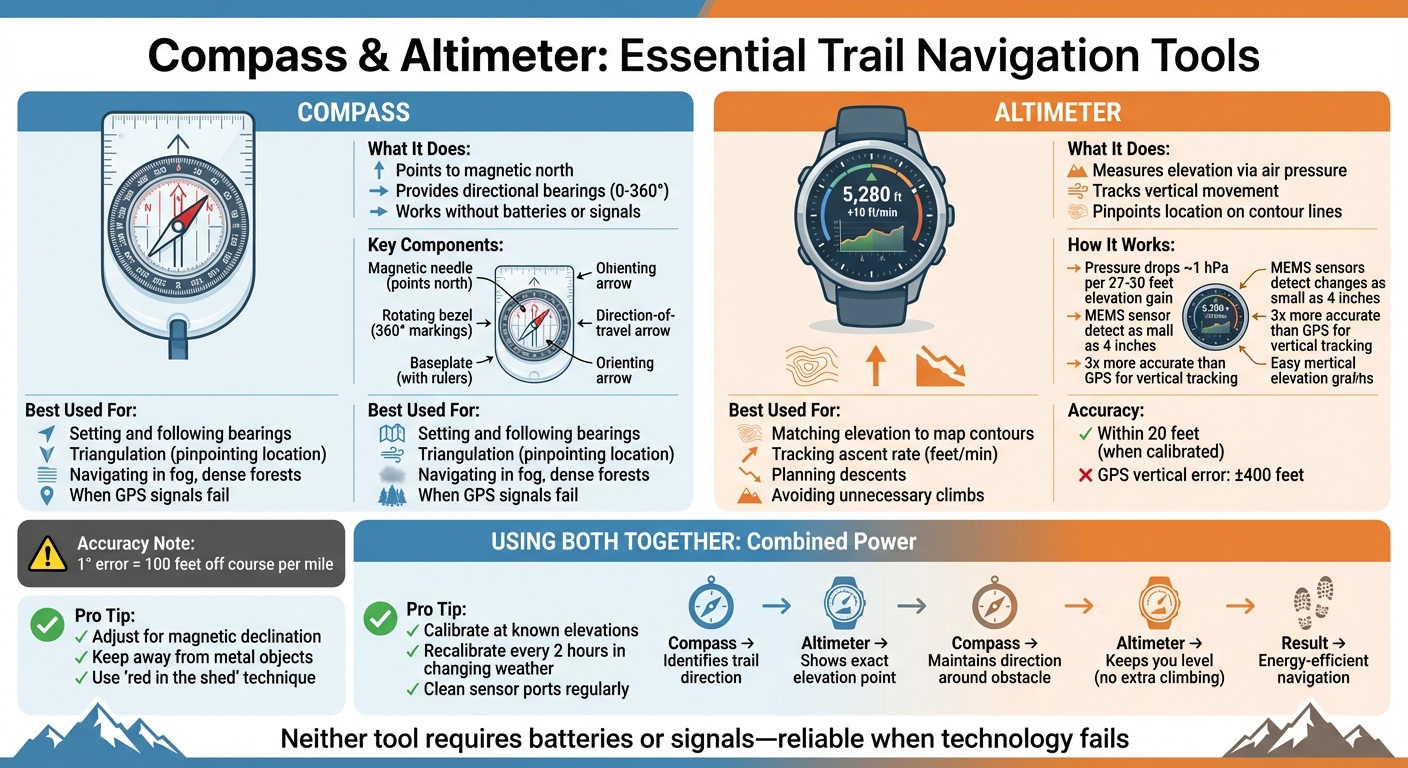
- Compass Basics: Learn how to use parts like the magnetic needle, rotating bezel, and orienting arrow to set bearings and stay on track.
- Altimeter Benefits: Track elevation changes to pinpoint your location, plan descents, or avoid unnecessary climbs.
- Using Both Tools: Combine compass bearings with elevation readings to navigate dense forests, fog, or unmarked terrain.
Quick Tips:
- Calibrate your altimeter at known elevations (e.g., trailheads or summits).
- Adjust your compass for magnetic declination to avoid errors.
- Keep your compass away from metal and electronics to prevent interference.
- Practice triangulation and map reading before heading into the backcountry.
By mastering these techniques, you’ll navigate confidently without relying solely on technology. Let’s dive into how these tools work and how to use them effectively.
Compass vs Altimeter: Navigation Tools Comparison for Trail Navigation
Compass Basics for Mountain Biking
Parts of a Compass and Their Functions
A baseplate compass is a simple yet powerful tool for navigation, and understanding its parts is key to using it effectively. The baseplate is a clear, flat piece of plastic that lets you see your map while also providing rulers along its edges for measuring distances. The magnetic needle, a magnetized strip of metal, pivots freely to align with Earth’s magnetic field, with its red tip always pointing to magnetic north.
The rotating bezel, or azimuth ring, is marked with 360° and can be turned to set and lock in your desired bearing. Inside the compass housing, you’ll find the orienting arrow (sometimes nicknamed "the shed"), which helps align the magnetic needle. When the red tip of the needle sits neatly inside this arrow – commonly called "red in the shed" – your compass is properly oriented. The direction-of-travel (DOT) arrow shows you the exact direction to move, while the index line is where you read your numerical bearing on the bezel.
| Compass Part | Primary Function in Navigation |
|---|---|
| Baseplate | Provides a flat surface for map work and includes rulers for measuring distances. |
| Magnetic Needle | Aligns with Earth’s magnetic field to indicate magnetic north. |
| Rotating Bezel | Lets you set and maintain a specific bearing. |
| Orienting Arrow | Aligns the needle with your chosen bearing ("red in the shed"). |
| DOT Arrow | Points in the direction you should travel. |
| Index Line | Displays the numerical bearing on the bezel. |
How to Use a Compass on Trails
Using a compass on the trails starts with your map. Place the compass’s edge along the line connecting your current location to your destination. Then, rotate the bezel until the orienting lines inside the housing align with the map’s north-south grid. The number at the index line is your bearing.
To follow this bearing, hold the compass flat and level so the needle can move freely. Turn your body until the red needle lines up with the orienting arrow ("red in the shed"). Once aligned, the DOT arrow will point toward your destination.
Pro tip: Before you start riding, pick a visible landmark along your bearing. Once you reach it, check your compass again to stay on course.
Be mindful of metal objects, as they can interfere with the magnetic needle. Items like bike handlebars, multi-tools, belt buckles, or even electronic devices can cause deflection. Just a one-degree error can lead you 100 feet off course over a single mile, so accuracy matters.
When and Where to Use a Compass
While a compass is useful for everyday navigation, it becomes essential when conditions are tough or technology fails. For example, dense forests can block GPS signals, and heavy fog, rain, or snow can obscure landmarks. In these moments, your compass becomes your most reliable guide.
"Your smartphone might die, your GPS unit may act up, but that compass of yours – as long as you keep the magnetic needle away from interfering metal – points north through thick and thin."
– Ethan Shaw, Author, Outdoors Generations
If you wander off the trail or need to navigate through unmarked terrain, your compass can prevent you from drifting off course. One technique to stay oriented is "aiming off." By intentionally veering slightly to one side of your target, you ensure that when you hit a familiar feature like a road or trail, you’ll know which direction to turn.
Another lifesaving method is triangulation, which helps pinpoint your location when you’re completely lost. Take bearings from two or three visible landmarks, draw those lines on your map, and where they intersect is where you are. This technique can be a game-changer in unfamiliar or remote areas.
sbb-itb-9d75ae1
Altimeter Basics: Elevation-Based Navigation
How Altimeters Work
Altimeters measure elevation by translating changes in atmospheric pressure into altitude readings. Near sea level, pressure typically decreases by about 1 hPa for every 27–30 feet of elevation gain.
Traditional altimeters use aneroid capsules – sealed chambers calibrated to standard atmospheric pressure. These capsules expand as external pressure drops when climbing and contract when pressure rises during descents. Modern devices, however, have shifted to MEMS-based technology, which uses silicon diaphragms that alter electrical resistance or capacitance when deformed by air pressure. This advancement provides greater accuracy and reliability.
The conversion from pressure to elevation relies on the International Standard Atmosphere (ISA) model, which assumes sea-level pressure at 1013.25 hPa and a temperature of 15°C. High-end MEMS barometers can detect elevation changes as small as 4 inches (10 centimeters), making them much more accurate than GPS for tracking vertical movement. In comparison, GPS vertical accuracy is typically 1.5 to 3 times less precise than horizontal readings, with errors often reaching ±400 feet.
"The altimeter isn’t lying to you – it’s telling you the truth about a chaotic atmosphere that refuses to behave like the textbook model." – Alfredo Ramses, The Hiking Tribe
Calibrating Your Altimeter
Since weather changes can affect pressure readings, regular calibration is essential for accurate measurements. Before starting your hike or ride, check the trailhead elevation using a topographic map or a trail sign, and manually set this value on your altimeter. Along the way, recalibrate at known landmarks like summits, trail junctions, or other marked elevations. In stable weather conditions, calibrating once a day is usually sufficient, but during rapidly changing weather, recalibrate every two hours.
Even minor pressure changes can skew readings. For instance, a 4 hPa drop – common before a storm – can make your altimeter falsely register a 120-foot ascent, even if you’re stationary. If your device shows highly inaccurate readings (like -7,000 feet), clean the sensor port by soaking it in warm water with a mild detergent for 10 minutes. Afterward, let the device adjust for 15–30 minutes if it was exposed to a warm environment, like inside a heated car.
With proper calibration, your altimeter becomes a reliable companion for navigating and planning your trail adventures.
Using Altimeters for Trail Planning
When used correctly, altimeters are invaluable for navigation and estimating effort during outdoor activities. By matching your current elevation to contour lines on a topographic map, you can pinpoint your location. For example, if your altimeter shows 6,200 feet and the map has only one contour line at that height, you can confidently identify your position.
Tracking your ascent rate (measured in feet or meters per minute) helps you estimate arrival times for summits or trail junctions, allowing you to adjust your pace as needed. When descending toward a feature like a stream crossing, aim for an elevation slightly above it to determine your turning point. Additionally, you can use your altimeter to maintain a consistent elevation while navigating around obstacles or steep terrain, saving energy that would otherwise be spent on unnecessary climbs and descents.
Using Compass and Altimeter Together for Trail Navigation
Reading Topographic Maps with Compass and Altimeter
Using a compass and altimeter together can be a game-changer for locating yourself on a trail, especially when landmarks are hidden. Here’s how it works: your altimeter tells you your exact elevation, while your compass helps you confirm your direction. If you’re on a mapped trail, simply match your current elevation to the corresponding contour line on your topographic map and find where it intersects the trail path.
For trickier situations, try triangulation. If only one landmark is visible, take a compass bearing to it and draw that line on your map. Your location will be where that bearing line crosses your elevation contour. To refine this, check the slope’s direction (its aspect) and combine it with your elevation reading for an even more precise location.
"My altimeter has completely transformed my hiking experience… It complements a compass and map that much…and if you pay attention, you can know where you are pretty much all the time." – Philip Werner, Founder, SectionHiker
The altimeter also acts as a warning system. If your elevation reading doesn’t match the expected contour (e.g., you’re aiming for 2,680 feet but read 2,550 feet), it’s a sign to adjust your path. This ensures you stay on track and avoid unnecessary detours.
Next, let’s dive into real-world examples of how these tools work together on the trail.
Practical Examples: Using Both Tools on Trails
In September 2014, Philip Werner showcased this method on the Black Angel Trail near Carter Dome. By reading 3,200 feet on his altimeter and matching that elevation to the trail on his map, he pinpointed his location – even with no visible landmarks. This technique is a lifesaver in dense forests where GPS signals falter and visual cues are scarce.
Another example is contouring around obstacles. On Sable Mountain, hikers stick to a 3,200-foot contour line while navigating the west face. This keeps them clear of tough summit blowdowns, while the compass ensures they stay on course toward the southern end. Similarly, when traveling between peaks toward a saddle at 2,680 feet, the altimeter quickly flags any lateral drift if the reading drops to 2,550 feet. This immediate feedback allows for quick corrections. Together, the compass and altimeter provide a level of accuracy and safety that neither tool can achieve alone.
| Navigation Task | Compass Role | Altimeter Role |
|---|---|---|
| Pinpointing Location | Identifies the trail or ridge being followed | Shows the exact point along the trail via elevation |
| Traversing to a Saddle | Gives the directional heading (bearing) to the target | Confirms you’re staying at the saddle’s elevation |
| Bypassing Obstacles | Keeps the general direction around the obstacle | Ensures you stay level to avoid extra climbing |
Recommended Compass and Altimeter Models for Mountain Bikers
Features to Look For in Navigation Tools
When it comes to navigation tools for mountain biking, durability is non-negotiable. These tools need to handle constant vibrations, mud splashes, and the occasional impact. Scratch-resistant faces – like those made from sapphire glass – and shock-resistant cases are key features. A good example is the Casio G-Shock series, which is built to endure rough trail conditions.
Another must-have for compasses is adjustable declination. This feature helps you account for the difference between magnetic north and true north, which varies depending on your location. Models with tool-less adjustments, such as a pinch mechanism, make this process quicker and easier [37,38].
For altimeters, the choice between barometric and GPS models depends on your preferences. Barometric altimeters, when calibrated correctly, can be accurate within 20 feet but require regular calibration. On the other hand, GPS altimeters don’t need weather-related recalibration but tend to drain batteries faster.
Physical buttons are another practical feature, especially for muddy or gloved conditions. For instance, the Garmin Edge MTB’s button design performs better than touchscreens when the trail gets messy. If you prefer a wrist-based option, consider ABC (altimeter, barometer, compass) watches like the Garmin Instinct 3 Solar. Priced around $400, it offers quick navigation without requiring a stop.
When it comes to compasses, liquid-filled housings stabilize the needle to counteract vibrations, and rare earth magnets – like those in the Brunton TruArc 15 – reduce interference from metal bike frames and electronics. Battery life is also crucial. The Coros Dura, for example, provides up to 120 hours of GPS tracking for $249, with solar charging adding extra runtime when exposed to direct sunlight [32,35].
These factors ensure your navigation tools are reliable, accurate, and ready to tackle the challenges of mountain biking.
Top Compass and Altimeter Recommendations
Here are some standout models designed with mountain bikers in mind:
The Garmin Edge MTB ($399.99) is a trailblazer as the first bike computer specifically made for mountain bikers. With 5Hz GPS recording – tracking your position five times per second – and a lightweight 58-gram build, it’s tough enough to handle mud and dust. Its button-only design ensures smooth operation in challenging conditions.
"The brand behind some of the world’s most popular bike computers has finally released a computer designed specifically for mountain biking." – Deven McCoy, Editor at BikeMag
For those who prioritize screen clarity, the Garmin Edge 1050 ($700) offers a brilliant 1,000-nit LCD display that’s easy to read even in dappled forest light.
"the best computer Garmin has ever made for the rider who actually looks at their screen" – Robb Sutton from Bike198
However, its 161-gram weight and larger size may not suit smaller cockpit setups with 35–40mm stems.
If you’re looking for a budget-friendly option, the Coros Dura ($249) is a great choice. It’s a solar-powered GPS unit with a battery life of up to 120 hours. Its simple "Digital Dial" interface is perfect for multi-day bikepacking adventures. For riders who prefer wrist-based navigation, the Suunto Core Alpine Edition offers reliable altimeter, barometer, and compass functions, while the Garmin Instinct 3 Solar combines ruggedness and solar charging for extended trail rides.
For traditionalists, the Suunto M-3 NH ($65) is a reliable compass with easy declination adjustment and glow-in-the-dark markings for low-light conditions. Another excellent option is the Brunton TruArc 15 ($80), which features a rare earth magnet and a built-in inclinometer to measure slope steepness – perfect for gauging climbs or descents. Both models provide dependable, battery-free navigation tools for any adventure.
Trail Navigation Tips and Common Mistakes
Practical Navigation Tips for Mountain Bikers
Regularly calibrate your altimeter at known elevations, especially under changing weather conditions. It’s a good idea to recalibrate at trailheads, marked junctions, or summits – anywhere you know the exact elevation.
When using a compass, keep it away from metal and electronics to ensure accuracy. Hold it several feet from these items while taking a bearing. After determining your direction, pick a clear landmark, like a distinct tree or rock, ride toward it, and then recheck your compass. This method is much safer than trying to navigate technical terrain while staring at your compass.
Take advantage of "handrails" and "backstops" to stay oriented. Handrails are linear features such as ridgelines or streams that run parallel to your route, helping you stay on track. Backstops are distinct markers – like a road, a steep drop, or a stream at a specific elevation – that let you know you’ve gone too far.
Keep your gear clean and in good condition. Sweat, sunscreen, and mud can block the barometer port on altimeter watches, leading to inaccurate readings. To avoid this, soak your watch in warm water with mild detergent to clear the sensor. Also, allow your altimeter 15–30 minutes to adjust to outdoor temperatures after leaving a warm vehicle.
These tips are essential for effective navigation, but knowing common mistakes and how to avoid them is equally important for a safe ride.
Common Mistakes and How to Avoid Them
Building on the tips above, here are some frequent errors that can throw off your navigation – and how to sidestep them.
Adjust for local magnetic declination to avoid major course errors. Magnetic declination – the difference between true north and magnetic north – varies widely across the U.S. It can range from 20° east in Washington to 20° west in Maine, so be sure to account for it.
Keep your compass level and avoid friction that can misalign the needle. Relying solely on digital tools is also risky. Batteries can fail in cold weather, and GPS signals often drop out in deep canyons[3,47].
"A compass is the most reliable navigation method – but it’s no good unless you know your way around it" – Leah Qiu from Backpacker Magazine
Extreme weather conditions can cause altimeter drift, so adjust for pressure and temperature changes as needed. For example, in very cold conditions, an altimeter may overestimate your elevation by about 4 feet per 1,000 feet for every 1°C deviation from standard temperature. When camping overnight, switch your altimeter watch to "Barometer" mode to stop weather changes from being logged as elevation shifts.
Practice using your tools before you need them. Test them out in a safe location like a local park, where the stakes are low if you make a mistake[10,5].
"Staying found is far easier than finding yourself after you’re lost" – REI
Lastly, always orient your map to match the actual terrain. This habit makes it much easier to identify landmarks and avoid costly navigation errors.
Learn Map & Compass with Andrew Skurka, Part 2: Find and transfer bearings in the field and on a map
Conclusion
Learning to use a compass and altimeter effectively is a game-changer for anyone venturing into the wilderness. This guide has walked through the basics of compass use, altimeter calibration, and how combining these tools can elevate your navigation accuracy. While GPS devices and smartphones are undeniably convenient, they’re not foolproof – batteries can die, and signals can vanish. A compass, powered only by Earth’s magnetic field, and a well-calibrated altimeter can step in when technology fails. Together, they offer a level of reliability and precision that even modern gadgets sometimes can’t match [6,20].
"Staying found is far easier than finding yourself after you’re lost." – Lindsay McIntosh-Tolle, Outdoor Instructor
Mastering techniques like adjusting for magnetic declination and fine-tuning your altimeter takes practice, but the payoff is huge. Start on familiar trails where the stakes are low, testing your compass bearings against visible landmarks and confirming altimeter readings at known elevations. These small steps help build the muscle memory and confidence needed when conditions aren’t in your favor.
Even minor errors, like a one-degree miscalculation, can lead to being 100 feet off course per mile [6,2]. In the backcountry, small mistakes can snowball quickly. But with consistent practice, these tools become second nature, transforming navigation from an intimidating task into a skill that empowers exploration.
Knowing you can confidently navigate without relying on technology opens the door to safer and more adventurous journeys. These skills aren’t just practical – they enhance your confidence and make every outing more enjoyable. Start practicing today, and you’ll soon find that mastering the art of staying found is one of the most rewarding skills you can develop.
FAQs
What map scale works best with a baseplate compass?
A map with a scale of 1:24,000 is perfect for detailed navigation when using a baseplate compass. It strikes the ideal balance between providing enough detail and remaining practical for outdoor adventures like hiking or mountain biking.
How can I reduce altimeter errors during fast-changing weather?
To keep your altimeter accurate in shifting weather conditions, make it a habit to recalibrate frequently. Set it to a known altitude, like a marked point or summit, especially every few hours or whenever the weather changes drastically. Barometric pressure fluctuations can throw off readings, so regular adjustments will help maintain dependable accuracy throughout your ride.
What’s a quick way to re-check my bearing while riding?
To double-check your direction while riding, grab your compass for a quick confirmation. Keep it flat, align the needle with the orienting arrow, and make sure the direction-of-travel arrow is aimed at your intended path. This quick step ensures you’re staying on track without needing to pause for a more detailed navigation check.


