
A dropped chain on a 1x drivetrain can ruin your ride. The problem arises because 1x systems lack a front derailleur to stabilize the chain, making them more prone to issues during rough rides or extreme gear angles. Here’s how to prevent and fix chain drops:
- Identify the cause: Common culprits include worn chains or chainrings, poor derailleur alignment, clutch failure, or improper chain installation.
- Fixes: Use a narrow-wide chainring, adjust derailleur settings, replace worn components, or install a chain guide for added security.
- Prevention: Regularly inspect, clean, and lubricate your drivetrain. Check for chain wear with tools like the Park Tool CC-3.2 ($12.95).
These steps ensure smoother rides and fewer interruptions. Keep your drivetrain in top shape to avoid chain-related frustrations.
How to easily fix chain drop on 1X Conversion. Starring a Fat Bar Road Bike Schwinn 754 PDG
Identifying the Cause of Chain Drops
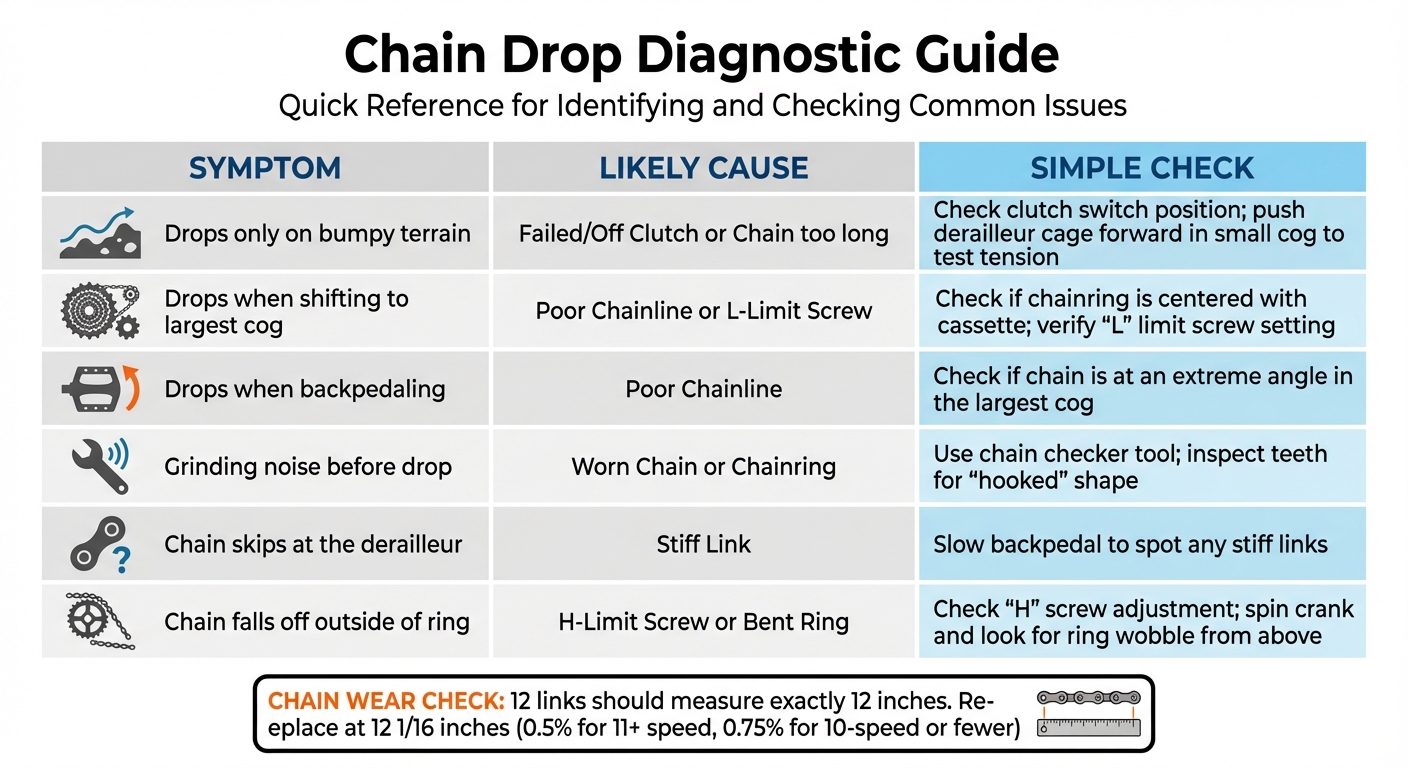
1x Drivetrain Chain Drop Diagnostic Guide: Symptoms, Causes, and Quick Checks
Frequent Causes of Chain Drops on 1x Systems
Chain drops can be frustrating, and they often come down to a few common culprits. Here’s a closer look at what might be causing the issue:
Worn components are a primary reason. When a chain stretches beyond 0.5% (for 11-speed or higher) or 0.75% (for 10-speed or fewer), it loses its ability to grip the chainring teeth properly. Similarly, chainring teeth that develop a "hooked" or shark-tooth shape can’t hold the chain securely. As Jim Langley, a Tech Columnist, puts it:
"Since the chainrings need to have a good grip on the links, when they’re too loose from wear and tear, the ring can’t hang on as well and the chain can fly off".
Mechanical misalignment is another frequent cause. A bent derailleur hanger can throw off the alignment between the rear derailleur pulley and the cassette. A bent chainring can wobble as you pedal, pushing the chain off-track. Even a loose bottom bracket can cause side-to-side movement in the crankset, which amplifies instability at the chainring teeth.
Tension issues often arise on rough terrain. If the rear derailleur clutch fails or disengages, the chain can bounce excessively on bumps. A chain that’s too long won’t have enough tension to stay seated in smaller cogs, while a chain that’s too short may pull itself off when shifting to the largest cog.
Installation errors can lead to immediate chain drops. For example, improper chain installation or misalignment with narrow-wide chainrings can cause problems right away. Narrow-wide chainrings are designed with alternating thick and thin teeth to match the chain’s profile. If the chain is installed "out of phase", it won’t seat correctly.
To quickly identify the issue, refer to the diagnostic table below.
Using a Diagnostic Table to Find the Problem
This table provides a quick way to diagnose chain drop issues and suggests simple checks to confirm the cause:
| Symptom | Likely Cause | Simple Check |
|---|---|---|
| Drops only on bumpy terrain | Failed/Off Clutch or Chain too long | Check clutch switch position; push derailleur cage forward in small cog to test tension |
| Drops when shifting to largest cog | Poor Chainline or L-Limit Screw | Check if chainring is centered with cassette; verify "L" limit screw setting |
| Drops when backpedaling | Poor Chainline | Check if chain is at an extreme angle in the largest cog |
| Grinding noise before drop | Worn Chain or Chainring | Use chain checker tool; inspect teeth for "hooked" shape |
| Chain skips at the derailleur | Stiff Link | Slow backpedal to spot any stiff links |
| Chain falls off outside of ring | H-Limit Screw or Bent Ring | Check "H" screw adjustment; spin crank and look for ring wobble from above |
To check chain wear, you can use tools like the Park Tool CC-3.2 Chain Checker ($12.95) or the professional-grade CC-2 ($27.95). If you don’t have a tool, a standard ruler works too: measure 12 links. If they span 12 1/16 inches instead of exactly 12 inches, it’s time to replace the chain.
How to Fix and Prevent Chain Drops
Solution 1: Check Chain Installation
One of the most common yet often overlooked issues is improper chain installation. To check the chain length, use the "Big-Big" method: wrap the chain around the largest cassette cog and chainring (skipping the derailleur), pull it tight, and add links based on your drivetrain type – 2 links for standard 1x systems, 4 links for SRAM Eagle 12-speed or Shimano 12-speed hardtails, and 6 links for Shimano 12-speed full-suspension setups.
Pay close attention to chain orientation. For Shimano chains, the engraved logos should face outward, and quick links often have arrows that must point in the direction of forward travel. As Bruce Lin from The Pro’s Closet explains:
"Many rear derailleurs have a tab that can rub the chain if it’s installed incorrectly. Make sure your chain is routed on the correct side of this tab so it doesn’t rub".
For narrow-wide chainrings, alignment is key. The wide teeth must fit into the chain’s outer (wide) links, while the narrow teeth should align with the inner links. Misalignment here can lead to immediate chain drops. Once the chain is properly installed, secure the quick link by rotating the cranks until the link is on top, holding the rear brake, and applying firm downward pressure to lock it in place. After confirming the chain is installed correctly, move on to inspecting for worn components.
Solution 2: Replace Worn Components
Chains wear out faster than many riders expect. For drivetrains with 11 speeds or more, replace the chain once it reaches 0.5% elongation; for 10-speed or fewer systems, replace it at 0.75%. A new chain should measure exactly 12 inches across 12 links, and if it stretches to 12 1/16 inches, it’s time for a replacement.
Inspect the chainring and cassette teeth for signs of wear, such as sharp edges or a "shark-fin" shape. Check for chainring wobble by spinning the crank and observing any side-to-side movement – this could indicate loose bolts or a bent ring. Additionally, test the bottom bracket by pushing the crankarms sideways; any play suggests it may need attention.
Don’t forget to examine the derailleur clutch. Singletracks highlights:
"A worn-out derailleur clutch will allow the chain to flop and bounce until it eventually loses the teeth".
If your chain frequently drops on rough terrain, the clutch mechanism may be fatigued and require adjustment or replacement. Once worn components are addressed, upgrading to a narrow-wide chainring can further improve chain retention.
Solution 3: Switch to a Narrow-Wide Chainring
Narrow-wide chainrings have revolutionized 1x drivetrains by using alternating thick and thin tooth profiles to match the chain’s inner and outer links. The wide teeth fit snugly into the chain’s outer links, while the narrow teeth secure the inner links, reducing lateral movement. Many of these chainrings also feature taller teeth, which provide deeper engagement to help keep the chain in place.
This design often eliminates the need for additional chain retention devices. As Wolf Tooth Components explains:
"A properly designed Wide/Narrow chainring… allows riders to run a chainring with no chain retention device for all but the roughest DH/Enduro racing".
However, compatibility is essential. Some Shimano 12-speed chains (Hyperglide+) require specific tooth profiles and may not work with standard narrow-wide chainrings. When installing, check for alignment marks or timing indicators to ensure the thick teeth align with the chain’s outer links. For optimal performance, modern trail bikes typically require chainlines between 48mm and 50mm, while Boost-spaced bikes need 51mm to 53mm. Additionally, make sure your derailleur’s clutch is functioning correctly for maximum chain control.
Solution 4: Install a Clutch Rear Derailleur
Clutch derailleurs are a game-changer for chain retention, as they maintain consistent tension by adding friction at the derailleur’s pivot point. This reduces chain slap and keeps the chain securely in place, even on rough trails.
Most clutch derailleurs have a switch on the body to engage the clutch, usually marked "ON" or indicated by a lock symbol. Singletracks notes:
"While we are right to praise the invention of narrow-wide chainrings for their retention qualities, clutch derailleurs deserve just as many accolades. They keep our drivetrain quiet and intact, and without them that fancy chainring would fail more frequently".
To check the clutch, shift to the smallest cog and push the derailleur cage forward. You should feel noticeable resistance. If the cage moves too freely, the clutch may be worn or disengaged. For the most challenging terrain, adding a chain guide can provide an extra layer of security.
Solution 5: Add a Chain Guide
For aggressive riding conditions, a chain guide offers additional protection by creating a physical barrier to prevent derailment. While narrow-wide chainrings and clutch derailleurs are sufficient for most trail riding, enduro racers and downhill riders often use a top-only chain guide for added security. These guides are generally easy to install and provide peace of mind on rough trails.
sbb-itb-9d75ae1
Maintenance Tips to Keep Your Chain in Place
Regular Inspection and Cleaning
Keeping your chain in top condition starts with regular inspection, cleaning, and lubrication. Check your chain for wear using a chain checker tool or by measuring 12 links with a ruler. A new chain measures exactly 12 inches from pin to pin. If it stretches to 12 1/16 inches, it’s time to replace it. Ignoring this can lead to poor performance and eventual chain drops.
Pay attention to your cassette cogs and chainring teeth. If they start to look hooked or take on a "shark-tooth" shape, it’s a clear sign of excessive wear that could cause your chain to slip off. Another simple check: backpedal slowly and watch the chain as it moves through the derailleur jockey wheels. If you notice links jumping or clicking, you may have stiff links that need to be loosened manually.
Clean your drivetrain regularly. In dry conditions, a few cleanings per year might suffice, but if you’re using wet lubricants or riding in dirty or wet environments, you’ll need to clean it more often. Always start by cleaning the rear cogs and derailleur pulleys before tackling the chain – this prevents re-contaminating the chain immediately after cleaning. If you hear squeaking or grinding noises while riding, that’s a clear sign your chain needs immediate attention. After cleaning, proper lubrication will help extend the life of your chain.
Proper Chain Lubrication
Once your chain is clean and inspected, lubrication is the next step to ensure smooth performance. Focus on the inner side of the chain, where it makes contact with the gears. Apply one drop of lubricant to each roller as you backpedal, then let it sit for several hours or overnight so the lubricant can properly set before your next ride.
Trevor Raab, Gear Editor at Bicycling, emphasizes:
"If your chain sounds squeaky or grinds, you’re not only wasting energy; you’re also costing yourself money. A properly lubricated, clean, and quiet drivetrain lasts longer".
Choose your lubricant based on riding conditions. Use a dry lube in dusty or sandy environments, applying it every two to three rides. In wet or muddy conditions, opt for a wet lube and reapply before each ride. After applying, always wipe off any excess lubricant with a clean rag to prevent dirt from sticking to the chain.
One important note: avoid using WD-40 as a chain lubricant. While it’s a great solvent, it strips away existing grease and can lead to rapid chain wear.
Conclusion
Chain drops on 1x drivetrains are avoidable with the right components and consistent maintenance. A narrow-wide chainring paired with a clutch rear derailleur works well for most riders, while a chain guide provides extra security on rough trails.
As Mike Levy puts it:
"Some people, especially those who are pushing hard and going fast over rough terrain, are just always going to need some sort of chain guide".
Keeping up with regular wear checks is equally important. A tool like the Park Tool CC-2 (priced at $27.95) can help you monitor chain stretch, catching it at the 0.5% mark before it damages your cassette or chainring. Look out for worn chainring teeth – hooked or "shark-tooth" shapes – and ensure your clutch derailleur is engaged and working correctly. These steps are key to maintaining a reliable drivetrain.
If your chain does drop, stop pedaling immediately to avoid damaging your frame. Take time to identify the cause – whether it’s a bent hanger, worn-out parts, or an improperly sized chain – and fix the underlying issue instead of just re-seating the chain.
FAQs
How can I tell if my bike chain is worn out and needs to be replaced?
To determine if your bike chain is worn, you can measure its stretch using either a ruler or a chain-checker tool. For the ruler method, align it along the chain. If the chain measures 1/16 inch longer than 12 inches, it’s a clear indicator of wear. If you’re using a chain-checker, check both sides: if the 0.5% wear side fits, your chain is still in good shape. However, if the 0.75% side fits, it’s time to replace the chain.
You should also inspect the chain for visible signs of wear, such as excessive slack, side-to-side movement, rust, or grime buildup. Spotting any of these issues early and replacing the chain can help protect your drivetrain and ensure your bike keeps running smoothly.
What are the advantages of using a narrow-wide chainring on a 1x drivetrain?
A narrow-wide chainring features alternating narrow and wide teeth, perfectly aligned with the shape of your chain links. This clever design helps hold the chain firmly in place, minimizing the risk of it slipping off while riding. With improved chain retention, your 1x drivetrain delivers smoother and more reliable performance, even on bumpy or uneven trails.
For mountain bikers tackling tough terrain, this straightforward upgrade can significantly enhance the dependability of your setup.
What can I do to stop my chain from falling off on rough trails?
To keep your chain from dropping on rugged trails, regular maintenance of your drivetrain is key. Inspect components like the chain, chainring, and cassette, and replace them if they show signs of wear – this helps everything run smoothly. Double-check your chain length and tension; a chain that’s too loose or too tight can lead to problems. If your bike is equipped with a clutch derailleur, make sure it’s activated to keep the chain steady. You might also want to upgrade to a narrow-wide chainring, which provides extra grip on the chain. With these precautions, you’ll be ready to tackle bumpy trails with confidence.


