
When deciding between rim brakes and disc brakes for your bike, the choice depends on your riding style, terrain, and budget. Here’s a quick breakdown:
- Rim Brakes: Lightweight, affordable, and easy to maintain. Best for casual riders in dry conditions or those prioritizing a lighter bike. However, they lose effectiveness in wet or muddy conditions and can wear down rims over time.
- Disc Brakes: Offer better stopping power, control, and performance in all weather. Hydraulic systems provide smoother braking with less effort but require more maintenance and cost more upfront. Mechanical disc brakes are simpler but less powerful than hydraulic ones.
Quick Comparison
| Feature | Rim Brakes | Disc Brakes |
|---|---|---|
| Stopping Power | Adequate in dry conditions | Stronger, especially in wet/muddy terrain |
| Weight | Lighter (250–450g less) | Heavier due to rotors and calipers |
| Maintenance | Simple; inexpensive | Hydraulic: more complex; annual bleeding required |
| Performance in Wet | Reduced braking efficiency | Consistent performance |
| Cost | Cheaper upfront and to maintain | Higher upfront and maintenance costs |
| Durability | Wears down rims over time | Preserves rims; rotors are replaceable |
Key Takeaway: Choose rim brakes for simplicity and affordability in dry conditions. Opt for disc brakes if you need reliable performance in varied or challenging terrains.
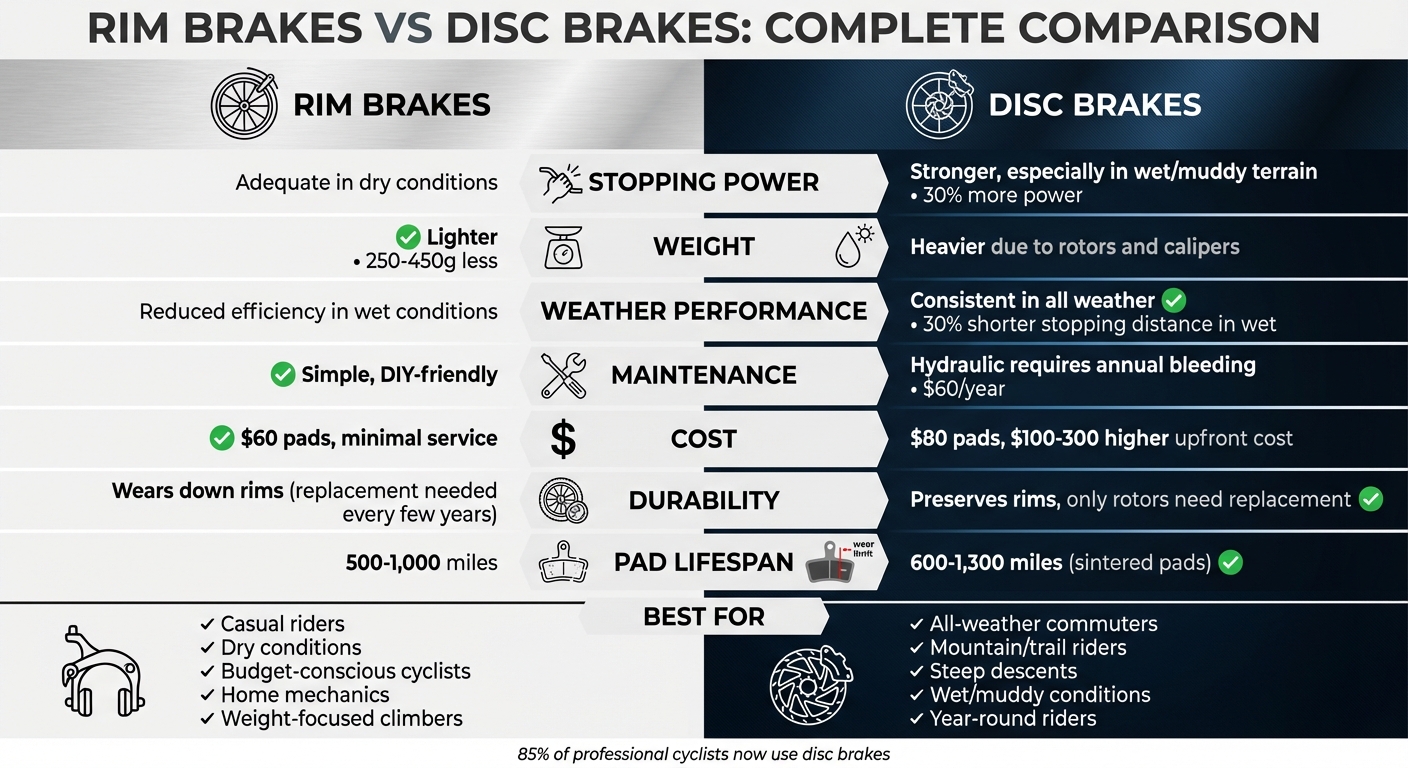
Rim Brakes vs Disc Brakes Comparison Chart for Cyclists
How Rim Brakes Work
Design and Mechanics
Rim brakes rely on a straightforward mechanical process: two rubber brake pads press against the wheel’s rim to create friction. When you pull the brake lever, it tightens a steel cable running through the housing to the brake caliper. This action forces the pads to clamp onto both sides of the rim, slowing or stopping the bike.
This friction converts the bike’s kinetic energy into heat, which reduces speed. As bicycle expert Sheldon Brown explains:
"Because a rim brake operates at nearly the full diameter of the wheel, the clamping force for a given amount of braking is much lighter than for a hub brake".
In this system, the rim essentially functions as the brake disk.
For optimal performance, the rim must be clean, evenly wide, and properly aligned. A bent or warped rim can cause the pads to rub even when the brakes aren’t engaged, leading to unnecessary drag and reduced efficiency. Modern aluminum rims often include a small pit in the sidewall to indicate wear – if the pit disappears, it means the rim has thinned dangerously due to friction and should be replaced.
Now, let’s take a closer look at the different types of rim brakes designed for various riding needs.
Types of Rim Brakes
Rim brakes come in several designs, each tailored to specific bike types and riding styles:
| Brake Type | Mounting Style | Common Application | Key Characteristic |
|---|---|---|---|
| Caliper | Single center bolt | Road bikes | Compact, aerodynamic, and self-contained |
| Cantilever | Dual frame bosses | Cyclocross, Touring | Great for mud clearance and wide tires; uses a straddle cable |
| V-Brake | Dual frame bosses | Mountain bikes, Hybrids | High stopping power with longer arms for better leverage |
| U-Brake | Dual frame bosses | BMX, Vintage MTB | Sturdy design, mounted above the rim |
Caliper brakes, which attach via a single bolt above the tire, are commonly found on road bikes due to their lightweight, streamlined design. However, they offer limited clearance for wider tires. Cantilever brakes, on the other hand, feature two arms mounted on separate bosses, providing excellent clearance for muddy conditions and larger tires. V-brakes (also called linear-pull brakes) are a variation of cantilever brakes that deliver more leverage and stopping power, making them a favorite for mountain bikes and hybrids.
For road bikes, modern short-reach caliper brakes typically provide a reach range of 39–49 mm from the mounting bolt to the brake shoe center. Regardless of the brake type, it’s essential to replace brake pads when their thickness drops below 1.5 mm.
sbb-itb-9d75ae1
How Disc Brakes Work
Design and Mechanics
Disc brakes work by converting kinetic energy into heat, but unlike rim brakes, they apply this force to a rotor mounted on the hub. Instead of braking at the wheel’s rim, the action takes place on a metal rotor that’s bolted directly to the hub. A caliper, which is attached to the frame or fork, surrounds this rotor. When you pull the brake lever, the force – transmitted either through a steel cable or hydraulic fluid – activates pistons in the caliper. These pistons press brake pads against both sides of the spinning rotor, slowing the wheel. As wheretheroadforks.com explains, "The difference between disc brakes and rim brakes is where the braking force is applied."
Rotors typically range from 5.5 to 8 inches (140–203 mm) in diameter, but heavy-duty systems can use rotors as large as 8.75 inches (223 mm). These rotors often feature cutouts, holes, or cooling fins to manage heat effectively, as temperatures can reach up to 286°C (547°F) during intense braking. Manufacturers generally recommend replacing rotors when their thickness drops to about 1.5 mm (0.06 inches).
Let’s dive into how mechanical and hydraulic systems influence disc brake performance.
Hydraulic vs Mechanical Disc Brakes
The key difference between hydraulic and mechanical disc brakes lies in how the braking force is transmitted from the lever to the caliper. Mechanical disc brakes use a steel cable. When you pull the lever, the cable tightens and moves an actuating arm on the caliper, which pushes the brake pads against the rotor. These systems typically rely on a single piston, causing the rotor to flex slightly against a stationary inner pad.
In contrast, hydraulic disc brakes use sealed lines filled with mineral oil or DOT fluid. Squeezing the brake lever pressurizes the fluid through a piston in the master cylinder. This pressure moves pistons on both sides of the caliper, applying even force to the rotor. As Paul Norman puts it, "Hydraulic disc brakes use sealed fluid lines instead of cables, delivering effortless lever pull and instantly noticeable stopping power." Hydraulic systems are known to provide about 30% more stopping power than mechanical ones.
Another advantage of hydraulic brakes is their self-adjusting capability. As brake pads wear down, the pistons automatically move forward to maintain consistent lever feel. Mechanical systems, on the other hand, require manual adjustments using barrel adjusters to account for cable stretch. However, this added convenience comes at a cost. Hydraulic systems are more expensive upfront, typically ranging from $150 to $400+ per wheel, compared to $80 to $200 for mechanical setups. They also require annual maintenance, such as bleeding the fluid (with bleed kits costing $45 to $55), while mechanical systems only need occasional cable tension adjustments.
Disc or Rim Brakes? Commuter, Road & MTB Explained
Performance Comparison
Understanding how each braking system operates helps explain their differences in performance on the trail.
Stopping Power and Control
Disc brakes are designed to amplify your input force more efficiently than rim brakes. As Where The Road Forks notes, disc brakes "use leverage to multiply the force that you put into the lever". This means you get stronger stopping power with less effort, even allowing for one-finger braking on steep trails.
A key distinction lies in modulation – the ability to fine-tune braking force. Hydraulic disc brakes excel in this area, letting you "feather" the brakes for gradual speed control without locking the wheels. Rim brakes, on the other hand, often feel more binary, with an "on-off" sensation and less precision. According to Shimano’s 2023 report, professional teams using disc brakes experienced a 5–8% improvement in modulation under extreme conditions. Still, professional cyclist Simon Yates points out, "In dry conditions rim brakes provide perfectly adequate stopping power for racing down mountains". For smooth pavement and fair weather, rim brakes remain a viable option for casual riders.
Performance in Wet and Muddy Conditions
Disc brakes truly stand out in wet weather. Positioned at the hub, away from road spray and debris, they maintain nearly full efficiency in rain. Rim brakes, by contrast, often require a full wheel revolution to clear water, which delays braking and increases stopping distances. Tests show disc brakes can reduce stopping distances by up to 30% in wet conditions, and during an 11-mile rainy descent, they delivered a 16-second advantage over rim brakes. Ken Knapp, Editor Emeritus at REI, emphasizes, "Disc brakes feature superior stopping power, especially in sloppy conditions".
On muddy trails, the difference becomes even clearer. Rim brakes can clog with debris, reducing their effectiveness, while disc rotors stay cleaner and deliver more consistent performance. For riders tackling such conditions, sintered (metallic) brake pads are often recommended as they maintain better grip compared to organic pads.
Performance on Steep Descents
Steep descents expose a significant limitation of rim brakes: heat management. Because rim brakes rely on friction at the wheel rim, they generate high temperatures, which can lead to "brake fade" – a drop in stopping power as components overheat. This overheating can even cause tire blowouts or damage to carbon rims. During the 2021 Tour de France, several riders using rim brakes reported brake fade on mountain descents, while those equipped with disc brakes maintained consistent performance.
Disc brakes solve this issue by transferring braking force to a rotor, which dissipates heat more effectively through features like cutouts and cooling fins. Charlotte Head from Cyclist.co.uk explains, "Disc brakes take braking force and heat away from the rim, redistributing it to a less problematic location i.e. the rotor". Hydraulic disc brakes also reduce the physical effort required, which can help prevent arm fatigue on long, technical descents. Deven McCoy, Editor at BikeMag, highlights, "Hydraulic disc brakes provide a lot of modulation and better heat management… This reduces arm fatigue and gives a more consistent brake during long descents". Instead of gripping the levers tightly, riders can control their speed with minimal finger pressure – an undeniable advantage on extended downhill sections.
Weight and Aerodynamics
Weight Differences
When comparing rim brakes to disc brakes, one key distinction is weight. Rim brakes typically weigh 250g to 450g less than their disc brake counterparts. This weight difference arises from several factors: the rotors and calipers, hydraulic fluid and hoses, reinforced frame construction, and heavier hubs designed to handle the braking forces of disc systems.
The fork is a major contributor to this extra weight. Disc brake forks require additional reinforcement to manage uneven braking forces, adding 200g to 500g compared to rim brake forks. This disparity becomes even more noticeable when comparing complete bikes. For instance, the Specialized Tarmac SL7 Disc with Ultegra Di2 weighs around 7.2kg, while the Tarmac SL6 Rim with Ultegra comes in at 6.7kg – a 500g difference.
For riders focused on climbing performance, such as hill-climb specialists, every gram matters. ChrisW from Bicycles Stack Exchange highlights this point:
"500 grams, that’s 6 seconds gained up the Alpe-d’Huez. Which is monumental. It’s 25 metres beyond the guy behind at the same Watts".
To put it into perspective, an extra kilogram can cost a rider about 5–7 seconds on a 10-minute climb, depending on the gradient. This is why professional teams sometimes opt for rim brakes in mountain stages, as it helps them reach or stay under the UCI minimum bike weight of 6.8kg.
That said, for most cyclists, the weight difference may not outweigh the advantages offered by disc brakes. One notable benefit is the ability to accommodate wider tires – often 32mm or more – which improve rolling resistance and comfort on rough terrain. These factors can partially offset the performance impact of the additional weight.
Aerodynamic Effects
Aerodynamics also play a role in bike performance. Rim brakes are more streamlined, with their low-profile calipers positioned close to the frame. In contrast, disc brakes, with rotors and calipers mounted near the hub, increase the bike’s frontal area and create additional turbulence in an already chaotic airflow zone. As Cycle Limited explains:
"Rim brakes have less aerodynamic drag than disc brakes. The differences are rather minor and will not really mean much to recreational riders, though".
However, disc brakes open up new possibilities for bike design. Patrick Brown, an engineer at Hunt Wheels, explains:
"The biggest benefit of disc brakes is you have so much more [on the bike] to play with aerodynamically. You aren’t limited by having a vertical [rim] brake track, so you can run a wider tire and get creative with front end and fork setup".
Disc systems allow for internal cable routing and wider, more aerodynamic rim profiles – design elements that can help counteract the drag caused by the rotors.
In mountain biking, aerodynamics take a backseat. With lower average speeds compared to road cycling, the advantages of disc brakes – such as better stopping power, improved mud clearance, and compatibility with very wide tires for enhanced traction – far outweigh any minor aerodynamic drawbacks.
Maintenance and Durability
Maintenance Requirements
Rim brakes are perfect for those who prefer to handle bike maintenance at home. Their straightforward design – consisting of cables, calipers, and rubber pads – makes upkeep relatively simple. Most tasks involve adjusting cable tension with barrel adjusters or replacing worn pads using basic tools. As Charlotte Head, Tech Writer at Cyclist, explains:
"Rim brakes are the home mechanic’s best friend. Loosen the grub screw, remove the worn pads, insert new ones."
On the flip side, disc brakes are a bit more demanding. Hydraulic disc brakes, for instance, require annual bleeding to remove air bubbles, a process that costs about $60 at a bike shop or $55 for a DIY bleed kit. While mechanical disc brakes are less complex than hydraulic systems, they still require precise alignment of the rotor. Patrick Brown, Engineer at Hunt Wheels, highlights:
"Rim brakes are easy to travel with. Most athletes can have confidence that they’ll have an easy time setting up their bike from the travel box when they have rim brakes."
One advantage of hydraulic disc brakes is their ability to automatically maintain optimal pad-to-rotor spacing as the pads wear down. In contrast, rim brakes need manual adjustments to account for pad wear. However, disc brakes come with their own challenges: contamination from oils or chain lube on the rotor can mean replacing both the rotor and pads.
These factors directly influence the durability and upkeep of each braking system over time.
Long-Term Durability
The simplicity of rim brakes not only makes maintenance easier but also impacts their longevity. However, their design comes with a tradeoff – rim brakes rely on the wheel’s sidewall as the braking surface, which wears down over time. For regular commuters, this could mean replacing the entire wheelset every few years due to rim erosion. Many rims include wear indicators, and if the sidewall becomes concave, the rim must be replaced immediately to avoid structural failure.
Disc brakes, by contrast, shift wear to a replaceable rotor, helping to preserve the more expensive wheelset. Journalist Paul Norman notes:
"Whereas it’s very expensive to replace a rim that’s been worn down from long-term braking, disc brakes only require a new rotor. Speaking of which, those rotors are also less likely to go out of true than a rim."
When it comes to pad lifespan, rim brake pads typically last between 500 and 1,000 miles, while disc brake pads can last an additional 100 to 200 miles. Sintered disc pads can even stretch up to 1,300 miles. That said, disc rotors can occasionally warp, leading to rubbing sounds that require manual adjustments. Charlotte Head points out:
"The clearance between pad and rotor is minute and just a small wobble in the disc can cause significant noise."
Another perk of disc brakes is their ability to function even if the wheel is slightly out of true. Since the braking surface is independent of the rim, disc systems are more forgiving – especially for riders tackling rough terrain.
Cost Comparison
Upfront Costs
Rim brakes are generally 10% to 20% cheaper than disc brakes, thanks to their simpler design. They don’t require additional components like rotors, specialized hubs, or reinforced frames, which keeps their production costs lower.
On the other hand, bikes equipped with disc brakes typically cost an extra $100 to $300. This higher price comes from several factors: the calipers are more intricate, the frame and fork need reinforcement on the non-drive side to handle uneven braking forces, and the wheels must include hubs designed for mounting systems like six-bolt or Center-Lock. As explained by WhereTheRoadFork:
"Disc brake components are more complex. They have more moving parts. This increases costs. Disc brake calipers are more expensive than rim brake calipers."
If you’re considering upgrading a rim brake bike to disc brakes, be prepared for a hefty price tag. As noted:
"The cost of upgrading from a rim brake bike to a disc brake bike, is the cost of a new bike."
Mechanical disc brakes offer a middle ground, delivering better stopping power at a lower price compared to hydraulic systems. Thanks to growing availability, even budget disc-equipped bikes now start at under $1,250.
But upfront costs are only part of the equation – maintenance expenses add another layer to consider.
Ongoing Maintenance Costs
When comparing long-term expenses, the differences between rim and disc brakes become even more apparent. For example, a full set of disc brake pads costs around $80, while rim brake pads are slightly cheaper at about $60. However, rim brakes wear down the braking surface of the wheel over time, which could lead to costly wheel replacements.
Hydraulic disc brakes also require specialized care. A professional brake bleed typically costs $60 annually, though you can purchase a home bleed kit for about $55. In contrast, maintaining rim brakes is simpler and only requires basic tools like a wrench and screwdriver for adjustments.
Here’s a quick comparison of key maintenance costs:
| Maintenance Item | Rim Brakes | Disc Brakes |
|---|---|---|
| Brake Pads (Full Set) | $60 | $80 |
| Annual Service | Minimal | $60 (hydraulic bleed) |
| DIY Tools Needed | Standard multi-tool | Bleed kit (~$55) |
| Long-Term Wheel Cost | High (rim replacement) | Low (rotor replacement) |
For casual riders who stick to fair-weather conditions, rim brakes offer a more budget-friendly maintenance option. However, for those who rack up serious mileage or frequently ride in wet or gritty environments, disc brakes may save money in the long run by preserving the wheelset. As Quintana Roo Tri highlights:
"With disc brakes, though, rims can last the lifetime of your bike, saving money in the long run!"
Taking both upfront and maintenance costs into account can help you choose the braking system that best fits your riding habits and budget.
Choosing the Right Brake System
Best Brake for Different Riding Styles
When it comes to choosing the right brakes, your riding style plays a big role. Cross-country riders, for example, often lean toward lightweight two-piston hydraulic disc systems paired with 160–180mm rotors. These provide enough stopping power for shorter, less demanding rides while keeping the bike light and nimble. Trail riders, on the other hand, benefit from hydraulic disc brakes with 180mm rotors, which deliver a good mix of power and control for varied terrain.
For downhill and enduro riders, the demands are far greater. Four-piston hydraulic calipers combined with larger 200mm to 223mm rotors handle the intense heat and prevent brake fade during long, steep descents. Meanwhile, bikepackers and remote touring enthusiasts often prefer mechanical disc brakes. These may lack the finesse of hydraulic systems but are easier to fix on the go with basic tools and standard cables.
If you’re a casual rider sticking to flat, dry conditions, rim brakes might be all you need. They’re simple, affordable, and easy to maintain. As REI Editor Emeritus Ken Knapp puts it:
"If you’re a casual, fair-weather rider and want to keep costs down, rim brakes will probably work for you".
For commuters, especially those riding in all kinds of weather, disc brakes – preferably hydraulic – are a better choice. They offer reliable stopping power whether you’re navigating rain-soaked streets or icy winter roads.
While your riding style is key to finding the right brake system, your experience level can also influence your decision.
Recommendations by Skill Level
Your skill level can refine your choice of brakes, balancing ease of use with performance. Beginners often find rim brakes appealing because of their simplicity. As Charlotte Head, a tech writer, explains:
"Rim brakes, on the other hand, are straight forward and require next-to-no knowledge to operate".
That said, hydraulic disc brakes can be a confidence booster for new riders, especially in wet conditions or during emergency stops, thanks to their consistent performance and better modulation.
Experienced riders, however, tend to gravitate toward hydraulic disc brakes. Their "one-finger" braking capability reduces hand fatigue and provides exceptional control, particularly on challenging terrain. It’s no surprise that over 85% of professional cyclists choose disc brakes for their reliability and precision. For those who enjoy hands-on maintenance, rim brakes or mechanical disc brakes remain a solid option, as they can be disassembled and repaired roadside with nothing more than a multi-tool.
Conclusion
When it comes to choosing a brake system, it all boils down to your riding conditions and priorities. Disc brakes shine in wet, muddy, or snowy conditions, offering consistent stopping power and extending wheel life by transferring wear to replaceable rotors. They’re ideal for steep descents, heavy loads, or year-round commuting. If you’re considering hydraulic disc brakes, they provide excellent control with minimal hand effort but come with a higher price tag – ranging from $150 to over $400 per wheel – and typically require professional maintenance every 12 to 24 months.
On the other hand, rim brakes are a solid choice for riders sticking to fair-weather conditions and looking to save money. They’re mechanically straightforward, easy to repair with basic tools, and lighter – shedding about 8 to 16 ounces compared to disc brake setups. Plus, they’re budget-friendly, with lower costs for both parts and maintenance. While rim brakes still hold their place, the industry’s momentum is clearly leaning toward disc brakes.
This shift is evident across the cycling world, with all WorldTour professional bikes now equipped with disc brakes. This trend ensures better availability of parts and compatibility for years to come. However, as Hunt Wheels engineer Patrick Brown aptly points out:
"There’s not one fastest setup. It wasn’t long ago that all bikes were rim brakes, and some of the new [rim brake wheel] setups are still super fast".
FAQs
Can I convert my rim-brake bike to disc brakes?
Converting a rim-brake bike to disc brakes isn’t a simple swap – it involves quite a few changes. For starters, you’ll need to replace or modify the wheel hubs so they can accommodate disc rotors. Then, you’ll have to ensure your frame or fork has the right mounts for disc brakes; if not, modifications or replacements might be necessary. On top of that, you’ll need to choose calipers and levers that are compatible with the new setup.
Keep in mind, not all bike frames and forks are designed to support disc brakes. To avoid any safety or performance issues, it’s a good idea to consult a bike mechanic before diving into this project. They’ll help ensure everything is compatible and properly installed.
Which brake type is best for carbon wheels and long descents?
Disc brakes are often the go-to choice for long descents, especially when using carbon wheels. Why? They provide stronger and more reliable stopping power, even in wet or challenging conditions. Another big plus: disc brakes help protect carbon rims from wear, which can extend their lifespan.
On the other hand, rim brakes are lighter and less complex, but they struggle to deliver the same level of braking performance in poor weather. Plus, they can cause gradual damage to carbon rims over time. For those prioritizing safety and consistent performance, disc brakes are usually the better option.
How do I choose the right disc rotor size for my riding?
Choosing the right disc rotor size comes down to your terrain, riding style, and bike setup. Larger rotors, like 180mm or 200mm, deliver more powerful braking and handle heat better, making them perfect for aggressive riding or heavier bikes. On the other hand, smaller rotors, typically 160mm, are lighter and work well for cross-country riders or those on lighter bikes. Always factor in your bike’s compatibility and the demands of your rides – 180mm rotors often strike a good balance for most mountain biking needs.


