
Urban mountain biking mixes park trails with city streets, creating a unique riding experience. But it also comes with risks like traffic, pedestrians, and unexpected obstacles. Here’s how to stay safe:
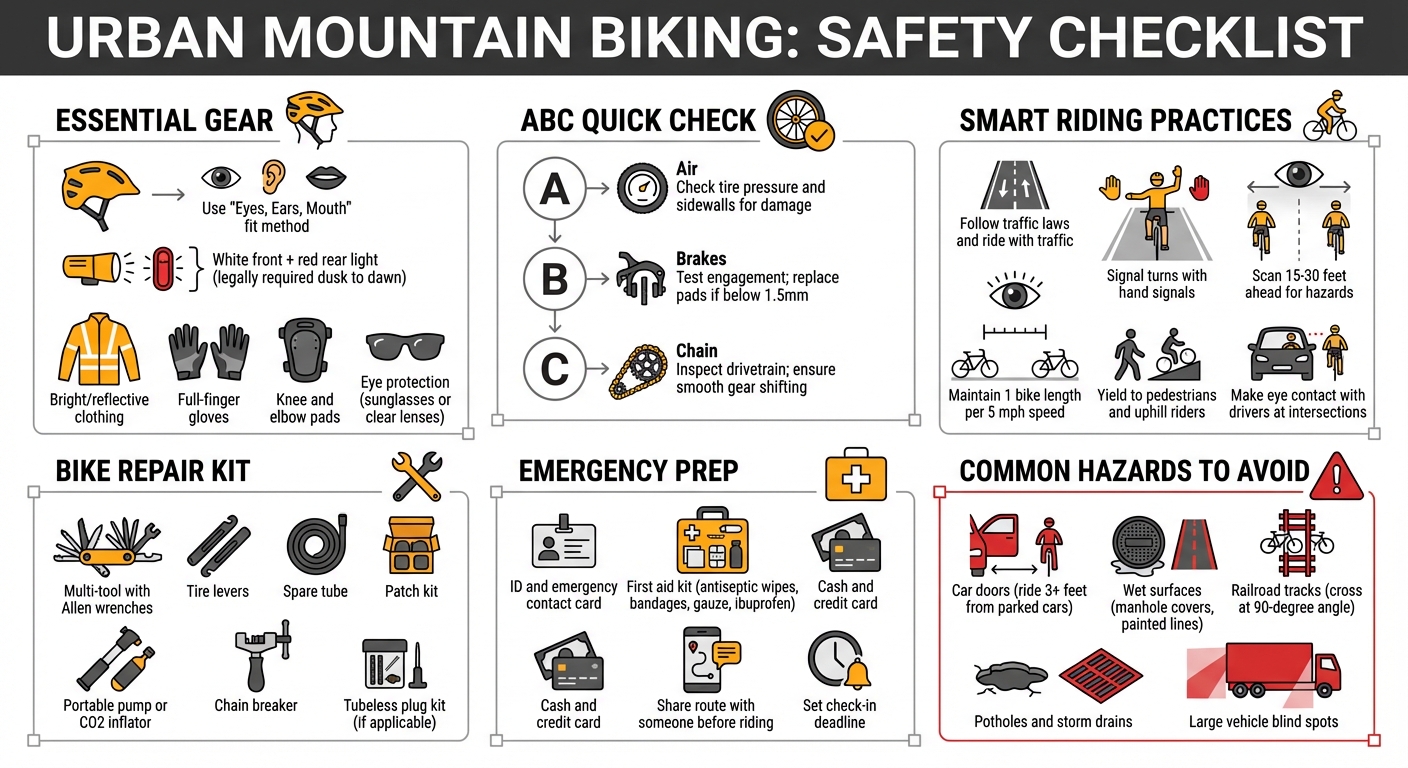
- Gear Up: Wear a certified helmet, bright/reflective clothing, and use front and rear lights. Gloves, knee pads, and eye protection are also key.
- Bike Check: Use the ABC Quick Check – Air (tires), Brakes, and Chain – to ensure your bike is ready.
- Plan Ahead: Use apps like Trailforks to find safe routes and check trail conditions. Avoid peak traffic times.
- Ride Smart: Follow traffic laws, signal turns, and stay visible. Avoid hazards like potholes, wet surfaces, and car doors.
- Emergency Prep: Carry a repair kit, first aid supplies, and ID. Share your route with someone and have a backup plan.
Stay alert, respect others on trails, and ride confidently through the city. Urban biking is challenging but rewarding with the right preparation.
Essential Urban Mountain Biking Safety Checklist
Required Gear for Urban Mountain Biking
Protective Equipment and Visibility Items
Start with a CPSC-certified helmet. Urban mountain biking demands extra safety, and helmets designed for biking provide better coverage, especially at the back of your head. Use the "Eyes, Ears, Mouth" method to ensure a proper fit: the helmet should sit level just above your eyebrows, straps should form a snug "Y" under your ears, and the chin strap should allow no more than two fingers between it and your chin. If you’ve been in a crash or your helmet takes a hard hit, replace it – even if there’s no visible damage.
Visibility is key in city riding. Urban environments require you to be seen, especially during low-light conditions. A white front light and red rear light are legally mandated in most cities from dusk to dawn. Flashing LED lights can make you even more noticeable. Bright or fluorescent clothing with reflective elements further enhances your visibility, whether it’s day or night.
Don’t skimp on additional protection. Urban obstacles like stairs, curbs, and uneven pavement can be tough on your body. Full-finger gloves help absorb vibrations and protect your hands during falls, while knee and elbow pads provide extra security for technical features. Eye protection – whether it’s tinted sunglasses or clear lenses – keeps your eyes safe from UV rays, dust, debris, and bugs. Avoid wearing long scarves or loose clothing that might get caught in your bike, and secure your pant legs to prevent them from snagging on the chain. With the right gear, you’ll be ready to tackle whatever urban challenges come your way. Don’t forget a compact repair kit for those unexpected mechanical hiccups.
Bike Repair Tools
A basic repair kit is a must-have for urban rides. Equip yourself with essentials like a multi-tool with Allen wrenches, tire levers, a spare tube, a patch kit, and either a portable pump or a CO2 inflator. A great option is the Crankbrothers M-17 Multi-Tool ($27), which includes hex wrenches, spoke wrenches, Torx wrenches, and even a chain breaker – all in a compact design. If you’re using tubeless tires, add a tubeless plug kit and a valve core wrench to handle punctures that sealant can’t fix.
Keep your tools within easy reach. Store them in a saddle bag, handlebar bag, or hydration pack. Flat tire repairs typically take about 10 minutes, so having your tools organized can save you time. For riders with air suspension, a shock pump like the FOX High Pressure Shock Pump (around $17.99) allows you to adjust your suspension for the varying demands of urban terrain. With the right tools on hand, you’ll be prepared to handle any quick fixes during your ride.
Pre-Ride Preparation Checklist
Finding Safe Trails and Routes
Choosing the right trail or route is key to a safe and enjoyable ride. Apps like Trailforks are fantastic for this – they offer features like "Route Finder" and "Route Planner", which provide details on trail difficulty, popularity heatmaps, and the usual direction riders take. For example, in the San Francisco Bay Area, you’ll find thousands of trails, including the 2.3-mile Mount Sutro Loop near UCSF, which is rated as a moderate urban trail on AllTrails.
Before heading out, always check real-time trail conditions. Platforms with "Trail Reports" and "Warnings" can alert you to hazards like fallen trees, muddy patches, or temporary closures. If you’re riding in cities like Portland, biking guides can help you locate "neighborhood greenways" – low-traffic streets specifically designed for cyclists, complete with route signs and markings. If you’re testing out a new route, try it on a quieter day to get familiar with the terrain and traffic flow.
Once you’ve picked your route, make sure your bike is ready for the challenges of city terrain.
Checking Your Bike for City Terrain
A quick bike check can save you from trouble later. Start with an ABC Quick Check:
- A: Air – Make sure your tires are properly inflated and inspect the sidewalls for damage. If the witness line above the rim dips or rises, deflate the tire and reseat it.
- B: Brakes – Test for smooth engagement. If the brake pads are worn below 1.5 mm, replace them.
- C: Chain and Crank – Check the drivetrain for any hesitation or noise and ensure all gears are shifting smoothly.
Spin the wheels to confirm they’re true and free of wobbles. For the headset, hold the front brake and rock the bike gently forward and backward – there should be no rattling or movement in the fork or stem.
Urban riding demands reliable brakes and gears, so address any issues before you hit the streets.
Planning for Weather and Traffic
Weather and traffic play a huge role in urban cycling safety. Apps like Trailforks can provide real-time updates on conditions like mud, ice, or freeze/thaw cycles. If rain is in the forecast, equip your bike with fenders and dress in waterproof, moisture-wicking layers. Be cautious of slick surfaces such as wet pavement, storm drains, gravel, or ice. Always cross railroad tracks at a right angle to avoid slipping or getting your tires stuck.
Timing also matters. Plan your ride to avoid peak traffic hours and stick to routes with dedicated bike lanes or quieter residential streets. Apps like Strava and Trailforks can help you find popular routes that other cyclists prefer, often a safer choice. Keep in mind that most car-bike crashes happen at intersections, especially when drivers turn across a cyclist’s path. Make eye contact with drivers at intersections to ensure they see you, and use daytime running lights to boost your visibility.
Safe Riding Practices for City Trails
Following Traffic Laws and Bike Lane Rules
Once you’ve prepped for your ride, it’s time to focus on safe riding habits that will help you navigate city streets with confidence. Cyclists are subject to the same rules of the road as drivers, which means obeying traffic signals, stop signs, and pavement markings. Always ride in the same direction as traffic and stick to designated bike lanes whenever they’re available. In many cities, adults are required to ride in the street or bike lanes rather than on sidewalks.
"To earn respect, show respect to other road users. Ride with traffic, not against it. Use bike lanes where available. Observe the road rules." – REI Expert Advice
Keep your movements predictable by riding in a straight line and signaling with your hands before making any turns. Avoid weaving between parked cars, and stay alert for potential hazards like car doors opening unexpectedly. If a lane is too narrow for a car to pass you safely, you’re within your rights to take up the full lane by riding in the center.
Handling Trail Surfaces and Obstacles
City trails can be full of surprises – potholes, storm drains, loose gravel, and even slippery painted lane markings when wet. The key to staying safe is scanning 15 to 30 feet ahead to spot hazards early, while occasionally shifting focus to your front tire to handle immediate challenges. Adopt a "ready position" when approaching tricky terrain: keep your pedals level, bend your knees and elbows, shift your hips back, and lift slightly off the seat.
"A beginner’s mistake is looking at spots you want to avoid rather than focusing on where you want to go." – REI
For slick surfaces like wet metal covers, painted lines, or wooden planks, avoid sudden turns or braking. If you hit a muddy patch, ride straight through instead of trying to go around it – this not only keeps you safer but also helps preserve the trail. Before reaching obstacles or sharp turns, brake gently and evenly, and shift your weight backward to maintain better balance. Beyond these physical challenges, it’s just as important to adjust your behavior when sharing mixed-use trails.
Sharing Trails with Pedestrians and Cyclists
Urban trails are often shared spaces, so respecting other users is essential for everyone’s safety. Cyclists should yield to all other trail users, including walkers, runners, and those with dogs. If you’re riding downhill, give the right of way to those climbing uphill – it’s much harder for them to regain momentum after stopping. Always make your presence known early, whether with a bell or a friendly “on your left” to alert others.
"Bicyclists should yield to all other trail users, unless the trail is clearly signed for bike-only travel." – International Mountain Bicycling Association (IMBA)
Slow down when approaching crowded areas or blind corners, and announce yourself before passing from behind. On narrow trails, be prepared to stop and step aside to let others pass safely. Maintain a safe following distance – about one bike length for every 5 mph you’re traveling – and always pass on the left. If you come across someone with a guide dog, give them extra room to ensure everyone stays comfortable and safe.
Common Urban Hazards to Avoid
Staying Visible to Cars and Pedestrians
Visibility is a top priority when navigating urban areas, and it goes beyond just having the standard front and rear lights. Adding spoke or wheel lights can make a big difference, especially when you’re at intersections where side-profile visibility is crucial. Wearing bright clothing with reflective patches or tape can also help ensure you’re seen, even in low-light conditions.
When it comes to signaling your moves, practice using one hand to indicate turns and stops. At intersections, make direct eye contact with drivers to confirm they’ve noticed you. In heavy, slow-moving traffic, it’s often safer to ride in the middle of the lane rather than hugging the curb. This positioning not only increases your visibility but also prevents cars from trying to squeeze past you in tight spaces.
Once you’ve ensured you’re visible, the next step is to stay alert for potential hazards on the road.
Spotting Road and Trail Hazards
Urban streets and trails can be riddled with obstacles like potholes, storm drains, slick surfaces, gravel, ice, and railroad tracks. One particularly dangerous scenario is the "dooring" hazard, where a parked car’s door swings open unexpectedly into your path. James Lynch, a writer for Public Lands, offers this advice:
"A surprise door that pops open into the bike lane can have dire consequences; ride at least 3 feet from parked cars for enough room to maneuver."
When crossing railroad tracks, always approach them at a 90-degree angle to avoid your tires getting stuck in the grooves. Large vehicles, such as buses and semi-trucks, also present unique challenges. They have substantial blind spots, especially when turning, so stay alert and avoid lingering in areas where the driver might not see you. Since your hearing often serves as an early warning system for approaching vehicles, skip the headphones or earbuds while riding.
With hazards identified, managing your speed becomes the next essential practice.
Managing Speed on Urban Features
Controlling your speed is just as important as staying vigilant. A key tip is to brake before entering a turn, not during it, to maintain stability and follow a clear line through the curve. Keep your index fingers ready on the brakes in crowded areas, and apply them evenly to ensure smooth, controlled stops.
A good rule of thumb is to leave one bike length of space for every 5 mph you’re traveling. This buffer gives you time to react to sudden hazards or stops. When crossing slippery surfaces like wet manhole covers, painted lane markings, or railroad tracks, maintain a steady pace and ride straight across without leaning or turning. Wet conditions can make braking less effective, especially if you’re using rim brakes, so give yourself extra stopping distance.
sbb-itb-9d75ae1
Emergency Preparedness for Urban Rides
Fixing Flat Tires and Mechanical Issues
Having the right tools on hand can mean the difference between a quick roadside fix and a ride cut short. At a minimum, pack spare tubes, a patch kit, tire levers, a compact pump or CO₂ inflator with cartridges, replacement chain links (master links), a chain tool, duct tape, and zip ties. A good multi-tool is also essential – look for one with Allen wrenches, a Torx wrench for disc brakes, and screwdrivers. Graham Averill, a Senior Writer at Bike Magazine, praises the Crankbrothers M-17 Multi-Tool (around $27), saying:
"Be prepared for trailside repairs with this multi-tool… it has approximately one million different wrenches, including hexes, spokes, opens and even a Torx for disc brakes."
Another often-overlooked item is a spare derailleur hanger. These are fragile and specific to your bike frame, so having one can save you from a long walk home. For short city rides, a patch kit and pump may suffice, but longer urban adventures call for a more extensive toolkit [37,38].
Once you’ve got your bike issues under control, don’t forget to prepare for minor injuries you might encounter.
First Aid for Common Injuries
A small, well-stocked first aid kit is a must for handling scrapes and cuts on the go. Include antiseptic wipes, antibacterial ointment, assorted bandages, sterile gauze, a SAM splint (around $12), elastic wrap, and ibuprofen. Emergency Room Doctor Will Timbers advises:
"Build a kit that you’ll actually bike with and if that means leaving behind some potentially useful items so be it. Just prioritize the most important items and make sure you know how to use them."
For more serious injuries, like a suspected head, neck, or back injury, keep your helmet on but undo the strap, stabilizing the head until help arrives. If you or someone else dislocates a shoulder, stabilize the arm with a makeshift sling – like a bandana – but don’t attempt to relocate it yourself. After any fall, take a moment to check yourself for injuries while still on the ground before trying to stand up.
Being ready for injuries is essential, but having a plan for other emergencies can make all the difference.
Planning for Emergencies
Beyond quick fixes and first aid, having an emergency plan in place ensures a safer ride. Before heading out, share your route and estimated return time with someone you trust. Set a "check-in deadline" so they know when to call for help if needed. Aspen Valley Health emphasizes the importance of accessibility:
"Connectivity to the internet is not always a guarantee on the trail, so it is best to program these numbers into your phone and/or jot them down on a piece of duct tape on your water bottle for easy access."
Always carry ID, an emergency contact card, cash, and a credit card. If something goes wrong, you might need to call a friend for a pickup, use public transit that accommodates bikes, or lock your bike and take a rideshare home. In the case of a collision with a vehicle, call 911 to file a police report, take photos, and collect the driver’s contact and insurance details. It’s also smart to pack a whistle and a compact emergency blanket – these lightweight items can be lifesavers if you’re stuck in an unexpected situation.
What to Bring Mountain Biking
Conclusion
Urban mountain biking combines adventure with unique challenges, but with the right preparation and mindset, you can navigate city trails safely and confidently. Start by prioritizing essential gear: a properly fitted helmet, reliable lights, reflective clothing, and a basic repair kit are your go-to essentials for safe riding.
Beyond equipment, adopting smart riding habits is key. Always yield to pedestrians and uphill riders, follow traffic laws, and ride defensively – assuming drivers may not see you. Take it slow on unfamiliar trails, communicate clearly with hand signals, and steer clear of slippery spots like wet manhole covers or painted lines. These habits not only keep you safe but also make the ride smoother and more enjoyable.
Urban biking is all about balancing preparation with awareness. By incorporating these practices into your routine, you can tackle city trails with confidence, respect others on the road, and fully enjoy the thrill of urban mountain biking.
FAQs
What safety gear do I need for urban mountain biking?
When you’re hitting city trails, having the right safety gear isn’t just smart – it’s essential for your protection and visibility. Here’s what you need:
- Helmet: A properly fitted helmet is a must. Opt for a half-shell style for casual rides or a full-face helmet if you’re tackling more challenging terrain.
- Eye protection: Keep your eyes shielded from dust, debris, and glare with sunglasses or clear goggles.
- Gloves: Full-finger cycling gloves enhance your grip, reduce vibrations, and can protect your hands if you take a tumble.
- Lights and reflectors: Equip your bike with a bright front light and rear flashing LEDs to stay visible, especially in low-light conditions. Adding reflective clothing or tape can make a big difference, too.
- Compact first-aid kit: Pack essentials like bandages and antiseptic wipes to handle small injuries on the go.
Having these items on hand will help you ride with confidence and stay safe while exploring urban trails.
What’s the best way to plan a safe urban mountain biking route?
To create a safe urban mountain biking route, start by consulting your city’s official bike maps. These maps often highlight bike lanes, multi-use trails, and streets with lighter traffic – ideal for a safer ride. Pair this with a reliable biking app, like Strava, or a navigation tool designed with bike-friendly features to draft a preliminary route. Pay close attention to important safety aspects, such as traffic speed, protected bike paths, and elevation changes that suit your skill level.
Before you hit the road, check for real-time updates on road closures or weather conditions that could affect your ride. It’s also a good idea to test the route beforehand to ensure it meets your safety standards. Once you’ve finalized the route, save it for future rides and consider sharing it with friends or local biking groups to get their input. By combining city resources with modern tech, you can make every ride safer and more enjoyable.
What should I do if my bike breaks down during an urban ride?
If you run into a mechanical issue during an urban mountain bike ride, the first step is to prioritize safety. Move to a secure spot, away from traffic, and ensure you’re visible to others around you. Safety always comes first.
Once you’re in a safe place, try to figure out what’s wrong. Listen for unusual noises, check how the bike is handling, and look for any visible damage. Having a small repair kit with you can be a real lifesaver. Essentials like a spare tube, tire levers, a mini-pump, and a multitool can help you tackle common problems like a flat tire or a loose bolt. For instance, if you have a punctured tube, you can patch it or swap it out, then inflate the tire to the recommended PSI (you’ll find this info on the tire’s sidewall). If the problem isn’t something you can completely fix on the spot, make a temporary repair and ride cautiously to the nearest safe location or bike shop.
To be better prepared for future rides, keep a record of any issues and how you fixed them. A quick note on your phone can help you spot patterns and address recurring problems during regular maintenance. Staying calm, prepared, and equipped means you’ll be ready to handle most challenges and get back to enjoying your ride through the city.


