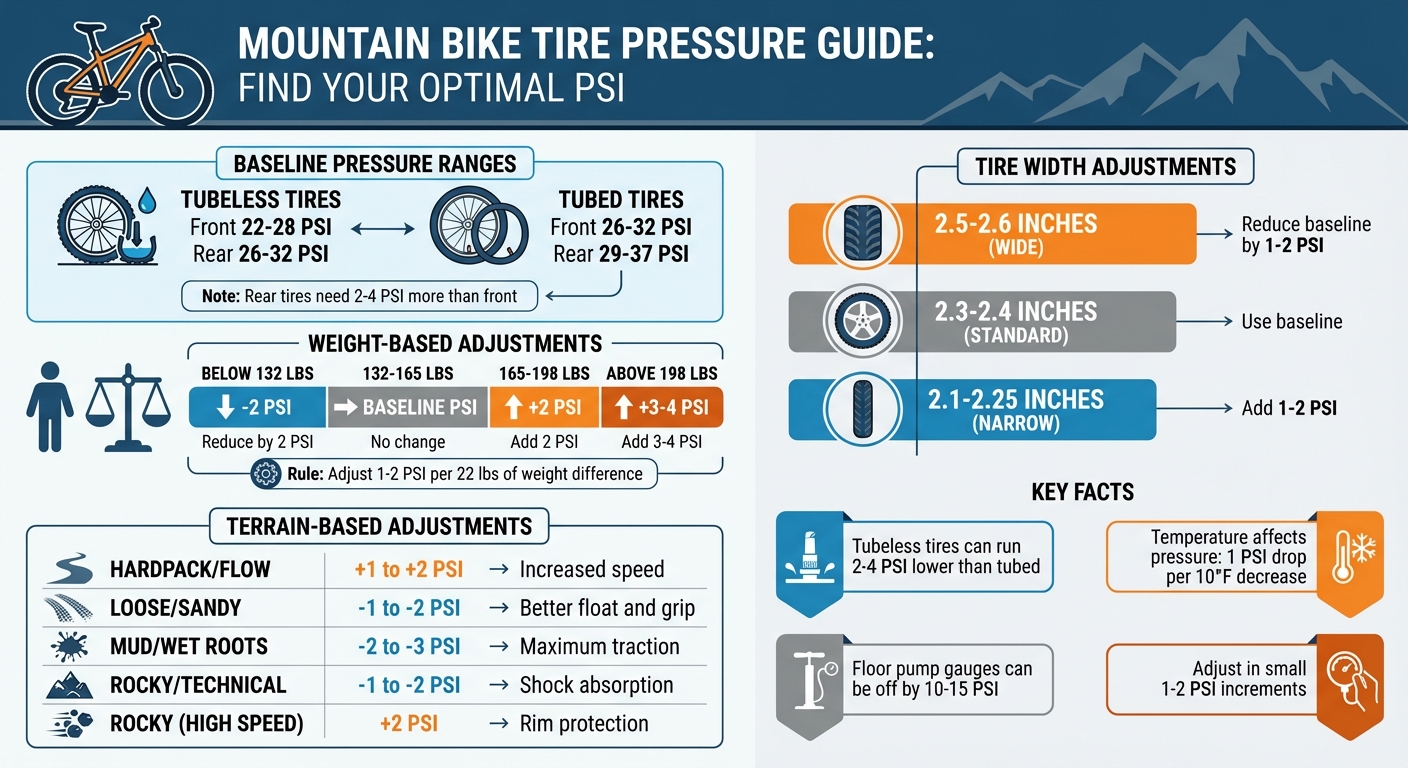
- Start with Manufacturer Guidelines: Check the pressure range on your tire’s sidewall. Always stay within these limits for safety.
- Adjust for Weight: Heavier riders or bikes need higher pressure. Increase by 1–2 PSI for every 22 lbs of added weight.
- Tubeless vs. Tubed Tires: Tubeless tires can run 2–4 PSI lower for better traction. Tubed tires need higher pressure to avoid punctures.
- Tire Size Matters: Wider tires (2.5 inches or more) can run lower pressures, while narrower tires (below 2.3 inches) require more air.
- Consider Terrain: Hardpacked trails call for slightly higher PSI, while rocky or muddy conditions benefit from lower pressure for grip.
- Tools Are Key: Use a reliable digital gauge for accuracy. Floor pump gauges can be off by as much as 10 PSI.
Quick Tips:
- Baseline Pressure: Start with 22–28 PSI for tubeless and 26–32 PSI for tubed tires.
- Front vs. Rear: Rear tires often need 2–4 PSI more due to extra weight.
- Fine-Tune: Adjust in small increments (1–2 PSI) based on feel during your ride.
- Regular Checks: Tire pressure drops over time and with temperature changes (1 PSI for every 10°F drop).
Dialing in your tire pressure is a process, but small adjustments can make a big difference in performance and comfort on the trail.
MTB Tire Pressure Guide: Baseline Settings and Adjustments by Weight, Tire Type, and Terrain
Preparation Before Adjusting Tire Pressure
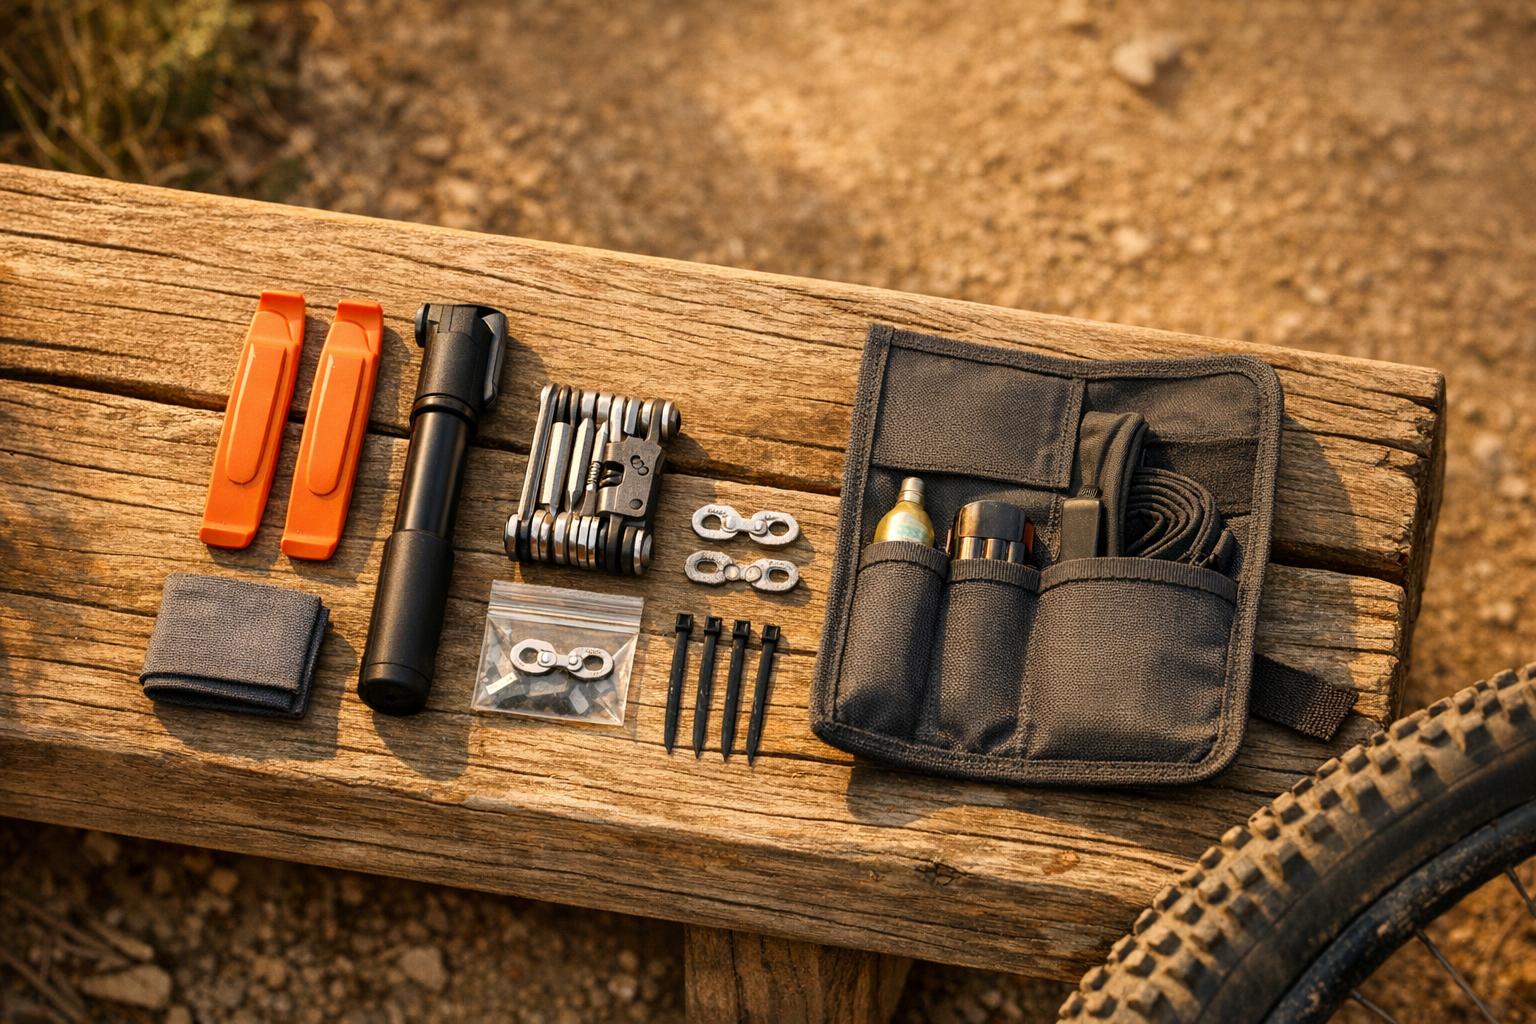
Gather Your Tools
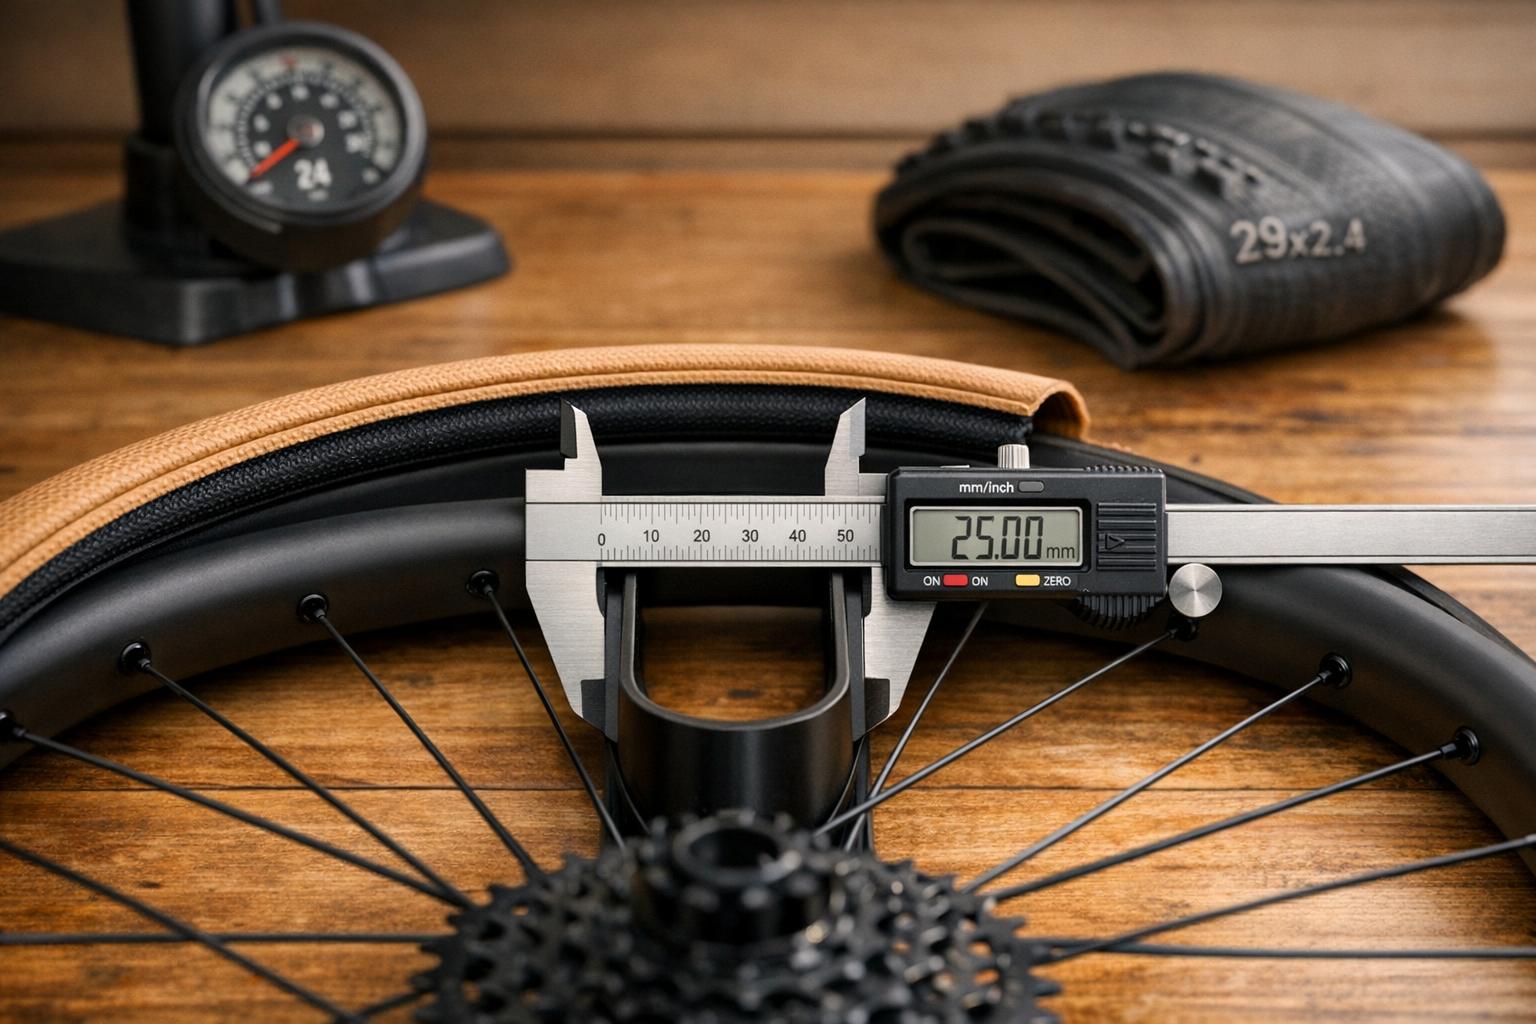
Before you start adjusting your tire pressure, make sure you have the right tools on hand. A floor pump with a built-in gauge is a good starting point for inflating tires at home. However, keep in mind that these gauges can sometimes be inaccurate, with readings off by as much as 10–15 PSI.
If you want precise pressure readings, consider investing in a digital pressure gauge. These devices allow for accurate measurements, usually within 1–2 PSI. Some popular options include the Topeak D2 SmartGauge (priced around $40–$48), the high-end Silca Truth Gauge (around $249), or the budget-friendly Meiser Accu-Gage (approximately $13).
For on-the-go adjustments, carry a mini pump or CO₂ inflator. If you use CO₂, remember to recheck your pressure with a standard pump later, as CO₂ tends to escape more quickly from butyl rubber tires. Kristen Bonkoski, the Founder of Femme Cyclist, highlights the importance of accuracy:
"The gauge on your tire pump is worthless. It will get you in the ballpark but can be off by as much as 25%. Not great for accuracy".
Once your tools are ready, check your tire’s manufacturer guidelines for pressure recommendations.
Check Manufacturer Guidelines
The sidewall of your tire is your go-to source for understanding the recommended pressure range. It typically lists both the minimum and maximum PSI values. These numbers are there to ensure safety, helping to prevent issues like the tire blowing off the rim or damage caused by underinflation. Always choose a pressure value within this range.
After reviewing the guidelines, you’ll need to fine-tune the pressure based on your specific riding setup.
Account for Rider and Bike Weight
Your combined weight – including yourself, your bike, and any gear – affects how much air pressure your tires need. Heavier setups compress the tires more, so you’ll need to increase the pressure to maintain proper tire shape and avoid rim strikes.
A general rule of thumb: adjust your pressure by 1–2 PSI for every 22 pounds of weight difference. For E-MTBs, you might need to add another 2–5 PSI to account for the motor and battery weight. Additionally, the rear tire usually carries more load, so it’s a good idea to increase its pressure by 2–4 PSI compared to the front tire.
Here’s a simple guide to help you adjust your baseline pressure based on rider weight:
| Rider Weight | Adjustment to Baseline Pressure |
|---|---|
| Below 132 lbs | Reduce by 2 PSI |
| 132–165 lbs | Baseline PSI |
| 165–198 lbs | Add 2 PSI |
| Above 198 lbs | Add 3–4 PSI |
Julian Mat, Editor at Suspension Traveler, underscores the importance of weight in determining tire pressure:
"Rider weight is the single most important factor here to calculate a baseline value for front and rear tire pressures".
sbb-itb-9d75ae1
Factors That Affect MTB Tire Pressure
Tire Type and Setup
The type of tire you’re using – whether it’s tubeless or has a tube – plays a big role in determining the right pressure. Tubeless tires allow you to run 2–4 PSI lower than tubed tires. This slight reduction enhances traction, cornering grip, and climbing ability on technical terrain, all without the risk of pinch flats. For most riders, the sweet spot for tubeless tire pressure is between 17 and 25 PSI.
Almir Zaripov from Lebel Bicycles highlights the benefits of tubeless setups:
"Tubeless tires can be run at lower pressures without the risk of pinch flats, reducing rolling resistance and improving efficiency".
For a 29-inch tubeless tire, you’re looking at around 25–30 PSI for optimal performance. On the other hand, tubed tires generally require higher pressures – typically 35–40 PSI – to maintain their shape and protect the inner tube from punctures.
Tire dimensions add another layer of complexity to these pressure adjustments.
Tire Size and Width
The width and diameter of your tires influence the air volume they can hold, which in turn affects the pressure you’ll need. Wider tires (2.5 inches or more) hold more air, so you can run lower pressures without sacrificing stability. Narrower tires (below 2.3 inches), however, need higher pressures to provide adequate support.
Wheel diameter also comes into play. For example, a 29-inch tire, which has more air volume, can achieve the same feel at slightly lower pressures compared to a 27.5-inch tire. If you’re running 28 PSI on 27.5-inch wheels, you might only need about 25–26 PSI for a similar ride on 29-inch wheels.
Here’s a quick guideline for width-based pressure adjustments:
- For tires in the 2.5–2.6 inch range: Reduce your baseline pressure by 1–2 PSI.
- For 2.3–2.4 inch tires: Stick to your baseline.
- For narrower tires (2.1–2.25 inches): Add 1–2 PSI.
Once you’ve dialed in your pressure based on tire type and size, the next step involves tailoring it to the trail.
Trail Conditions and Riding Style
Trail conditions and your riding style are key factors in fine-tuning tire pressure. On smooth, hardpacked trails, adding 1–2 PSI can lower rolling resistance and boost speed. But when the conditions get muddy, wet, or slippery, dropping the pressure by 2–3 PSI increases the tire’s contact patch, giving you better traction.
For rocky or technical terrain, it’s all about finding balance. Lower pressures improve grip and absorb shocks, but extremely rocky trails – especially at higher speeds – might call for a slight increase (around 2 PSI) to protect your rims from damage. Johan van Seijen, Founder of Two Wheel Tales, sums it up perfectly:
"One PSI can be the difference between sketchy and dialed".
Riding style also influences pressure preferences. Cross-country riders often favor higher pressures (24–28 PSI) to maximize rolling speed, while downhill riders lean toward lower pressures (17–21 PSI) for better grip and control.
Here’s a table to guide your pressure adjustments based on terrain:
| Terrain Type | Pressure Adjustment | Primary Benefit |
|---|---|---|
| Hardpack / Flow | +1 to +2 PSI | Increased speed and efficiency |
| Loose / Sandy | −1 to −2 PSI | Better surface float and grip |
| Mud / Wet Roots | −2 to −3 PSI | Maximum traction and control |
| Rocky / Technical | −1 to −2 PSI | Improved shock absorption |
| Rocky (High Speed) | +2 PSI | Rim and sidewall protection |
Step-by-Step Checklist for Adjusting Tire Pressure
Deflate and Start Fresh
If you’re unsure about your current tire pressure or it feels off, the best approach is to start from scratch. Fully deflate your tires to ensure you’re working with a clean slate. This eliminates any guesswork about the existing pressure.
Use a dedicated digital gauge or a high-quality needle gauge for accuracy. Avoid relying on pump gauges, as they can sometimes give misleading readings. Once the tire is completely deflated, you’re ready to inflate it to your baseline pressure.
Inflate to Baseline Pressure
After deflating, inflate your tires to the appropriate baseline pressure. For tubeless tires, aim for 22–28 PSI in the front and 26–32 PSI in the rear. If you’re using tubed tires, add 3–5 PSI to these numbers. Keep in mind that the rear tire typically requires 3–5 PSI more than the front, as it bears more weight and absorbs greater impacts. Make gradual adjustments so you can fine-tune the feel of your ride without over-inflating.
Perform a Press Test
Once you’ve inflated the tires, perform a simple press test to check your setup. Apply your body weight to the handlebars to test the front tire, and do the same on the saddle to test the rear. The tire should compress slightly – just enough to absorb shocks without hitting the rim.
If the tire barely compresses, the pressure is too high. On the other hand, if it feels wobbly or unstable, the pressure is too low. As Kristen Bonkoski, Founder of Femme Cyclist, explains:
"Finding the perfect tire pressure for your mountain bike is more art than science".
This test helps you get close to the ideal pressure before making fine adjustments on the trail.
Recheck After Settling
After completing the press test, let your tires settle and then recheck the pressure. Tires, especially tubeless ones, may lose a small amount of air as they settle into place. Wait about a minute after inflating, then check the pressure again to ensure accuracy. Always perform these checks when the tires are cool, as heat from riding can temporarily increase PSI readings.
If your tires feel off during the ride, stop and make small adjustments – just 1–2 PSI at a time – until you find the sweet spot. This ensures your bike performs exactly how you want it to on the trail.
97% of MTBers Get Their Tyre Pressure Wrong. How To Get It Right
Maintaining and Verifying Tire Pressure
After fine-tuning your tire pressure, keeping a close eye on it ensures dependable performance on the trail.
Regular Pressure Checks
Make it a habit to check your tire pressure before every ride. Both tubed and tubeless tires naturally lose air over time, and shifts in temperature can cause noticeable changes. For instance, a 10°F drop can lower tire pressure by about 2%. If you’re heading out after a significant weather change or riding at a different altitude, recheck your pressure to avoid surprises.
Always measure when your tires are cool. Heat from riding can temporarily raise PSI readings, giving you inaccurate results. To get precise measurements, use a dedicated gauge – either digital or analog. Floor pump gauges, while convenient, are often unreliable. As Dan Chabanov, Test Editor at Bicycling, advises:
"The important thing is to develop and stick to a habit of regular checkups and top-offs that works for you – if you don’t, your pressure is probably wrong most of the time you ride".
Log Your Pressure Settings
Tracking your tire pressure settings can make future adjustments quicker and easier. Keep a record of your optimal PSI for different trails, weather conditions, and terrains. Jot down the exact pressure that felt perfect after a ride. This personal reference guide can save you from trial-and-error adjustments later. Whether you prefer a notebook or a phone app, record your settings as soon as you find the sweet spot. This habit will help you adapt to changing trail conditions while maintaining top performance.
Common Mistakes to Avoid
When it comes to tire pressure, precision matters. Here are some pitfalls to steer clear of:
- Overinflating to the sidewall maximum: The number printed on your tire is a safety limit, not a performance guideline. Inflating to this maximum can reduce traction and make your ride bumpier.
- Relying on the "squeeze test": Pressing the tire with your thumb might seem quick and easy, but it’s highly unreliable. Stick to using a gauge for consistent and accurate results.
- Trusting floor pump gauges: These gauges often have calibration issues. Invest in a standalone gauge and use it regularly, even if it has a slight calibration offset.
- Skipping air replacement after a CO₂ repair: If you’ve used CO₂ to inflate your tire after a flat, bleed the tire and refill it with regular air. CO₂ can escape quickly, leading to pressure loss.
Conclusion
Getting your tire pressure just right can transform the way your bike handles. It improves grip on loose corners, smooths out trail chatter, and makes technical descents feel more controlled. As Johan van Seijen, Founder of Two Wheel Tales, explains:
"One PSI can be the difference between sketchy and dialed."
The key is using a reliable digital gauge, understanding how your weight and tire setup influence baseline pressure, and fine-tuning in small 1–2 PSI increments to match the terrain. This approach not only boosts traction and control but also helps prevent rim damage, pinch flats, and tire burping.
There’s no one-size-fits-all solution here. Your ideal pressure depends on factors like your weight, tire width, whether you’re running a tubeless or tubed setup, and the type of trails you ride. A good starting point is the higher end of your recommended range. From there, make small adjustments – 1 PSI at a time – until you hit that sweet spot where grip and stability meet.
Don’t forget to check your pressure before every ride and adapt for weather and trail changes. Those minor tweaks can make a huge difference in how your bike performs through technical sections. Ride with confidence, knowing your setup is dialed in.
FAQs
What PSI should I use if I’m between weight ranges?
If your weight is between two ranges, adjust the PSI within the suggested limits. For instance, if you weigh between 150 lb and 155 lb, aim for about 21-22 PSI in the front tire and 24-25 PSI in the rear tire. You can fine-tune these settings depending on the terrain and your riding style to achieve the best mix of performance and comfort. Using a tire pressure chart or calculator can make these adjustments more accurate.
How do I know if my tire pressure is too low on the trail?
If your tires feel unstable, squirmy, or seem at risk of rolling off the rim, it’s a clear sign your tire pressure might be too low. Low pressure can also cause the tires to flex excessively, which increases the chances of rim damage or impacts. These are strong indicators that your tire pressure isn’t suited to the trail conditions.
Do I need different PSI for different rim widths?
Yes, rim width plays a role in determining the ideal PSI for your tires. Wider rims allow you to run lower pressures, which can enhance grip, provide a smoother ride, and lower the chances of rim strikes. To get the best performance, make sure to adjust your tire pressure based on your rim size and the specific trail conditions you’ll encounter.