Mountain biking can be thrilling, but skipping basic pre-ride checks can lead to safety risks and costly repairs. Key mistakes include neglecting tire pressure, brakes, drivetrain, suspension, cockpit, and protective gear. Spending 5–10 minutes on a routine inspection ensures your bike is ready for the trail and prevents avoidable issues like loose bolts, worn-out components, or poorly adjusted settings. Here’s what to check:
- Tires: Check pressure (20–35 PSI for mountain bikes) and inspect for wear or damage.
- Brakes: Test levers, inspect pads, and ensure cables or hydraulic systems are functioning.
- Drivetrain: Clean and lubricate the chain, and inspect for wear or misalignment.
- Suspension: Verify sag settings and inspect for cracks or loose bolts.
- Cockpit: Tighten handlebars, stem, and controls to avoid unexpected movement.
- Protective Gear: Ensure your helmet fits correctly and other gear stays secure.
Using a simple ABCDE checklist – Air, Brakes, Chain, Drivetrain, and Everything else – can streamline your routine. Regular checks not only keep you safe but also extend your bike’s lifespan, letting you focus on enjoying your ride.
10-Minute Pre-Ride Mountain Bike Safety Checklist
10 Essential Pre-Ride Mountain Bike Checks
Mistake 1: Skipping Tire Pressure and Condition Checks
Tires are your bike’s lifeline to the trail, yet they’re often overlooked before a ride. Neglecting tire pressure or riding on worn-out tires can lead to serious problems. Low tire pressure, for example, increases the risk of pinch flats – where the inner tube gets caught and punctured between the rim and the ground – or "burping" in tubeless setups. As Gerow from Singletracks explains:
"If [pressure] gets too low you will waste heaps of energy trying to pedal the smooshy rubber and also risk puncturing the tire between the ground and the rim – otherwise known as pinch flatting."
On the flip side, over-inflated tires reduce traction, making your bike bounce off obstacles like rocks and roots instead of absorbing them. The Oconee County Mountain Bike Team puts it this way:
"A PSI that’s too high will have you bouncing off rocks and roots like a pinball."
For most mountain bikes, the ideal pressure typically falls between 20–35 PSI, depending on your weight and trail conditions.
Checking Tire Pressure
Forget the hand-squeeze test – it’s unreliable. Use a proper gauge for an accurate reading. Keep in mind that many floor pump gauges measure the pressure inside the pump, not the tire, so a dedicated digital or analog gauge is your best bet. Look at the tire sidewall for the manufacturer’s recommended PSI range. From there, fine-tune based on the terrain: drop 2–3 PSI in wet or slippery conditions for better grip. Also, note that a 10°F temperature change can shift tire pressure by about 1 PSI.
Your rear tire should generally have 2–3 PSI more than the front since it supports 60–70% of your body weight. If you’re running tubeless tires, you can go with lower pressures but ensure the sealant is topped off every 4–6 weeks.
Inspecting Tire Condition
Before hitting the trail, take a moment to spin each wheel and inspect for debris, sidewall cracks, worn knobs, or cuts that expose the internal threads. As REI recommends:
"Properly inflated tires helps prevent flats. Check the sidewall of your tire for the recommended tire pressure. While you’re checking the air, take a moment to look for cracks or excessive wear on your tires."
Also, check the tire’s seating by examining the molding line near the base of the sidewall. It should sit evenly above the rim edge all the way around. If it’s uneven, deflate the tire, adjust the bead into the rim’s center, and reinflate to seat it properly.
As for tire lifespan, road tires typically need replacing after about 2,000 miles, while racing tires wear out closer to 1,500 miles. Off-road tires vary depending on terrain, but if you notice exposed casing threads or bead wire, it’s time to replace them immediately.
Once your tires are trail-ready, double-check that your brake system is up to the task too.
Mistake 2: Ignoring Brake System Inspection
Skipping a brake system inspection before riding can lead to serious issues like brake failure caused by worn pads, spongy levers, or frayed cables. The National Interscholastic Cycling Association (NICA) emphasizes:
"Only bike mechanics with training and professional experience should complete brake or brake pad installation, maintenance, repair or replacement."
While it’s crucial to leave major repairs to professionals, a quick pre-ride check can help catch potential problems before they become hazardous.
Checking Brake Pads and Levers
Start by firmly pulling each brake lever to test its engagement. The brake pads should make contact with the rim or rotor well before the levers touch the handlebar. If the lever pulls all the way back, it’s a sign that the pads are worn or the hydraulic system needs bleeding.
For rim brakes, inspect the pads for their built-in grooves. If these grooves are shallow or no longer visible, it’s time to replace the pads. Also, ensure the pads hit the rim squarely and don’t rub against the tire’s sidewall.
For disc brakes, check pad thickness by looking through the caliper or removing the wheel. The braking material should be at least 1.5mm thick. Watch out for chunks, indentations, or any signs of oil or grease contamination, as these can severely compromise safety.
Perform a simple roll test to verify brake effectiveness. Pull the front brake while pushing the handlebars forward to lift the rear wheel, then do the same with the rear brake to lift the front wheel. If either wheel doesn’t lift, your brakes need immediate attention.
Spotting Hydraulic or Cable Issues
Hydraulic brakes should feel firm and consistent when engaged. A soft or spongy feel usually indicates air in the system, which requires a professional brake bleed. Never squeeze hydraulic levers while the wheels are removed unless a brake spacer is in place, as this can overextend the pistons.
For cable-actuated brakes, carefully run your fingers along the exposed cables to check for fraying, especially near the anchor bolts. Look for rusted housings or excessive cable stretch, which can lead to delayed engagement or complete failure under pressure. If you find frayed wires, replace the cable before riding again.
You can fine-tune cable tension using the barrel adjusters on the brake calipers or levers. For rim brakes, the pads should rest about 1/8-inch to 1/4-inch away from the rim when not engaged. If there’s too much lever travel, turn the barrel adjuster counterclockwise to bring the pads closer.
Lastly, ensure you can comfortably reach the brake levers from your regular riding position without having to adjust your grip. Many brake levers allow for reach adjustments – use a multitool to reposition them if necessary. Once your brakes are in good shape, you’re ready to move on to inspecting the drivetrain for peak performance.
Mistake 3: Neglecting Drivetrain Maintenance
When you’re going through your pre-ride checklist, don’t overlook the drivetrain. Failing to maintain it can lead to chain slips, grinding noises, and unpredictable shifting. As Matt Phillips, Senior Test Editor at Bicycling, puts it:
"A properly adjusted and lubricated drivetrain should operate smoothly, quietly, and shift precisely. If it’s noisy and buzzy during riding and shifting, your drivetrain needs attention."
Skipping maintenance doesn’t just make your ride less enjoyable – it can also wear down expensive components faster. A worn chain can damage the cassette and chainrings, and in some cases, cause "chain suck", where the chain gets stuck between the crank and frame, potentially harming the frame itself.
Inspecting the Chain and Cassette
Start by rotating the pedals backward. The chain should glide smoothly without any strange noises or resistance. If you hear squeaking, grinding, or crunching, it’s time for maintenance. Shift through all gears to ensure smooth transitions. If shifting to a larger cog hesitates, try a counterclockwise barrel adjustment. If shifting to a smaller cog is sluggish, turn the barrel clockwise. Persistent issues might indicate stretched cables or dirt in the housing.
To check for chain wear, try the "3 O’Clock Test." Pull a chain link away from the chainring at the 3 o’clock position – if it lifts noticeably, the chain may need replacing. For a more accurate measurement, remember that a new chain has exactly 12 inches between 24 pins. If this distance stretches to 12-1/16 inches or more, it’s time for a replacement.
While inspecting, look for rust, stiff links, or any that don’t bend easily. Also, ensure the crank arms and chainring bolts are tight. Addressing these details ensures your drivetrain is ready for proper lubrication.
Ensuring Proper Lubrication
A well-lubricated chain reduces friction, guards against rust, and keeps your drivetrain in good shape. Apply lubricant after your ride to allow it to penetrate the chain rollers effectively. Focus on the inner rollers – they’re the parts that need lubrication. Outer links don’t require lube and will only attract dirt. After applying, rotate the chain a few times and wipe off any excess oil with a clean rag.
As Gavin Richardson, Chief of Cykel House, explains:
"The rollers inside the chain are the part that wears, which in turn causes wear to your cassette and chainring due to it not sitting snug in the teeth."
Select your lubricant based on the conditions you’ll ride in. Wet lube sticks well in muddy or wet environments but attracts more dirt, while dry lube is better for dry conditions since it resists grit but may wash off in the rain.
If your chain is particularly dirty, a simple wipe-down won’t cut it. Use a chain scrubber or soak the chain in a degreaser to remove built-up grime. Avoid spraying high-pressure water directly at the drivetrain, as it can damage delicate bearings.
Once your drivetrain is clean and running smoothly, you’re ready to move on to checking your suspension and frame integrity.
Mistake 4: Overlooking Suspension and Frame Integrity
Your bike’s suspension isn’t just about a smooth ride – it’s a cornerstone of control and safety. If your fork and shock aren’t dialed in correctly or your frame hides unseen damage, you’re risking more than just discomfort. Poor handling is the best-case scenario; at worst, it could lead to a dangerous crash. Will Soffe, Workshop Manager at BikeRadar, puts it bluntly:
"Incorrectly set rebound damping will, at best, reduce comfort and speed and, at worst, make the bike dangerous and unpredictable to ride."
Misadjusted suspension undermines your control, while loose bolts or frame cracks can lead to mechanical failure mid-ride. A quick pre-ride inspection can catch these problems before they escalate, giving you the chance to fine-tune your suspension and ensure your frame is up to the task.
Checking Suspension and Sag Settings
Start by dialing in your sag, which measures how much your suspension compresses under your weight. For front forks, aim for sag between 15% and 20%, and for rear shocks, shoot for 25% to 30%. Too much sag makes your bike feel sluggish and increases the chance of pedal strikes. Too little sag, on the other hand, results in a harsh ride with poor traction.
Adjust the air pressure in increments of 15–20 psi to find the right balance. Then, compress and release both the front and rear suspension to check for balanced rebound. Both ends should offer similar support and return at the same speed. If one rebounds faster or slower, your bike’s handling can become erratic and unsafe.
Rebound damping is another critical setting. Compress the suspension and watch how it rebounds. If it bounces back too quickly – like a pogo stick – you risk getting thrown off when hitting obstacles. On the flip side, if it rebounds too slowly, the suspension can “pack down,” failing to recover between bumps and making each hit feel harsher. Trevor Raab from Bicycling.com emphasizes the importance of proper pressure:
"Too little [pressure], and you risk bottoming out, which can damage the shock, your bike, or your body."
Inspecting Frame and Pivot Points
Your bike’s frame endures constant stress, and cracks can appear without warning – especially near welds, the rear linkage, swingarm, and chainstays. Before every ride, take a close look at these areas for cracks or stress marks. Ignoring this step could lead to catastrophic failure on the trail.
Next, check for play in your pivot points. Hold the front brake and rock the bike back and forth. If you feel a knocking sensation, your headset is loose and needs immediate attention. Lift the rear of the bike by the frame and check for clunking or excessive movement in the rear triangle. Doug Stenclik from Cripple Creek Backcountry highlights a common issue:
"90% of what should be checked on a bike are bolts that sometimes have the tendency to loosen over time."
Suspension pivots and linkages should be inspected for tightness every 10 hours of riding. Use a torque wrench to ensure bolts are tightened to the manufacturer’s specifications. Over-tightening can bind the suspension, while under-tightening can allow parts to loosen during your ride. If bolts are secure but there’s still play, it’s likely time to replace the bushings or bearings. Never ignore a loose headset or a cracked frame – the risks simply aren’t worth it. Once you’ve confirmed your suspension and frame are in good shape, you can move on to securing your cockpit and controls.
sbb-itb-9d75ae1
Mistake 5: Forgetting Cockpit and Control Tightness
After securing your bike’s suspension and frame, don’t neglect the cockpit and control components. An unsecured cockpit can quickly turn a routine ride into a hazardous one. Imagine your handlebars slipping, your stem shifting, or your brake levers rotating unexpectedly – these issues can rob you of the precise control you need, especially on technical trails. Over time, vibrations can loosen bolts, creating serious risks. For example, a loose steertube bolt can lead to independent stem movement, resulting in a complete loss of steering. Similarly, loose stem faceplate bolts might allow your handlebars to shift when you hit a bump or apply force, throwing you off balance. If the bolts securing your shifter or brake levers loosen, the controls could rotate around the bar when engaged, compromising both braking and shifting.
Securing the Cockpit Components
Start by checking the headset. Hold down your front brake and rock the bike back and forth. If you feel a knocking sensation, it’s a sign your headset needs adjustment. For a more detailed check, stand over your front wheel and twist the handlebars. If they move independently of the wheel, it’s time to tighten your stem steertube bolts.
Next, inspect the stem faceplate bolts. Tighten them in an "X" pattern (top-left, bottom-right, bottom-left, top-right). This ensures even pressure distribution and maintains equal gaps at the top and bottom of the faceplate. If your bike has carbon components, use a torque wrench to avoid damaging the material. Most stem bolts require a torque of around 5–6 Nm, but always follow your manufacturer’s guidelines.
Finally, ensure your controls operate reliably under normal force.
Testing Controls and Adjustments
Your brake and shifter levers should be secure but not overly rigid. David Arthur, Tech Editor, explains:
"You want controls to be tight enough not to move under normal operating forces, yet not so tight, that in the event of a crash or collision, they won’t move. It’s better they move or rotate than snap."
Press each lever to ensure it stays in place during regular use but can still move under significant impact. Pay close attention to dropper post levers, which often require very low torque – around 2.5 Nm. Over-tightening these can strip threads or damage the mechanism. For optimal comfort, position your brake levers at about a 45-degree angle or parallel to your forearms. This alignment helps keep your wrists straight and reduces arm fatigue.
Once your cockpit is secure and your controls are properly adjusted, you’ll be better equipped for a safer, smoother ride.
Mistake 6: Skipping Helmet and Protective Gear Fit
Making sure your helmet fits properly is just as important as checking your bike’s mechanics before a ride. If your helmet doesn’t fit securely, it can shift during a fall, leaving you unprotected when it matters most. A well-fitted, CPSC-certified helmet can prevent 85% of head injuries and significantly lower the risk of serious or fatal injuries – by 69% and 65%, respectively. Yet, many riders mistakenly believe that once they’ve adjusted their helmet, it will stay secure indefinitely. Katherine Moore, a contributor at BikeRadar, emphasizes this point:
"Fitting and wearing a helmet properly is just as important as wearing one at all because without the correct fit, the bike helmet’s function can be seriously compromised."
Here’s how to ensure your helmet and other protective gear are ready to keep you safe.
Ensuring Helmet Fit
Start by wearing your helmet level on your head, ensuring it covers your forehead by about one to two finger-widths. If it tilts back and leaves your forehead exposed, it won’t offer proper protection in a crash.
- Adjust the side straps so they form a "V" shape that meets just below your earlobes.
- Tighten the chin strap so it’s snug – only one or two fingers should fit between the strap and your chin.
Before each ride, perform a wiggle test. Once fastened, your helmet shouldn’t move more than an inch in any direction when pushed side-to-side or front-to-back. You can also try the yawn test: when you open your mouth wide, the helmet should pull down noticeably. If it doesn’t, tighten the chin strap. Keep in mind that straps can loosen over time, so it’s a good habit to check the fit before every ride. For mountain bikers, helmets designed specifically for the trails offer extra coverage for the back of your head and often include visors to shield against low-hanging branches and glare.
Checking Additional Protective Gear
Your helmet isn’t the only piece of gear that needs attention – other protective equipment, like gloves, knee pads, and body armor, should fit securely too. Loose-fitting pads can slide during a fall, reducing their effectiveness. Before heading out, make sure your knee and elbow pads haven’t lost their elasticity. If they slip easily when you move, they won’t stay in place during an impact. Gloves should fit comfortably without bunching or restricting finger movement, so you can maintain full control of your brakes and shifters. All protective gear should feel secure but not so tight that it limits your circulation or range of motion.
Building a Reliable Pre-Ride Routine
Taking the safety checks a step further, it’s smart to combine them into a dependable pre-ride routine. The good news? This doesn’t have to be a drawn-out process. A thorough check of your bike takes just 5 to 10 minutes. As the National Interscholastic Cycling Association (NICA) wisely points out:
"One major element to a safe and enjoyable mountain bike ride is to have a well-maintained, properly functioning bike."
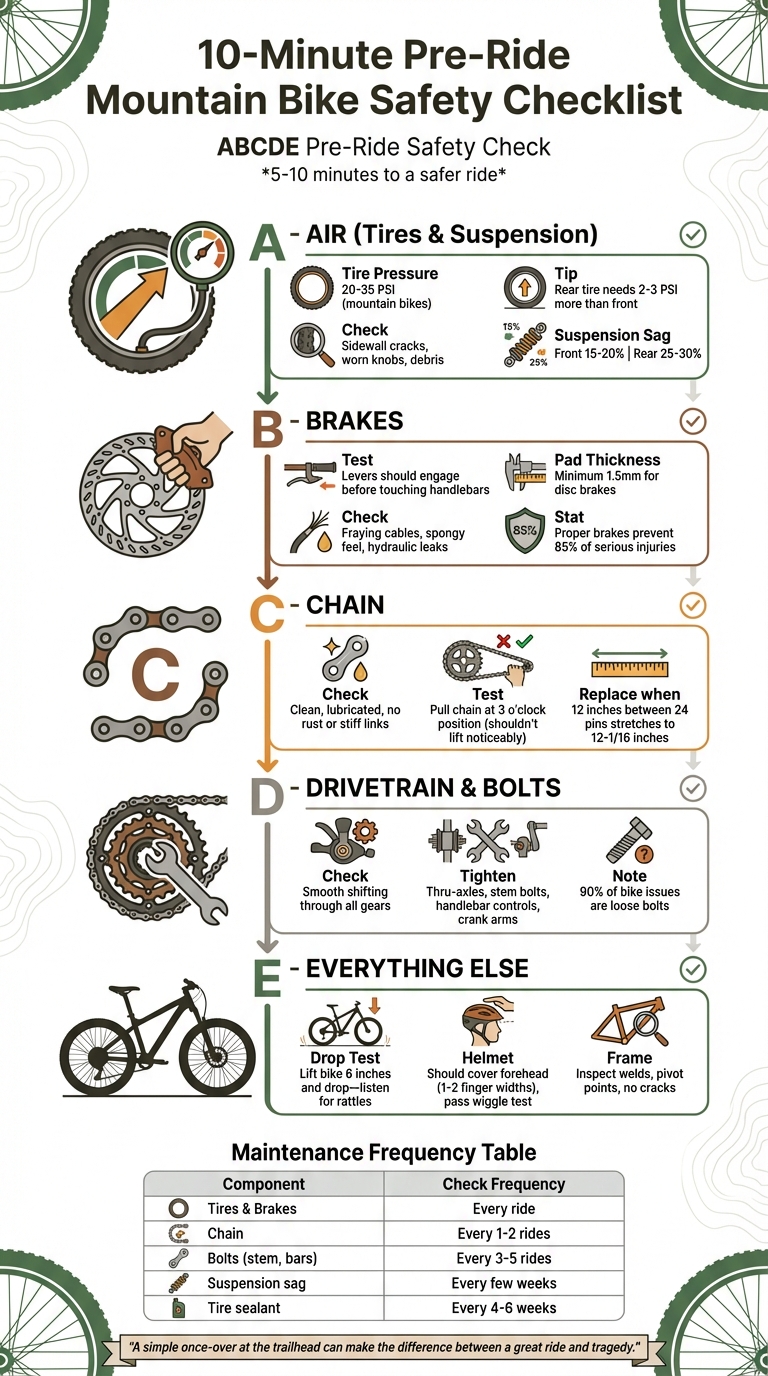
Creating a 10-Minute Pre-Ride Checklist
The ABCDE method simplifies the process into five key steps: Air, Brakes, Chain, Drivetrain, and Everything else. Here’s how it works:
- Air: Use a floor pump with an accurate gauge to check tire pressure – guessing by hand isn’t reliable. For air-sprung suspension, double-check sag settings with a shock pump every few weeks.
- Brakes: Test the brake levers in a parking lot stop. Make sure the wheels stop before the levers touch the handlebars.
- Chain: Ensure the chain is clean and properly lubricated. Shift through all gears to confirm smooth transitions.
- Drivetrain and Bolts: Check that thru-axles or quick releases are secure, along with stem faceplate bolts, handlebar controls, and crank arms.
- Everything Else: Lift the bike a few inches and drop it. Listen for rattles or loose parts.
Keep essential tools handy: a floor pump with a gauge, a shock pump, a multi-tool with the right bits, chain lubricant, and a clean rag. These small steps can make a big difference.
| Component | What to Check | Frequency |
|---|---|---|
| Tires | Pressure and sidewall cuts | Every ride |
| Brakes | Lever feel and pad thickness | Every ride |
| Chain | Lubrication and cleanliness | Every 1–2 rides |
| Thru-Axles | Tightness/Security | Every ride |
| Bolts | Stem, bars, and linkage | Every 3–5 rides |
| Suspension | Sag and air pressure | Every few weeks |
By following this checklist, you’ll keep your bike trail-ready at all times.
The Value of a Consistent Approach
Using this checklist consistently does more than prevent breakdowns – it builds trust in your bike’s performance. When you know how everything should feel, you’ll be quicker to spot when something’s off. Mountain bikes endure constant vibrations on rough trails, and small problems can snowball into major issues if ignored.
As Called2RideMTB, a Maryland NICA coach, puts it:
"A quick once-over of the bike can make the difference between a good ride and walking out."
For example, a loose stem bolt or underinflated tires might seem minor but can lead to serious trouble mid-ride. Regular checks also help you stay ahead of maintenance tasks, like tightening linkage bolts on full-suspension bikes every 3 to 5 rides or refreshing tire sealant on tubeless setups every 4 to 6 weeks. These small habits go a long way in keeping your rides smooth and worry-free.
Conclusion
A solid pre-ride routine isn’t just about preparation – it’s about safety. Mountain biking is thrilling, but it comes with risks that can often be avoided with a quick check before hitting the trails. As Jason Van Horn from Bermstyle wisely notes:
"A simple once-over at the trailhead can make the difference between a great ride and tragedy".
The six common mistakes we’ve discussed – skipping tire checks, ignoring brakes, neglecting the drivetrain, overlooking suspension and frame integrity, forgetting cockpit tightness, and skipping gear fit – are entirely preventable. By taking just 5 to 10 minutes to inspect your bike, you can address potential issues while still in the parking lot, rather than dealing with them in the middle of a remote trail.
Using the ABCDE method makes this process second nature. When you’re familiar with how your bike should feel and function, identifying and addressing problems becomes almost instinctive. This habit not only keeps you safe but also protects your gear and saves you from costly repairs.
In short, those few minutes of preparation before each ride are a small investment with big returns. They ensure your bike is ready to handle the trail, giving you peace of mind and allowing you to focus on what matters most – enjoying the ride.
FAQs
How often should I inspect my bike’s tires before a ride?
Before you hit the road or trail, take a moment to give your bike tires a quick once-over. Start by checking the tire pressure – make sure it’s inflated to the level recommended by the manufacturer. Then, scan for any visible damage like cracks, cuts, or signs of heavy wear that might compromise your ride. These simple pre-ride checks can go a long way in avoiding problems and keeping your ride smooth and safe.
How can I tell if my bike’s brakes need immediate attention?
If your bike’s brakes are letting out a high-pitched screech, it’s often a sign that the brake pads are either worn out or not aligned correctly. Another red flag? When the brake pads are visibly worn down to less than 1/4 inch thick. Either way, it’s crucial to inspect and fix the problem quickly to stay safe on the road.
Taking a moment to check your brakes before every ride isn’t just a good habit – it can help you prevent accidents and keep your bike running smoothly.
How do I make sure my helmet and protective gear fit correctly before a ride?
To get the best fit for your helmet and protective gear, start by using a flexible tape measure to check the size of your head. Wrap the tape around your forehead, just above your eyebrows, to get an accurate measurement. Once you have the measurement, pick a helmet size that matches it. Adjust the helmet’s fit system so it sits level on your head, and make sure the straps form a snug "V" shape around your ears. The helmet should stay firmly in place without feeling too tight or causing discomfort.
When it comes to knee and elbow pads, ensure they fit securely and don’t slide around or limit your movement. Try moving around while wearing them to confirm they stay in place during activity. Properly fitting gear not only keeps you safe but also makes your ride more comfortable, giving you the confidence to enjoy every moment.