Injuries on mountain biking (MTB) trails can happen when you least expect them, often in remote areas far from help. Planning ahead is critical to ensure your group can handle emergencies effectively. Here’s what you need to know:
- Pre-Ride Planning: Map your route, identify exit points, and assign roles like Incident Leader and First Aid Lead. Share your itinerary with someone who can alert authorities if needed.
- Emergency Gear: Carry medical supplies (e.g., bandages, tourniquets), repair tools (e.g., multitool, spare tubes), and survival items like whistles, GPS devices, and emergency blankets.
- Communication: Establish clear meet-up points, use tools like satellite messengers in areas without cell service, and always send at least two people to get help if necessary.
- Evacuation Process: Stay calm, secure the area, stabilize the injured person, and use your pre-assigned roles to coordinate the evacuation.
- Post-Incident Review: Reflect on what worked, restock supplies, and practice emergency scenarios to improve future preparedness.
Preparation, teamwork, and the right equipment can make all the difference when facing unexpected challenges on the trail.
Mountain Bike 101, EMERGENCY ACTION PLAN Explained for You, Episode 1
Pre-Ride Planning: Creating Your Emergency Action Plan
Before heading out on your ride, take the time to put together a solid emergency action plan. This plan should clearly outline your route, assign responsibilities within the group, and establish how you’ll communicate if something goes wrong. It will serve as the foundation for everything else you prepare.
Mapping Trails and Identifying Exit Points
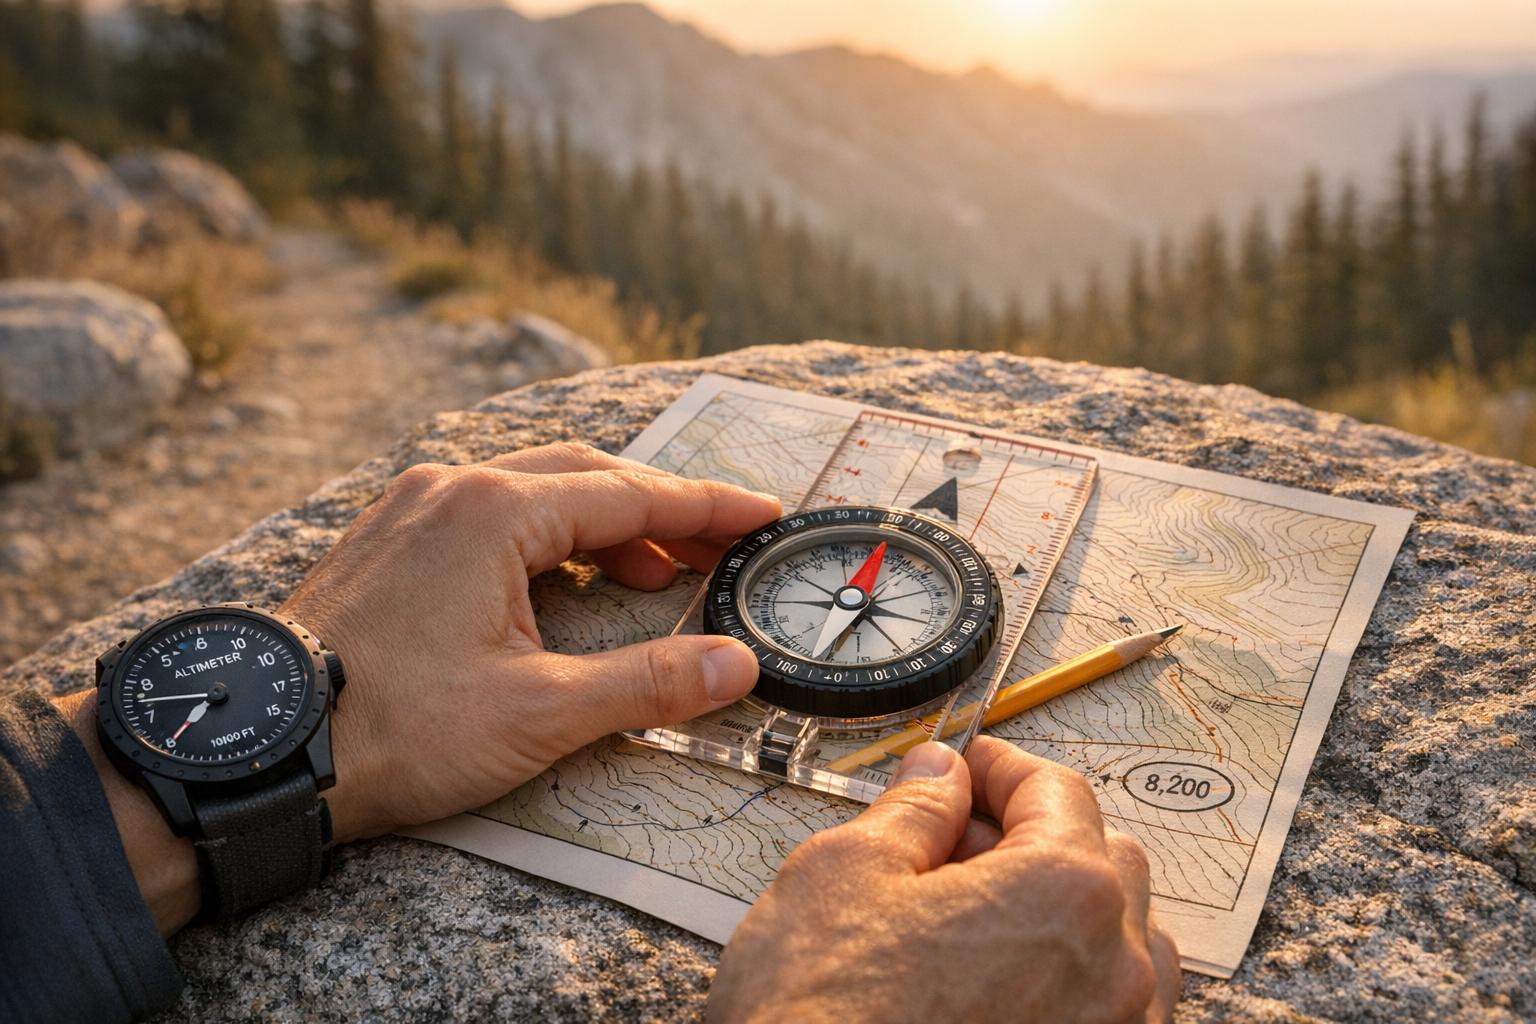
Start by reviewing your planned route using physical maps, a compass, and a GPS device. Relying solely on your smartphone isn’t a good idea since batteries can die or signals may drop when you need them most. Be sure to mark trail exit points that can quickly lead to roads or trailheads. It’s also smart to identify "bailout routes" – these are paths that allow faster access to help in case of an emergency.
Check the weather forecast ahead of time. If conditions look bad, either choose a route with more accessible exits or reschedule the ride altogether. Share your full itinerary with someone staying behind. Include details like specific trail names, your estimated return time, and a "past-due" time – this is the point when they should call 911 if you haven’t checked in. Also, make sure you research and jot down local emergency numbers (like 911 in the U.S.) before you head out.
Assigning Group Roles and Responsibilities
Clear roles within your group can make all the difference in an emergency. Appoint an Incident Leader to take charge and delegate tasks. Identify a First Aid Lead, ideally someone with medical training, to manage injuries and urgent care. If someone gets hurt and can’t continue, you’ll need a Stretcher Team of at least four people to help transport them.
"Utilize the entire group; organize and assign individuals to do certain tasks." – The Mountaineers
If help needs to be sent for and there’s no cell signal, never send one person alone – always send at least two riders together. When assigning roles, take into account each person’s strengths, such as medical expertise, mechanical skills, or familiarity with the area. You should also assign someone outside the group – like a friend or family member – to act as your communication hub in case of emergencies.
Establishing Communication Plans
Once roles are assigned, make sure everyone knows how to stay in touch during emergencies. Build on your plan by setting up clear methods for communication. Designate a specific meet-up location where everyone will regroup if the group gets separated. Equip yourself with tools like cell phones with location services, whistles, and signaling devices such as mirrors or flashlights. Whistles are especially useful – they’re louder than yelling and conserve energy.
For areas without cell coverage, bring a satellite messenger or a Personal Locator Beacon (PLB). These devices can send distress signals with GPS coordinates, ensuring rescuers can find you even in remote locations. If you have to call 911 from the trail, be prepared to share key details like your GPS coordinates, the trailhead name, nearby landmarks, and even the colors of your group’s clothing. Finally, set a clear return time buffer (e.g., if the group isn’t back by 5:00 PM, someone should call 911).
Required Gear for Group Emergency Preparedness
MTB Emergency Kit Comparison: Lightweight vs Full Backcountry Setup
Once you’ve laid out your pre-ride emergency plan, the next step is making sure your group is equipped with the right gear. Having the proper tools and supplies can turn a potential disaster into a manageable situation. The trick is finding the balance between being prepared and not overloading your packs to the point where fatigue sets in before the ride even gets interesting.
Group Emergency Kit Checklist
A well-rounded emergency kit should address three key areas: medical care, mechanical repairs, and survival essentials.
Medical Supplies
Your kit should be versatile enough to handle anything from minor scrapes to more serious injuries. Chris Alston, Senior Training Officer at Cycling UK, emphasizes:
"First aid kits should be scalable dependant on type of activity, who is participating and how remotely you are operating".
Include basics like bandages, gauze, tape, antiseptic wipes, and common over-the-counter medications. For more critical scenarios, consider adding a SAM splint (around $12), a CAT tourniquet ($20–$30), and an Israeli bandage ($10–$20). Keep everything dry and organized in a 2-liter dry bag, which will protect your supplies from rain or accidental submersion.
Mechanical Repair Tools
A mechanical failure can easily leave your group stranded, so pack tools for common fixes. A multitool with a chain breaker, spare tubes, tire levers, a compact hand pump, and spare chain links are essential. Don’t forget a spare derailleur hanger specific to your bike model – it can save you from a ride-ending breakdown. Items like duct tape and zip ties are also great for quick, temporary fixes, whether you’re patching up gear or securing an emergency bandage.
Navigation and Communication
While fully charged phones with location services are helpful, don’t rely on them entirely, especially in remote areas. For areas without cell service, carry a satellite messenger or a personal locator beacon (PLB) to send GPS distress signals. Devices like the Garmin inReach or the emergency SOS feature on newer iPhones are solid options. Equip each rider with an emergency whistle – three sharp blasts are a universal distress signal and a lot less exhausting than yelling. Physical maps and a compass are excellent backups in case your electronics fail.
Survival Items
Prepare for unexpected delays with lightweight survival gear. Mylar emergency blankets can help you stay warm, and water purification tablets let you safely drink from natural sources. Each rider should also carry at least one high-calorie gel or energy bar for an energy boost in emergencies. For longer or more remote group rides, consider bringing a shelter designed for 4–6 people and thermal bivy bags for added protection.
The gear you bring should always be tailored to the specific demands of your ride.
Lightweight vs. Full Kits
The type of kit you carry depends on the duration, difficulty, and location of your ride. Emergency room doctor Will Timbers advises:
"Build a kit that you’ll actually bike with… prioritize the most important items and make sure you know how to use them".
For a short ride near town, a lightweight kit with just the essentials will do. But if you’re heading into the backcountry, you’ll need a more comprehensive setup.
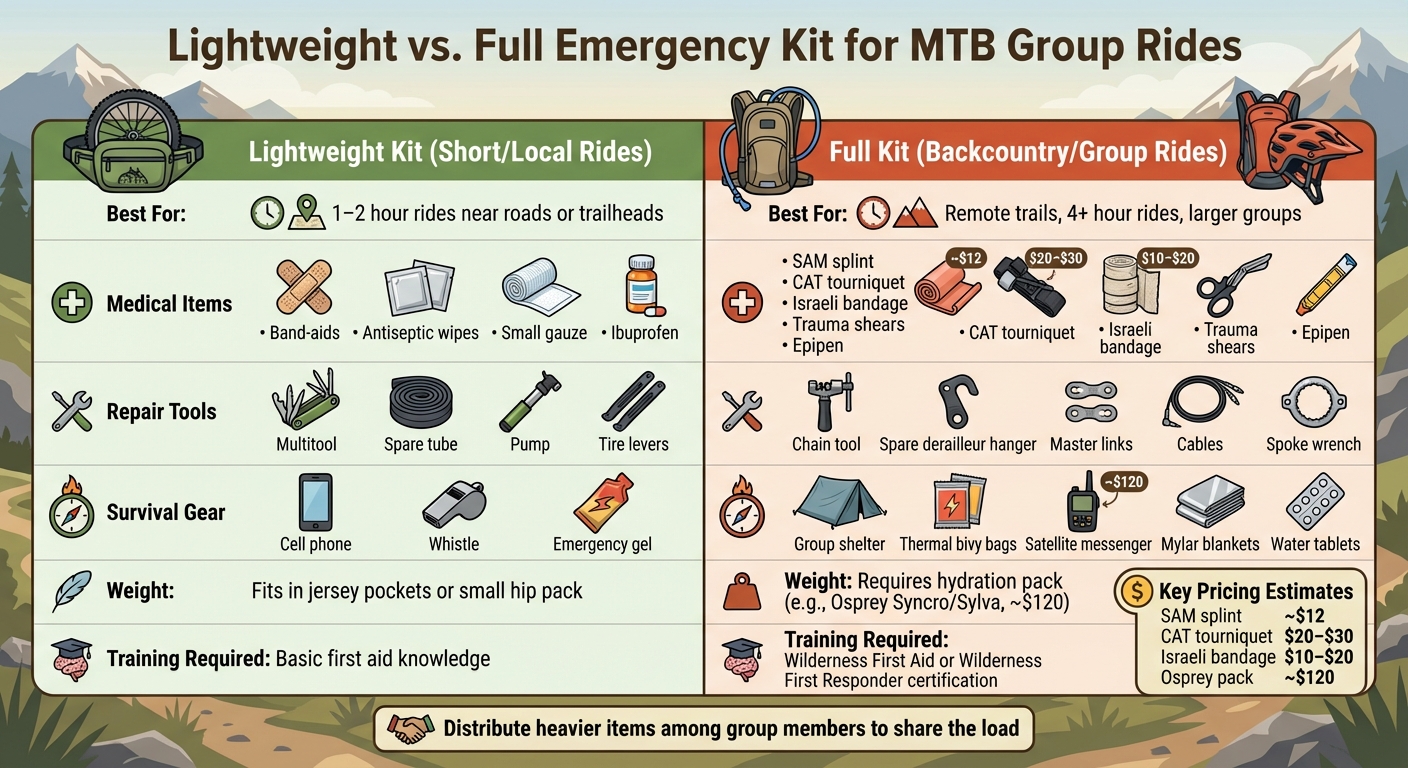
| Feature | Lightweight Kit (Short/Local Rides) | Full Kit (Backcountry/Group Rides) |
|---|---|---|
| Best For | 1–2 hour rides near roads or trailheads | Remote trails, 4+ hour rides, larger groups |
| Medical Items | Band-aids, antiseptic wipes, small gauze, ibuprofen | SAM splint, CAT tourniquet, Israeli bandage, trauma shears, Epipen |
| Repair Tools | Multitool, spare tube, pump, tire levers | Chain tool, spare derailleur hanger, master links, cables, spoke wrench |
| Survival Gear | Cell phone, whistle, emergency gel | Group shelter, thermal bivy bags, satellite messenger, Mylar blankets, water tablets |
| Weight | Fits in jersey pockets or a small hip pack | Requires a hydration pack (e.g., Osprey Syncro/Sylva, ~$120) |
| Training Required | Basic first aid knowledge | Wilderness First Aid or Wilderness First Responder certification |
To avoid overloading any one rider, distribute heavier items among the group. For example, one person can carry the group shelter, another the first aid kit, and someone else the extra tools. This way, the load is shared, and the group remains prepared. It’s also smart to keep a backup kit in your vehicle at the trailhead, stocked with items like ice packs, extra clothing, bulk snacks, and a floor pump.
Michael Paul, a seasoned MTB product reviewer, sums it up well:
"Chances are, most of the time that you ride you will never need anything but water and nutrition. Being prepared with an emergency kit, however, could help you give the ol’ middle finger to Murphy and his ‘Law’ if disaster strikes".
sbb-itb-9d75ae1
How to Execute a Safe and Efficient Evacuation
In emergencies, take a moment to think clearly. Use the "10 for 10" rule: pause for 10 seconds to plan your next 10 minutes of action. Start by clearing the area – move bikes and gear off the trail to prevent further accidents. If the injured person can’t be moved, position someone at a nearby trail junction to redirect traffic. Once the area is safe, rely on your pre-assigned roles and communication plan to begin the evacuation process. Assign a "Take Charge" leader and a primary caregiver, ideally someone with first aid training. As Peter Walker, a Technical Editor and trained paramedic, explains:
"Simple preparation, conscious behaviour and the right prevention can avoid a lot of drama in an emergency situation, save lives, or significantly reduce long-term damage".
Follow these steps: take charge, provide urgent first aid, secure the patient, check for other injuries, and then plan and carry out the evacuation. If the injured rider can’t be moved, set up a shelter using emergency blankets or any gear on hand. If calling 911, use the "Five W’s": Where it happened (include GPS coordinates), Who is calling, What happened, Who is injured, and Wait for further instructions.
In areas without cell service, send a Help Party of at least two experienced riders to find a signal or reach the trailhead. Never send anyone alone. Record GPS coordinates on at least two devices and mark the location on a physical map for them to carry. Place "marshals" at trail junctions to guide emergency responders to the scene. If medication is administered to the injured rider, write the drug name, dose, and time directly on their arm for rescuers to see.
This calm, structured approach ensures injuries are managed effectively and evacuation proceeds smoothly.
Treating Injuries and Helping Injured Riders
Once the scene is secure, focus on stabilizing the injured rider. Address immediate needs like controlling bleeding, stabilizing fractures, and checking for head or spinal injuries. If a spinal injury is suspected but the rider must be moved due to immediate danger (like falling debris or fire), use proper techniques such as the straight lift. This requires five people: one to stabilize the head and neck, and four to support the body.
Only move the patient if absolutely necessary. Moving someone with a serious injury can cause further harm. If they’re cold, keep them warm with extra layers or an emergency blanket. Have them lie on a backpack to reduce heat loss from the ground. Reassure them and monitor their condition while waiting for rescue. Keep in mind that search and rescue teams may take hours or even days to arrive, depending on the circumstances.
For minor injuries, the rider may be able to walk out with assistance, which is often the safest option. Carrying someone over rough terrain is only practical for short distances (under 5 miles) and requires 6 to 8 adults to manage a stretcher. As The Mountaineers emphasize:
"Don’t let anyone leave unless you’ve assigned them to go get help, and no one should be solo – your obligation is to the whole group, not just the injured person".
Evacuating in Difficult Conditions
Challenging conditions like extreme weather, wildlife, or rugged terrain can complicate evacuations. In hot weather, move everyone to shade and watch for signs of heat stress in the group – not just the injured person. Encourage hydration and eating salty snacks to maintain electrolyte balance. In cold conditions, layer up before you feel cold and tuck pants into socks to retain warmth. Keep cell phones inside clothing to preserve battery life, and use airplane mode to conserve power while keeping GPS active.
For steep or uneven terrain, mechanical systems like Z-pulleys can help with patient transport. On long routes, set up relay stations to rotate carriers and provide care. If using a stretcher, pad it with blankets or foam to minimize discomfort during transport.
Avoid building a fire for signaling during wildfire season or in high-risk areas. Instead, use tools like a whistle (three sharp blasts), a signal mirror, or a flashlight in an SOS pattern (three quick flashes, three slow, three quick) to alert rescuers. When coordinating with emergency vehicles, choose noticeable landmarks like trail forks or river crossings, as GPS coordinates alone may not be sufficient for responders without proper equipment.
Paul Petzoldt, founder of the National Outdoor Leadership School, offers this reminder:
"Rules are for fools… backcountry travelers need to assess the situation and make your best determination on the best response".
Emergencies are unpredictable, so stay adaptable, communicate clearly with your group, and prioritize the safety of everyone – not just the injured rider.
Post-Evacuation Review and Training
Once everyone is safe, it’s time to reflect on the incident and assess its impact. Start by checking in on everyone’s emotional well-being. Serious incidents can leave both group members and leaders feeling shaken, so it’s important to ask if anyone could benefit from counseling or follow-up support. These conversations are a key step toward improving your emergency response strategy.
Debriefing and Updating Your Emergency Plan
The depth of your review will depend on the severity of the incident. The Mountaineers use a straightforward three-tier system to classify incidents:
- Major: Required a 911 or search-and-rescue response.
- Significant: 911 was called, but emergency personnel weren’t ultimately needed.
- Minor: Near misses, equipment failures, or injuries that didn’t need professional care.
Major incidents call for a detailed review, while minor ones might only need a quick discussion and a check of your gear.
Take a close look at your SOAP notes to evaluate what worked well and what didn’t. Did your communication devices perform as expected? Were GPS coordinates and trail landmarks clear enough for emergency responders? Did everyone understand their roles during the evacuation? Use these insights to fine-tune your Emergency Action Plan. Update your maps to highlight challenging areas, restock any medical supplies or food used, and revise your "special needs" list if any group members now have new medical considerations.
Don’t delay restocking supplies. Replace items like bandages, medications, batteries, and any gear that failed during the evacuation. If you had to improvise equipment – like a stretcher or a signaling tool – make sure to document those solutions and consider adding similar items to your standard kit. Regular reviews and practice sessions will help your plan stay aligned with your group’s evolving experiences.
Training and Skill Development
Emergency drills are essential. Enrolling in a Wilderness First Aid (WFA) course can teach you critical skills like patient assessment, wound care, and making evacuation decisions in remote areas. For those looking to deepen their knowledge, a Wilderness First Responder (WFR) certification offers advanced training in backcountry medical care. Organizations like NOLS, the Red Cross, and local outdoor education centers provide these courses.
Apply what you’ve learned to strengthen your group’s preparedness. Regularly practice scenarios, like a 10-minute evacuation challenge, to keep everyone sharp. Build improvised stretchers using tarps and poles, and rehearse signaling techniques, such as the three-whistle blast or the SOS flashlight pattern (three quick flashes, three slow, three quick).
Grant Rayner, founder of Spartan9, underscores the importance of planning ahead:
"It’s imperative that you consider evacuations at the start of your expedition planning. Don’t plan everything, and then consider evacuations as an afterthought."
Conclusion: Staying Prepared for Safe Mountain Biking Adventures
Being ready for group evacuation and emergencies can make all the difference on the trail. The line between a minor mishap and a major crisis often comes down to preparation, having the right gear, and working together as a team.
Before heading out, check the weather forecast, share your route with a trusted contact, and pick trails that match the skill levels of everyone in your group. It’s also a good idea to keep a record of your group members for quick identification if needed. On the trail, stick to a pace that works for everyone, and agree on clear meet-up points. These simple steps set the stage for effective responses if something goes wrong.
Your gear plays a big role in keeping you safe. An emergency kit isn’t just about what’s inside – it’s about knowing how to use it. Take time to review its contents and practice using them. A well-stocked kit, combined with your familiarity with it, can be a lifesaver. Keep in mind that while mountain bikers can cover miles quickly, an injury or mechanical issue can turn a short ride into an unexpected overnight stay.
Preparation doesn’t stop at packing. Practice emergency scenarios with your group. Try a 10-minute drill where you gather essential gear and simulate an evacuation. Build makeshift stretchers, rehearse communication strategies, and assign roles so everyone knows their part in an emergency. As Colorado Search and Rescue advises:
"When injured or lost parties delay calling because they’re ashamed to call or think they might be charged, it results in increased risk for both you and the rescuers."
If the situation calls for it, don’t hesitate – call for help immediately.
The trails will always be there, but your safety depends on the effort you put into preparation. Regularly update your emergency plan, restock supplies after use, and invest in wilderness first aid training to sharpen your skills. By practicing and staying prepared, you’ll be ready to handle emergencies with confidence – so you can focus on what you love most: the thrill of the ride.
FAQs
What key roles should be assigned for a safe group evacuation on MTB trails?
To handle emergencies on mountain biking trails effectively, assigning specific roles within your group before heading out is key. Here are the essential roles to consider:
- Leader: Takes charge during emergencies, evaluates the situation, and organizes the group’s response.
- First-Aid Responder: Administers immediate medical care to the injured rider.
- Communicator: Makes emergency calls (like dialing 911) and ensures everyone stays informed about the situation.
- Transport Coordinator: Maps out the fastest evacuation route and arranges transportation for the injured person.
- Safety Monitor: Keeps an eye out for potential risks, such as sudden weather changes or dangerous trail conditions, to maintain group safety.
By assigning these roles in advance, you can create a clear plan and respond quickly, ensuring everyone’s safety on the trail.
How can I communicate effectively during an emergency on mountain biking trails?
Effective communication is crucial for managing a safe group evacuation during emergencies on mountain biking trails. Start by equipping your group with dependable two-way radios that function without cellular service, and agree on a shared channel before heading out. Assign specific roles, such as a team leader to handle coordination and a point of contact responsible for reaching emergency services if necessary.
Create straightforward signal codes for situations like an "all-clear" or an "emergency", and schedule regular check-ins to ensure everyone’s safety. Always have a backup plan in place – make sure at least two riders carry cell phones or satellite messengers in case the radios fail. Practicing your communication plan beforehand ensures everyone knows the protocol and can act quickly if needed.
In the event of an emergency, remain calm and use clear, concise language to describe the situation, your location, and the type of help required. After the ride, evaluate how well the plan worked and make adjustments for future outings. Strong communication is the foundation of a safe and prepared group on the trail.
What should I pack in an MTB emergency kit for group rides?
A well-prepared MTB emergency kit can make all the difference when unexpected situations arise on the trail, especially during group rides. While the exact items you pack may depend on the terrain and weather, here are some essentials to consider:
- First aid essentials: Pack bandages, antiseptic wipes, adhesive tape, pain relievers, and any personal medications your group might need.
- Bike repair basics: A multi-tool, tire levers, a patch kit, a spare tube, and either a portable air pump or CO2 inflator are must-haves for handling bike issues.
- Navigation and communication tools: Bring a map, a compass or a fully charged GPS device, and a whistle or two-way radio for emergencies.
- Safety items: Include a headlamp or flashlight with extra batteries, a survival blanket, and a compact rain poncho to stay prepared for unexpected weather.
- Food and hydration: Pack high-energy snacks and enough water for everyone in your group. A portable water filter can also come in handy if you need to refill from natural sources.
Make sure your kit aligns with the specific needs of your group and the trail you’re tackling. Regularly inspect and update your supplies so that everything is ready when you need it. For more detailed advice and guides on mountain biking preparation, check out trusted sources like Intermountain Bikes.