When selecting tires for your rims, matching the right sizes is essential for safety and performance. A tire and rim fit chart helps you identify which combinations work best, ensuring proper handling, stability, and reducing risks like blowouts or tire burping. Here’s what you need to know:
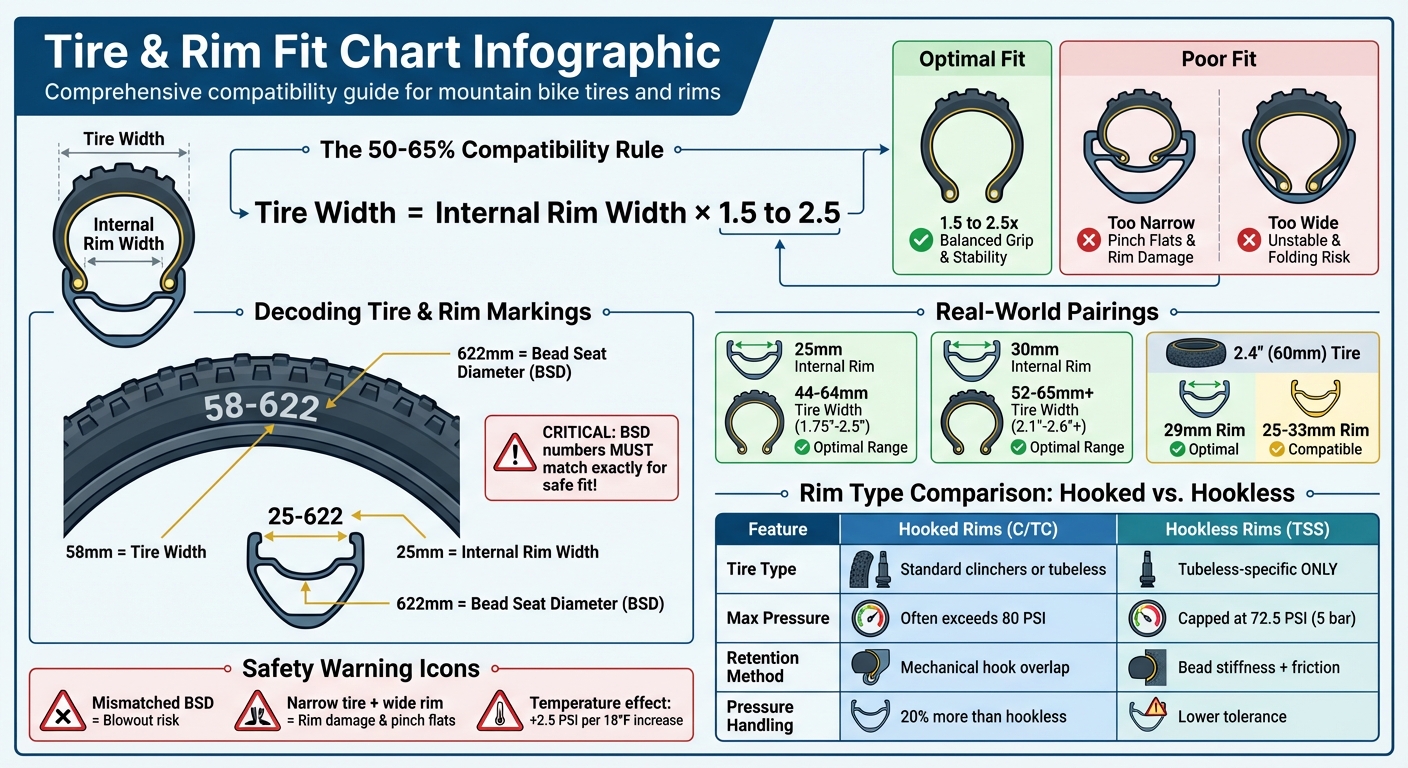
- Tire & Rim Pairing: Tire width should generally be 1.5 to 2.5 times the rim’s internal width.
- ETRTO Standards: Ensure tire and rim Bead Seat Diameters (BSD) match exactly for compatibility.
- Shape Matters: Incorrect pairings can lead to unstable tire profiles, compromising performance.
- Pressure Adjustments: Wider rims often require lower tire pressures for better grip and safety.
- Rim Design: Hooked rims handle higher pressures, while hookless rims require tubeless-specific tires.
Tire and Rim Compatibility Guide: Width Ratios and Rim Type Comparison
Tire and Rim Compatibility Standards
ETRTO and ISO Standards Explained

The ETRTO (European Tyre and Rim Technical Organisation) has established detailed specifications for tire and rim sizes to ensure compatibility and safety across manufacturers. Their work led to the creation of ISO 5775, a global standard for labeling bicycle tires and rims, which is now maintained by the International Organization for Standardization.
These standards use a millimeter-based system (e.g., 57-622). The first number refers to the tire’s inflated width in millimeters, while the second is the Bead Seat Diameter (B.S.D.) – a critical measurement that determines whether a tire will fit securely on a rim and handle pressure safely. For rims, the first number represents the internal width between the flanges, while the second remains the B.S.D..
A tire can only fit a rim if their B.S.D. numbers match exactly. This eliminates the confusion of older sizing systems, where terms like "28-inch" could refer to rims with diameters of either 622mm or 635mm – two sizes that are not interchangeable despite sharing the same name.
Understanding these precise measurements is key to grasping their role in ensuring safety and performance.
Why These Standards Matter
These standards go beyond technical details – they play a crucial role in safety and handling. Adhering to ETRTO and ISO specifications directly impacts your confidence on the trail. If the B.S.D. or sidewall height is mismatched, the tire might not have adequate support, increasing the risk of blowouts, particularly in tubeless setups. This risk is even higher during aggressive riding.
Improper matching also affects handling. A tire that’s too wide for a narrow rim can lead to a spongy ride and make the tire more prone to folding or burping. Conversely, a tire that’s too narrow for a wide rim increases the likelihood of rim damage and pinch flats.
Temperature fluctuations introduce another challenge. Tire pressure rises by about 0.17 bar (2.5 PSI) for every 18°F (10°C) increase in temperature. Without proper ETRTO-compliant matching, this pressure increase during hot summer rides could push your setup beyond safe limits.
"The last thing we want to worry about when descending a mountain pass at speed is whether our tires will stay on the rims. And neither should you." – Jan Heine, Author/Founder, Rene Herse Cycles
These standards also simplify interchangeability. When the ETRTO numbers align, you can mix tires and rims from different manufacturers with confidence, knowing they’ll work together seamlessly. This clarity makes reading fit charts easier and ensures your mountain bike performs reliably and safely.
Min/Max Tire Size For Rim Width
Reading Tire and Rim Specifications
Understanding tire markings and accurately measuring rim dimensions are essential steps for ensuring compatibility and performance when working with mountain bike tires and rims.
Tire Size Markings Explained
Mountain bike tires typically use two sizing systems: the traditional inch-based system (e.g., 29 x 2.3) and the ISO/ETRTO metric system (e.g., 58-622).
The inch-based system gives approximate measurements. For instance, "29 x 2.3" indicates a tire with a total inflated diameter of about 29 inches and a width of 2.3 inches. The first number represents the overall diameter, while the second shows the width of the tire.
The ISO/ETRTO system, on the other hand, provides precise measurements in millimeters. For example, "58-622" specifies a tire width of 58mm and a Bead Seat Diameter (BSD) of 622mm. The BSD is crucial because it determines if the tire will fit your rim. Interestingly, a 29-inch mountain bike tire and a 700c road tire both share the same 622mm BSD, even though they are labeled differently. Similarly, a 27.5-inch tire has a BSD of 584mm, matching the French 650b standard.
One thing to watch out for is the potential confusion between decimal and fractional sizes. These can look similar but indicate different BSDs. For example, a 26 x 1.75 tire fits a 559mm rim, while a 26 x 1 3/4 tire requires a 571mm rim.
Once you’ve decoded tire markings, the next step is to measure your rim dimensions accurately.
Inner Rim Width and Diameter Measurements
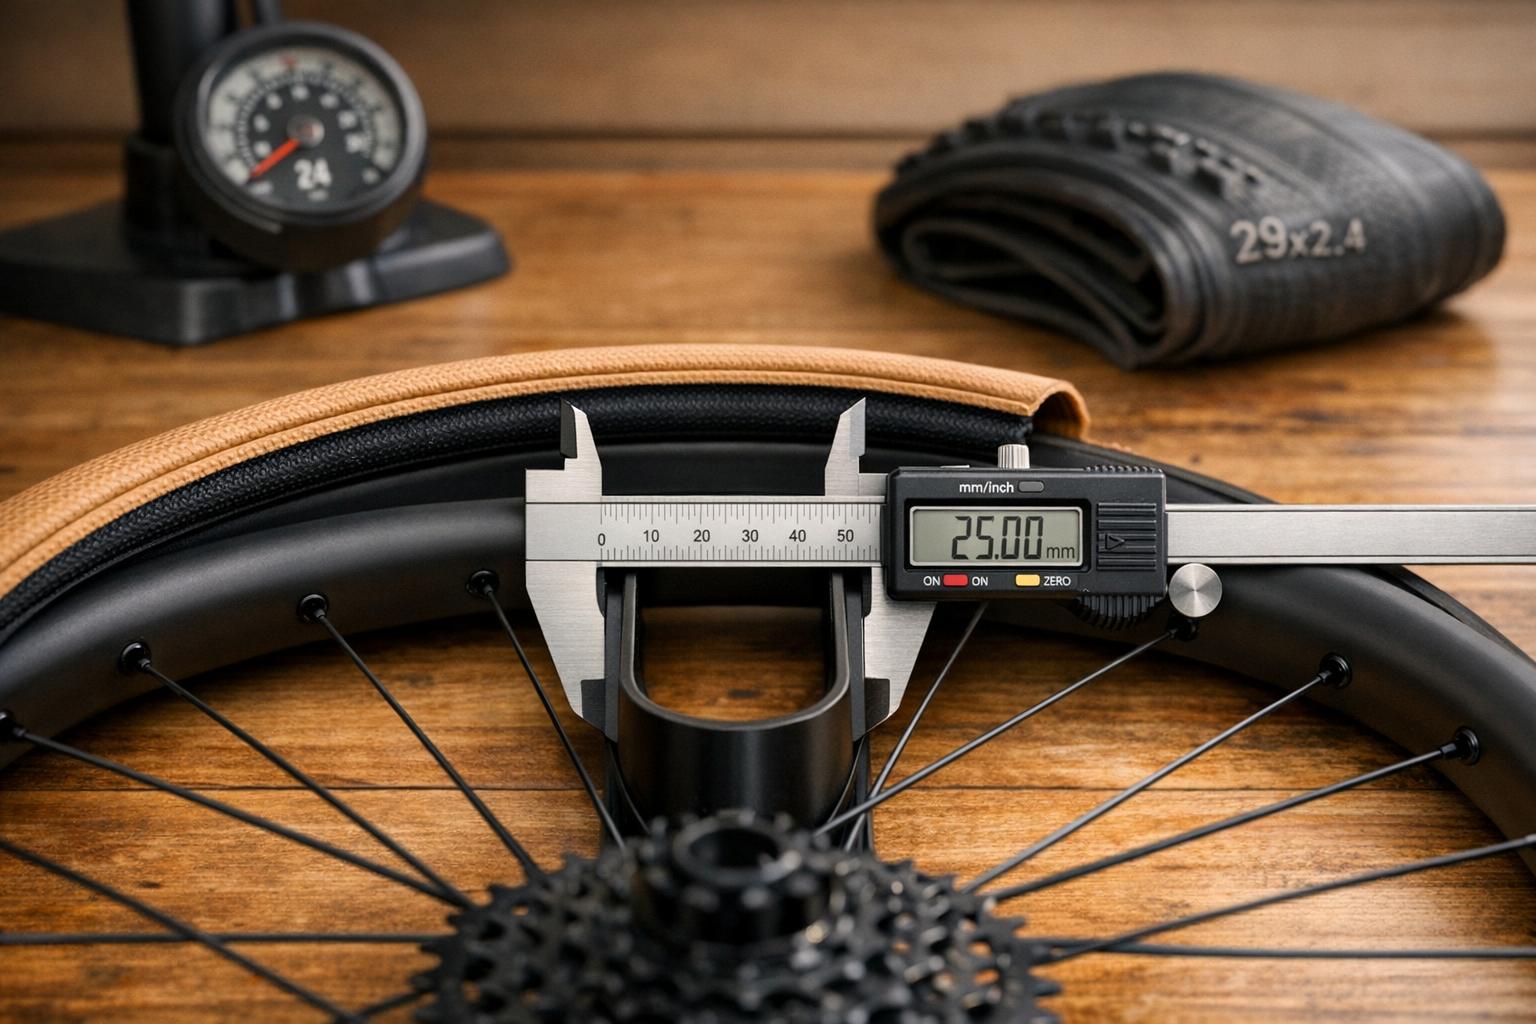
The internal width of the rim – the distance between the inner flanges where the tire bead sits – plays a significant role in tire performance and safety. Most modern mountain bike rims have an internal width between 25mm and 35mm. To measure this, remove the tire and rim tape, then use a vernier caliper to measure the distance between the bead hooks. Some manufacturers make this easier by engraving the ETRTO designation (e.g., 25-622) directly on the rim. Here, the first number represents the internal rim width in millimeters.
The general guideline for compatibility is simple: the tire width should be 1.5 to 2.5 times the internal rim width. For example:
- A 25mm internal rim pairs well with tires between 44mm and 64mm wide (approximately 1.75" to 2.5").
- A 30mm internal rim supports tires from 52mm to 65mm+ (roughly 2.1" to 2.6"+).
Using a tire that’s too wide for the rim can lead to an unstable "light-bulb" shape, which may fold under hard cornering. On the flip side, forcing a narrow tire onto a wide rim can expose the rim edges to damage and increase the risk of pinch flats.
To measure the Bead Seat Diameter, wrap a narrow metal tape (about 6mm wide) around the rim’s widest point. Divide the circumference by 3.142, then add twice the offset from the rim’s well to the bead seats. Avoid using fabric tape, as it can stretch and compromise accuracy. These precise measurements ensure your tire and rim combination meets safety and performance standards.
sbb-itb-9d75ae1
How to Use a Tire and Rim Fit Chart
Understanding Fit Chart Components
Tire and rim fit charts are laid out in a grid format to help you identify which tire and rim combinations work best together. The internal rim width (measured in millimeters) is typically displayed along one axis, while tire widths are listed along the other. Most charts use symbols or color codes to indicate three levels of compatibility:
- Solid colors or filled boxes: Mark "Optimal" pairings, where the tire and rim are perfectly matched for performance and handling.
- Dots or shaded areas: Indicate "Compatible" pairings that are safe to use but may not offer peak performance.
- Empty boxes or unshaded areas: Highlight "Not Suggested" combinations, which could lead to safety issues like tire blowouts or poor handling.
When using these charts, always focus on the internal rim width – the distance between the bead hooks – because this directly impacts tire shape and performance. Avoid relying on external rim width, as it doesn’t provide the same accuracy.
Now, let’s see how this information comes into play when choosing a tire and rim.
Example: Matching Tires and Rims
Say you want to pair a 2.4-inch (60mm) tire with the correct rim. Start by checking the tire’s ETRTO marking. A 2.4-inch tire often has a marking like "60-622", where 60mm is the tire width. Next, consult the fit chart to identify the suitable rim width range. According to manufacturer guidelines, a 2.4-inch tire is safe on rims with an internal width between 25mm and 33mm, with a 29mm internal rim being the ideal choice. This setup ensures a balance between weight, sidewall support, and handling performance.
If you opt for a 25mm internal rim, the chart might show a "Compatible" rating instead of "Optimal." While safe, this combination could produce a more rounded tire profile, which might feel less stable during sharp turns. On the other hand, pairing the same tire with a 30mm internal rim would likely fall under the "Optimal" category (solid color), offering better contact and enhanced handling for more demanding rides.
Common Mistakes and Safety Guidelines
Preventing Size Mismatches
Using tires and rims that don’t match properly can lead to two major problems. First, a narrow tire on a wide rim takes on a bell-like shape, leaving the rim more vulnerable to impacts. On the flip side, a tire that’s too wide for a narrow rim forms a bulbous shape, which can collapse under the stress of hard cornering. This happens because the narrow rim fails to provide enough lateral support, allowing the tire casing to roll during aggressive turns.
To avoid these issues, your rim’s internal width should be 50% to 65% of your tire’s width. Keep in mind that for every 2mm change in rim width, your tire’s section width will adjust by about 1mm. For example, a 28mm tire mounted on a 25mm internal rim could measure over 30mm, potentially exceeding safety standards for certain rims.
Another common mistake is ignoring pressure limits. Riders often inflate tires based solely on the markings on the tire’s sidewall, but it’s critical to follow the lower maximum pressure between the tire and the rim. Wolf Vorm Walde, Tire Product Manager at Specialized, emphasizes the importance of this:
"We do not recommend using any tires with a max pressure above 5.5 bar (80 psi) on straight wall rims".
By following these guidelines and consulting proper fit charts, you can ensure your tire and rim combination works safely and efficiently.
Hookless vs. Hooked Rim Safety
Tire retention isn’t just about size – it also depends on the rim design. Hookless rims, also called straight-wall or TSS rims, function differently from traditional hooked rims. Hooked rims use a mechanical overlap where the rim flange locks onto the tire bead. Hookless rims, however, rely entirely on the stiffness of the tire bead and the friction between the bead and the rim wall.
Because of this difference, standard clincher tires cannot be used on hookless rims. They lack the necessary bead stiffness and could detach during use.
Here’s a quick comparison of the two rim types:
| Feature | Hooked Rims (C/TC) | Hookless Rims (TSS) |
|---|---|---|
| Tire Type Required | Standard clinchers or tubeless | Tubeless-specific only |
| Max Pressure | Often exceeds 80 PSI | Capped at 72.5 PSI (5 bar) |
| Retention Method | Mechanical hook overlap | Bead stiffness and friction |
To ensure safety, always check the manufacturer’s compatibility chart to confirm that your tire is approved for hookless use. According to ETRTO standards, tires requiring more than 80 PSI must be paired with hooked rims. Additionally, inspect your rim tape before mounting tires. Even a single wrinkle in the locking channel can prevent proper bead seating on hookless rims, leading to a dangerous blow-off.
Testing has shown that hooked rims can handle 20% more pressure than hookless designs before failing. This is why pressure limits for hookless setups are stricter, and careful attention to these details is essential for safe riding.
Conclusion
Tire and rim fit charts are essential for both performance and safety. As Robbie Ferri, Senior Bike Maintenance Writer at BikeTips, puts it:
"If you don’t use the correct tires on your rims, then you could push the tolerance limit of the wheels, which could cause the tire to slip or the wheel to break".
The 50%-65% rule we discussed earlier remains a key guideline for achieving optimal performance and safety. When your tires and rims are properly matched, you can run lower tire pressures, which results in better traction, smoother rides over rough terrain, and more predictable handling.
In modern mountain biking, wider rims (25–35mm) have become the standard to support high-volume tires effectively. Keep in mind that for every 2mm change in rim width, your tire’s actual width shifts by about 1mm, highlighting the importance of precise compatibility.
Once you’ve ensured the right fit, proper installation is the next step. Always check the ETRTO markings on both the tire and rim to confirm compatibility. The first two digits indicate the tire’s width, while the last three represent the bead seat diameter. For tubeless setups, using a digital pressure gauge ensures accurate pressure readings.
FAQs
How do I find my rim’s internal width?
To determine your rim’s internal width, measure the distance across the inside of the rim where the tire bead rests. This measurement, typically in millimeters, plays a key role in tire compatibility and overall performance.
You might also find this information on casing labels or in the manufacturer’s specifications. For mountain bikes, rim widths generally fall between 20 mm and 35 mm, depending on the specific model.
What if my tire width falls between chart sizes?
If your tire width doesn’t align perfectly with the chart sizes, opt for one within the recommended range for your rim width. This ensures proper support and maintains performance. Using tires that are too wide or too narrow can lead to problems like poor handling, tire instability, or even damage. If you’re unsure, stick to the rim manufacturer’s guidelines or pick a size that closely matches the chart’s recommendations to prioritize safety and a smooth ride.
Can I use a clincher tire on a hookless rim?
Yes, you can mount a clincher tire on a hookless rim, but it might be more challenging to install and isn’t always the best option. Hookless rims are typically designed with tubeless-specific tires in mind to guarantee a proper seal and maintain safety. Make sure to consult the manufacturer’s compatibility recommendations before using clincher tires with hookless rims.