When you’re out on the trails, a mechanical issue can turn a great ride into a long, frustrating walk. The solution? A well-prepared repair kit. Here’s what you need to handle common problems like flat tires, broken chains, or loose bolts:
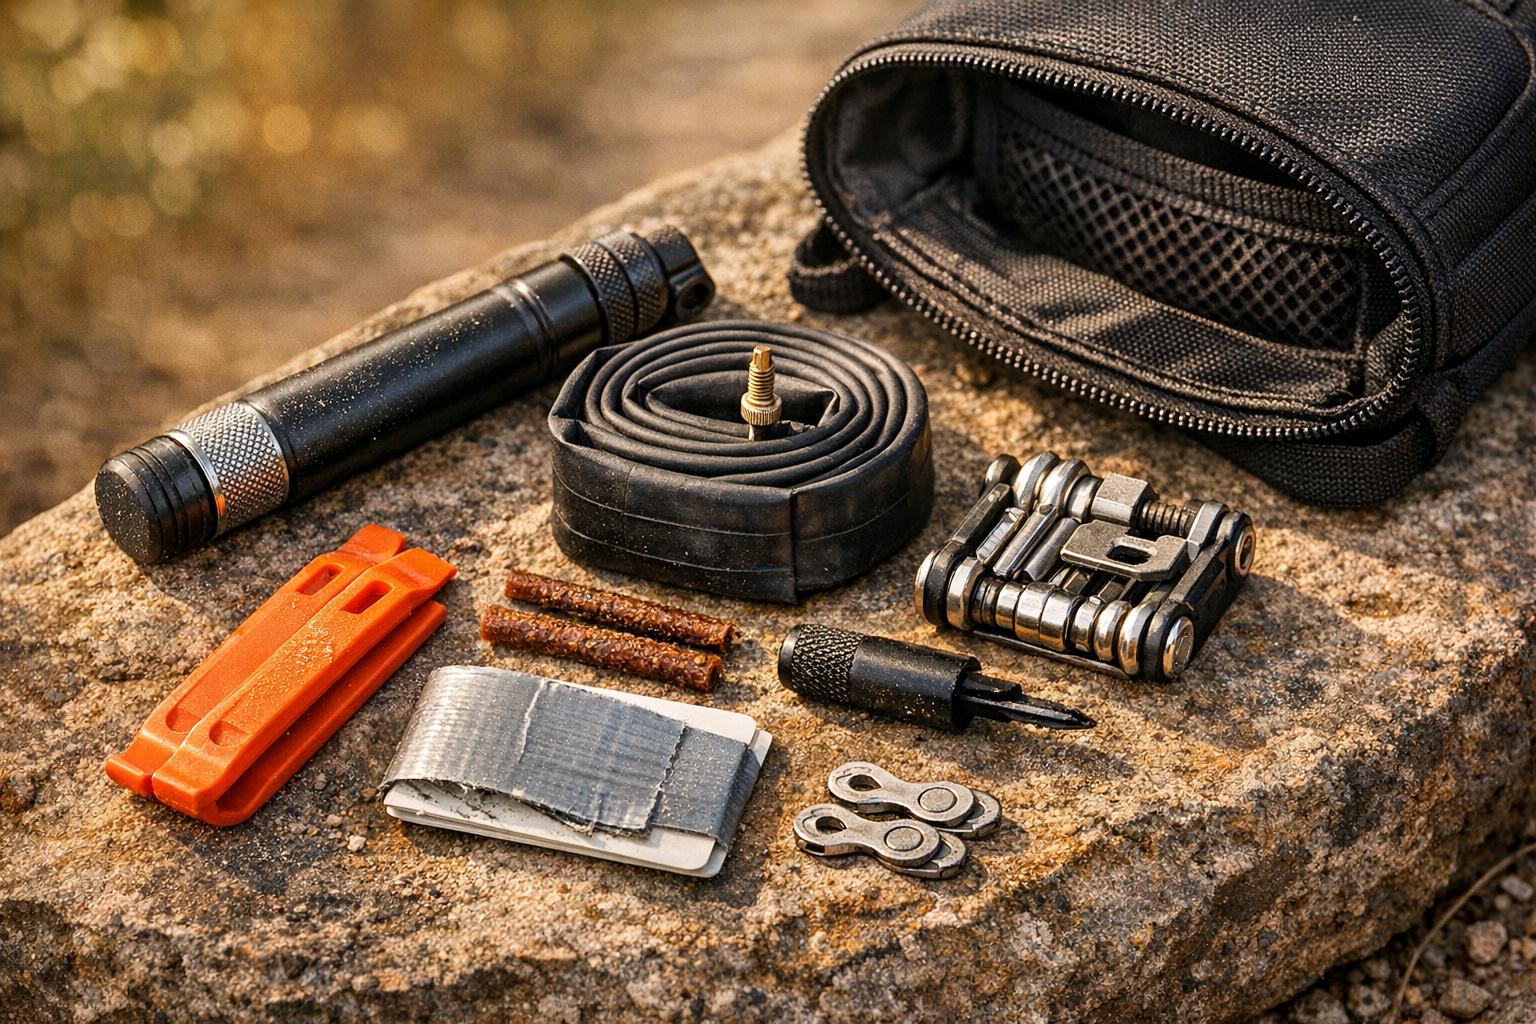
- Flat Tire Fixes: Carry a spare inner tube (or two), tubeless plugs, tire levers, and a patch kit. A mini pump or CO₂ inflator will help you get rolling again.
- Chain Repairs: A multi-tool with a chain breaker and spare master links are must-haves for reconnecting a broken chain.
- General Tools: Include hex keys, a T25 Torx bit, and a spoke wrench for quick adjustments. Duct tape and zip ties are great for unexpected fixes.
- Storage Options: Use a saddle bag, hydration pack, or frame bag to keep your tools organized and accessible.
Preparation is key – check your bike before heading out, and ensure your tools match your bike’s specific needs. With the right gear, you’ll be ready to tackle most trail issues and keep riding.
5 Common Mountain Bike Trail Side Repairs
Tire and Tube Repair Tools
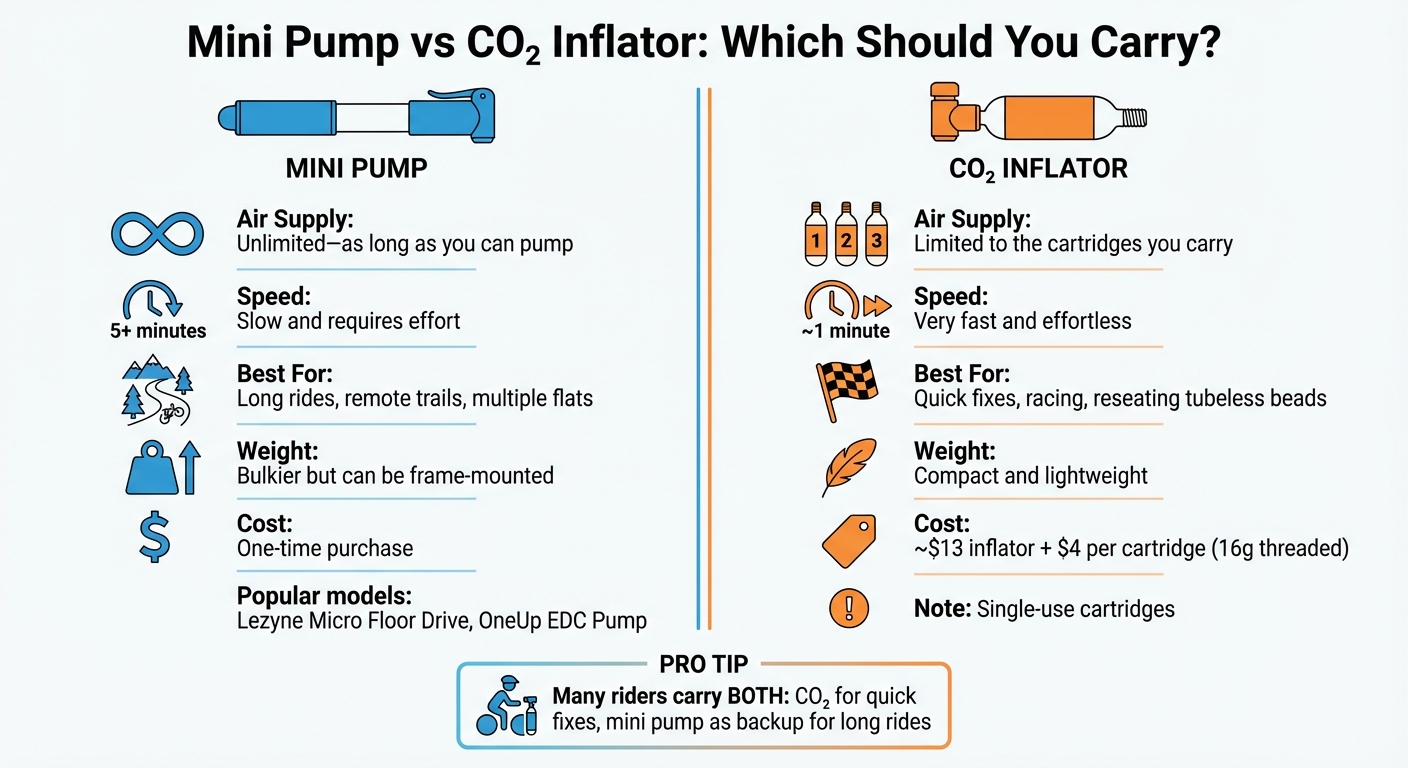
Mini Pump vs CO2 Inflator Comparison for Trail Repairs
Flat tires are the most common mechanical issue you’ll face on the trail. Having the right tools can mean the difference between a quick fix and a long walk back.
Spare Inner Tube or Tubeless Plugs
Always carry at least one spare tube, even if you’re using a tubeless setup. Large punctures, sidewall tears, or broken valve stems can overwhelm sealant, leaving you stranded. For extended or remote rides, pack two tubes for added security.
If you’re looking to save space and weight, consider TPU tubes. These weigh just 40–45g, compared to 100–115g for traditional butyl tubes. Brands like Tubolito offer TPU tubes for about $25 per pair, while butyl tubes cost around $8 each. The lighter weight and compact size of TPU tubes make it easy to carry two in the space of one standard tube.
"I switched to TPU-style tubes in my flat kits three seasons ago. This allows me to carry two tubes in the space of one traditional butyl tube."
– Tara Seplavy, Deputy Editor, Bicycling
For tubeless riders, plugs are your go-to solution for punctures. Tools like Dynaplug, priced at roughly $44, can quickly seal holes up to 1/4 inch without removing the wheel. While tubeless sealant works for smaller punctures (up to 3/16 of an inch), larger damage will need a plug – and a spare tube as a backup is always wise.
Once you’ve addressed the issue, tire levers and a patch kit will help you complete the repair.
Tire Levers and Patch Kit
Nylon tire levers are must-haves for removing tires without damaging the rim. Options like Pedro’s levers cost around $5–$7 per pair. Since some tire-and-rim combinations can be especially tight, it’s a good idea to carry two or three levers.
A patch kit is a great backup if you’ve already used your spare tube or run into multiple flats. Before heading out, make sure the rubber cement and sandpaper in your kit are fresh and ready to use.
For sidewall tears, a tire boot is essential to keep the tube in place. In a pinch, a folded dollar bill or a small piece of Gorilla Tape can serve as a temporary fix.
"A folded dollar bill or a swatch of Gorilla Tape can ‘boot’ a tire and prevent the tube from bulging out."
– Jason Bauer, Owner, Bauerhaus Bikes
Mini Pump or CO₂ Inflator
Once your repair is done, you’ll need to reinflate the tire. Mini pumps are reliable for multiple flats since they provide an unlimited air supply. They can be slow and require some effort, but models like the Lezyne Micro Floor Drive and the OneUp EDC Pump are known for their durability and ability to handle high-volume tires.
CO₂ inflators, on the other hand, are incredibly fast and easy to use. They can inflate a tire in about a minute. A basic alloy inflator with flow control costs around $13, while 16-gram threaded cartridges are about $4 each (or five for $10). However, since each cartridge is single-use, you could be stuck without air if you misplace one or face multiple flats.
| Feature | Mini Pump | CO₂ Inflator |
|---|---|---|
| Air Supply | Unlimited – as long as you can pump | Limited to the cartridges you carry |
| Speed | Slow and requires effort | Very fast and effortless |
| Best For | Long rides, remote trails, multiple flats | Quick fixes, racing, reseating tubeless beads |
| Weight | Bulkier but can be frame-mounted | Compact and lightweight |
To protect the valve stem, press the pump head against a stable surface while inflating. Pumps with extendable hoses are also a smart choice to reduce stress on the valve stem.
"Hand pumps with extendable hoses are another great way to avoid stressing the valve stem."
– Josh Patterson, Contributor, BikeRadar
Many riders opt to carry both a mini pump and a CO₂ inflator. A CO₂ inflator is perfect for quick fixes, while a mini pump serves as a reliable backup for longer rides or multiple flats. For tubeless setups, a CO₂ inflator is particularly useful for reseating the tire bead if the seal breaks. With these tools, you’ll be well-equipped to keep rolling until you reach your destination.
Chain Repair Tools
When your bike chain breaks, it can bring your ride to an abrupt halt. Having the right tools on hand can mean the difference between a quick fix and a long, frustrating walk back. Just like tire repairs, chain issues demand specific tools to get you rolling again.
Multi-Tool with Chain Breaker
A multi-tool equipped with a chain breaker is essential for repairing a broken chain. This tool allows you to push out rivets from damaged links, with a recess that holds the link steady while a screw plunger drives the pin out.
One popular option is the Crankbrothers M-17 ($39), which includes a chain breaker along with hex keys and spoke wrenches. If you’re looking for a more affordable choice, the Blackburn Mini-Switch ($32) offers similar features. Just make sure the chain breaker on your tool is compatible with your bike’s chain – especially if you use a 12-speed chain like SRAM T-Type, which requires specific geometries.
When using the chain breaker, remove the damaged links until the chain ends align properly for reconnection. If the repaired link feels stiff, you can loosen it by holding the chain on either side and flexing it sideways.
"A broken chain is a surefire way to turn an epic ride into an epic hike."
– Corey Maddocks
Spare Master Links or Quick Links
After removing damaged links, you’ll need master links (also called quick links) to reconnect the chain. These small connectors snap the chain back together without the need to reuse old rivets. Modern chains rely on master links for a secure and reliable repair.
SRAM Powerlock master links are a solid choice, costing about $13 each. Keep in mind that master links are drivetrain-specific, so you’ll need the correct version for your bike’s speed – a 12-speed chain, for example, won’t work with an 11-speed link. For longer or remote rides, it’s smart to carry at least two master links in case one gets lost during the repair process.
"All of the stuff now is very bike-specific, and you have to have your own package of stuff."
– Rebecca Rusch, Professional Mountain Biker
To install a master link, insert each half into the chain ends from opposite sides. Place the link on the upper section of the chain, hold the rear brake, and apply firm pressure to the pedals to snap it into place. If the link is stubborn, a tool like the Wolf Tooth Pack Pliers ($22) can make opening and closing master links much easier.
Once the chain is reconnected, keeping it properly maintained is crucial.
Chain Lube
A small bottle of chain lube can make a big difference in keeping your chain running smoothly. Dust, mud, and water crossings can dry out your chain, leading to squealing and sluggish performance. A quick application of lube restores smooth movement and reduces wear.
WD40 Wet Chain Lubricant is available in convenient 2ml single-use packets for about $5. These tiny packets are lightweight and easy to carry in any repair kit. Before applying fresh lube, wipe away dirt and old grease to ensure the new lube works effectively.
To avoid losing small items like master links during repairs, store them in a zip-top bag or secure them inside your tool kit.
sbb-itb-9d75ae1
Multi-Tool and General Repair Items
Once you’ve tackled flats and chain problems, it’s time to think about other adjustments that keep your bike in top shape. A few extra tools can make all the difference when you’re out on the trail and need a quick fix.
Hex Keys, Torx Keys, and Screwdrivers
Most of your bike’s bolts and fasteners rely on hex keys (commonly called Allen wrenches), usually in sizes ranging from 2 mm to 8 mm. The 4 mm, 5 mm, and 6 mm sizes are the most common for adjustments to stems, seatposts, brake calipers, and derailleurs. For pedals or specific crank bolts, an 8 mm hex is a must-have.
A T25 Torx bit is another essential tool, as it fits most disc brake rotor bolts and many SRAM components. Some bikes may also require T10, T20, or T30 Torx fasteners for parts like stems or chainrings. As for screwdrivers, a #2 Phillips and a 3 mm flathead are perfect for tweaking derailleur limit screws and brake lever reach.
When choosing a multi-tool, look for one that includes these key sizes and bits. Make sure it has enough reach to access bolts in tight spots – some folding tools can struggle with recessed fasteners.
"A multi-tool is the most important mountain bike pack essential."
– Becks Timbers, Founder, Two Wheeled Wanderer
Once you’ve got your multi-tool sorted, don’t forget about tools to keep your wheels in check.
Spoke Wrench and Spare Spokes
A damaged spoke can quickly turn a smooth ride into a frustrating one, leaving your wheel wobbly and rubbing against your brake pads or frame. A spoke wrench can save the day by tightening loose spokes or truing your wheel enough to get you home. Many multi-tools include a spoke wrench or even a chain tool for added convenience.
Carrying a few spare spokes – specific to your wheel size – can prevent a broken spoke from cutting your ride short. Tape them to your bike frame or rack so they’re always within reach. Since spoke nipple sizes vary, double-check that your spoke wrench matches your wheels before you hit the trail.
Duct Tape and Zip Ties
Sometimes, the unexpected happens, and you need quick fixes that go beyond tires or chains. Heavy-duty duct tape can seal a torn tire sidewall, stop a seatpost from slipping, or quiet a rattling water bottle cage. Meanwhile, zip ties are perfect for securing loose cables, fixing bolts, or temporarily stabilizing a cracked frame.
"Zip ties are the bailing wire of cycling. What duct tape won’t fix, zip ties have it covered."
– Jason Bauer, Owner, Bauerhaus Bikes
To save space, wrap about 10 feet of duct tape around your mini pump. And don’t skimp on zip ties – carry more than you think you’ll need. They’re lightweight, versatile, and incredibly handy. A multi-tool with a knife or pliers is useful for trimming off the excess ends after securing them.
These tools and supplies may seem simple, but they can make the difference between finishing your ride or walking your bike home.
How to Pack Your Repair Kit
Storage Options: Saddle Bags, Hydration Packs, and Frame Bags
The storage you choose for your repair kit depends on the type of ride and terrain you’ll encounter. Saddle bags are perfect for everyday essentials like tubes, tire levers, and a multi-tool. They attach directly to your bike, so you don’t have to worry about forgetting them. Prices range from about $25 for options like the Specialized Road Bandit to $130 for high-end models like the EVOC Seat Pack Boa, which features a compression system to minimize rattling on bumpy trails.
For longer rides or remote trails, hydration packs are the way to go. They offer plenty of space for water and gear, making them incredibly versatile. However, they can feel heavy, especially on extended climbs. Frame bags are another option, offering balanced weight distribution and keeping your center of gravity low. Just keep in mind they may block access to water bottle cages. If you’re tackling technical terrain, hip packs can be a great compromise. They’re less sweaty than backpacks but can dig into your stomach if overpacked.
| Storage Type | Best For | Key Advantage | Key Disadvantage |
|---|---|---|---|
| Saddle Bag | Essentials | Convenient and always ready | Limited space; may sway if unsecured |
| Hydration Pack | All-day rides | Large capacity for water and gear | Can feel heavy |
| Frame Bag | Bikepacking | Balanced weight; easy access | May block water bottle cages |
"Saddle bags are so easy to pack your everyday repair kit in, strap it to your bike, and just forget about it until you need it. You’ll never accidentally leave home without it."
– Chris Pino, Cycling Expert
No matter which storage option you pick, make sure your tools are organized and easy to grab during an emergency.
Pack Only What You Need
Packing wisely is just as important as choosing the right storage. Your repair kit should be lightweight but equipped to handle the most common trail issues. For example, protect spare tubes by placing them in sandwich bags to avoid friction damage. Instead of lugging around an entire roll of duct tape, wrap 10–20 winds of tape around your mini pump – this saves space and keeps your tubes protected. Spare spokes? Tape them to your frame or secure them inside your seatpost with foam to keep them in place.
A tool roll with compartments is great for organizing small items like master links and valve cores. To prevent metal tools from rattling, wrap them in a clean rag, which can also double as a chain-cleaning cloth. Compression straps on your storage bag can help cinch everything down, keeping your load stable on rough descents. The best bag for the job is one that keeps all your gear secure, organized, and easy to access when you need it most.
Conclusion
Having the right trailside repair kit can mean the difference between finishing your ride or facing a long, frustrating walk back. At a minimum, every rider should carry the essentials, often referred to as the "Big Four": a spare tube or patch kit, tire levers, a pump or CO₂ inflator, and a multi-tool. If you’re riding tubeless, don’t forget a plug kit like Dynaplug or Sahmurai Sword to quickly seal punctures. A chain breaker and a spare master link that matches your drivetrain speed (whether it’s 11-speed or 12-speed) can be a lifesaver if your chain snaps. Toss in a small roll of duct tape and a handful of zip ties for those unexpected quick fixes.
Customize your kit based on the ride. Short rides under 1.5 hours usually only require the basics, but if you’re heading out for a full day in a remote area, it’s smart to pack extras like a spare derailleur hanger, brake pads, and even a compact first aid kit. As professional mountain biker Rebecca Rusch wisely notes:
"All of the stuff now is very bike-specific, and you have to have your own package of stuff".
Make sure everything in your kit is compatible with your bike.
Of course, prevention is key. Check your tire pressure, ensure bolts are secure, and keep your chain properly lubed before heading out. Familiarize yourself with your tools at home so you’re confident when using them on the trail. By keeping your kit well-organized and tailored to your needs, you’ll be ready to tackle whatever the trail throws your way.
FAQs
What tools should I bring to fix a flat tire while biking on the trail?
If you find yourself dealing with a flat tire while out on the trail, having the right tools can make all the difference. Be sure to pack a spare tube or a patch kit to address the issue, along with tire levers to help remove the tire. A portable bike pump is essential for reinflating the tire, but for a faster solution, you might want to bring along a CO2 inflator.
With these tools in your kit, you’ll be ready to handle unexpected flats and get back to enjoying your ride without too much hassle.
What’s the difference between a mini pump and a CO₂ inflator, and which one should I pack?
When deciding between a mini pump and a CO₂ inflator, it all comes down to your needs on the trail. A mini pump is a dependable, reusable tool that doesn’t rely on cartridges, making it ideal for longer rides or situations where you want more control over tire pressure. While it does take more time and effort to use, it’s a solid choice for those who prioritize reliability and aren’t in a rush.
On the flip side, a CO₂ inflator is all about speed and simplicity. It inflates your tire in seconds with almost no effort, making it a lifesaver during races or urgent situations. The downside? It requires single-use cartridges, so you’ll need to carry extras and handle proper disposal.
Ultimately, the choice depends on your riding style and priorities. If quick fixes and convenience are what you’re after, a CO₂ inflator is the way to go. But if durability and reusability matter more, stick with a mini pump.
What tools should I pack for emergency bike repairs on a trail ride?
When heading out for a trail ride, it’s crucial to bring along tools to tackle common issues like flat tires or mechanical hiccups. Some essential items to pack are a multi-tool with a chain breaker, tire levers, a spare tube, and either a pump or a CO2 inflator. If you’re planning a longer ride or venturing into remote areas, it’s wise to include extras like a quick link for your chain, a spare derailleur hanger, and a patch kit.
Equally important is how you carry these tools. Depending on your comfort and riding style, you can opt for a backpack, hip pack, or frame bag. Packing thoughtfully not only prepares you for the unexpected but also helps you avoid turning an enjoyable ride into a frustrating trek back to the trailhead.


