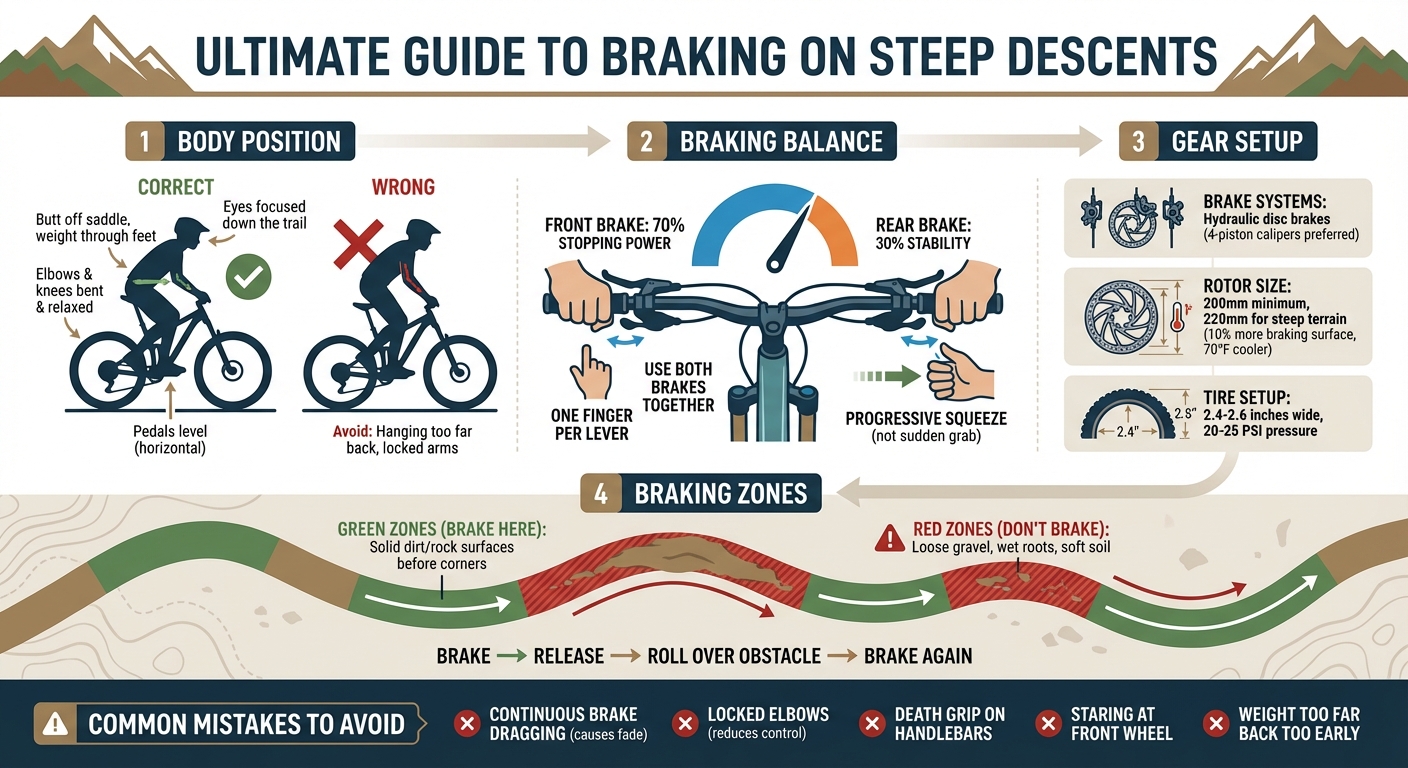
Mastering steep descents on a mountain bike is all about control, braking technique, and proper body positioning. When heading downhill, your weight shifts forward, increasing the challenge of maintaining traction and stability. Over-braking can lead to accidents, while poor positioning can leave you unable to steer or absorb impacts. Here’s what you need to know:
- Body Position: Stay centered over the bike’s bottom bracket with bent elbows and knees. Avoid leaning too far back or locking your arms.
- Braking Techniques: Use both brakes together, focusing on smooth, gradual application to avoid wheel lockup. The front brake provides 70% of stopping power, while the rear adds stability.
- Gear Setup: Hydraulic disc brakes, larger rotors (200mm+), and wide tires (2.4–2.6 inches) improve braking performance and control.
- Practice Drills: Work on brake modulation, emergency stops, and finding braking zones on stable terrain to build confidence.
The right mix of technique, gear, and practice ensures you can handle steep, technical descents safely and confidently.
Mountain Bike Steep Descent Braking Technique Guide
How To Ride Steep Descents With Confidence | MTB Skills
sbb-itb-9d75ae1
Body Position for Steep Descents
Steep descents can be intimidating, but the right body position can make them manageable – and even fun. The key? Stay centered over your bike’s bottom bracket and avoid "passenger mode", where you hang too far off the back.
The Correct Riding Stance
Think of your stance as your bike’s suspension system. Lift your butt off the saddle, focus your weight through your feet, and let your arms absorb shocks naturally. Keep your elbows and knees bent and relaxed – they’re there to adapt to the terrain, not to stay stiff. Hinge at your hips to lower your chest and drop your center of gravity. This position automatically creates a bend in your arms, giving you better control over steering.
Here’s something that might surprise you: when approaching a steep drop, move forward slightly at the knees – yes, forward. This motion bends your elbows, preparing them to extend as the bike drops beneath you. Simon Lawton, founder of Fluidride, explains it perfectly:
"Flexion creates extension… the faster I move forward at the knees, the faster my arms bend, and the faster they, therefore, are able to extend".
Keep your pedals level (horizontal to the ground) and your eyes focused down the trail. This stance not only improves your balance but also gives you better control over your brakes, allowing for smooth and safe descents.
Common Positioning Errors
Even with the ideal stance in mind, it’s easy to fall into bad habits. One of the biggest mistakes riders make is shifting their weight too far back too early. Doing this eliminates your ability to adjust mid-descent. If your arms are already fully extended when the bike tips downward, you’ll have no room to compensate. Pro coach Olly Morris emphasizes this point:
"Hanging off the back of the bike makes chutes dangerous… It gives you zero front wheel grip, bucks you forward if you hit a bump and gives you the least amount of stability".
Another common issue? Locked elbows. When your arms are stiff, you lose the ability to move the bike independently, which reduces your control. Lee McCormack, author of Mastering Mountain Bike Skills, sums it up well:
"The biggest mistake I see people making is not being in an athletic position or being completely tense and rigid. You can’t get a bike to do cool things if you’re rigid".
Finally, avoid gripping the handlebars like your life depends on it. A death grip leads to tension, which makes everything harder. And don’t stare at your front wheel – look down the trail to anticipate obstacles and maintain smooth steering. By staying centered and flexible, you’ll avoid "passenger mode" and gain the control you need for steep, technical descents.
Braking Techniques for Steep Terrain
Once your body position is dialed in, the next step is refining your braking technique. A smooth descent isn’t just about pulling the levers – it’s about mastering brake balance, gradual application, and knowing exactly when and where to brake.
Front and Rear Brake Balance
Getting the right balance between your front and rear brakes is key. On steep descents, your weight shifts forward, increasing traction on the front wheel while reducing it on the rear. This makes your front brake the main stopping force, while the rear brake adds stability and helps control your speed.
The goal? Use both brakes together without locking either wheel. Your front brake provides most of the stopping power, but don’t underestimate the importance of the rear brake for maintaining control. Modern hydraulic disc brakes are so effective that you only need one finger (your index or middle finger) on each lever. This keeps your grip firm on the handlebars, which is crucial on rough terrain. Once you’ve got the balance down, focus on applying pressure smoothly and progressively.
Gradual Brake Application
Braking isn’t an on/off switch – it’s an art of modulation. This means progressively squeezing the levers rather than yanking them abruptly. Start by positioning your brake levers so your finger naturally lands in the "crook" at the end of the lever. This gives you maximum control. Begin with a light squeeze to engage the pads, then gradually increase pressure as needed.
Modulation not only prevents wheel lockup but also helps maintain traction, which is essential for staying in control. Pay attention to how the bike responds – if you feel or hear a skid, ease off the lever until the skidding stops. Smooth braking is all about feeling the bike slow down in a controlled manner. Once you’ve mastered this, the next step is knowing where to brake.
Identifying Braking Zones
Controlled braking works best when you choose the right spots. Braking zones are sections of the trail with solid traction, like firm dirt or rock, where you can slow down effectively. These zones are often found before corners or technical features. As cycling coach Levi Bloom explains:
"Brake only when you have a good braking surface. This would be solid dirt or rock where you can get traction."
Avoid heavy braking on loose gravel, wet roots, or soft soil, as these surfaces reduce stopping power and can cause sliding. Instead, scan the trail ahead to spot braking zones early – especially when riding fast. Do most of your braking in a straight line before entering a corner or technical section, and then release the brakes to let your wheels roll freely.
If you encounter a slippery obstacle, like a wet root, in the middle of your braking zone, try split braking. This means braking before the obstacle, releasing to roll over it, and resuming braking once you’re back on solid ground. As Matt Wragg from Canyon points out:
"Top mountain bike racers focus on their exit speed, because it does not matter how much speed you have at the start or the middle of a corner, all that matters is how much speed you leave it with."
Gear for Steep Descents
When tackling steep terrain, the gear you choose is just as important as your technique. Braking performance relies on three key components: the brake system, rotor size, and tire setup. Each plays a crucial role in ensuring you stay in control.
High-Performance Brake Systems
Modern hydraulic disc brakes make steep descents much more manageable. Take the SRAM Maven, for example – it boasts a 50% power boost over its predecessor, the Code model, thanks to oversized 18mm and 19.5mm pistons. Pricing ranges from $185 for the Maven Bronze to $300 for the Maven Ultimate.
For those who prefer a sharper, more immediate braking feel, the Shimano XT M8120 ($230 per brake) is a solid choice. Its firm bite point is particularly useful for navigating technical terrain. Meanwhile, the Hayes Dominion A4 ($250) stands out for its light lever pull, which reduces hand fatigue on long rides. As reviewer David Golay points out:
"Having a more powerful brake (within reason) can actually make for easier modulation since you’ve got better fine-motor control when you’re squeezing with a more moderate effort, and can help stave off hand and wrist fatigue".
Four-piston calipers are the go-to for gravity-focused riding. They distribute heat more evenly than two-piston models, cutting pad wear by 27%. These systems also maintain reliable performance even when rotors heat up to 572°F (286°C), a critical feature for avoiding brake fade during extended descents.
Rotor Size Selection
Rotor size has a direct impact on both stopping power and heat dissipation. For steep descents, 200mm rotors should be your baseline. Upgrading to 220mm rotors increases the braking surface by 10% and can lower pad temperatures by 70°F (39°C) during intense braking. This added thermal control helps prevent brake fade when you’re riding long, technical sections.
With modern 29-inch wheels, 220mm rotors are often a better fit due to the reduced braking leverage. Heavier e-MTBs benefit even more from oversized rotors, as their added weight and higher speeds demand greater braking capacity.
Before making the switch, double-check that your frame and fork are compatible with larger rotors. You’ll also need specific caliper adapters – for instance, a 20P-2 adapter allows you to go from 180mm to 200mm rotors. SRAM Centerline rotors are priced at $53 for 180mm and $59 for both 200mm and 220mm sizes. As Bruce Lin from The Pro’s Closet advises:
"Run the rotors that give you confidence on the hardest descent(s) you ride".
Pairing the right rotor size with proper tire selection further optimizes your braking setup.
Tire Selection for Traction
Tire grip plays a huge role in braking performance. Opt for wide tires between 2.4 and 2.6 inches, as they provide a larger contact patch to handle the increased braking force without skidding. Combine this with lower pressures – 20 to 25 PSI – to help the tires conform to trail obstacles like rocks and roots.
This setup ensures your tires maintain grip even under heavy braking. When combined with a high-performance brake system, it creates a reliable and predictable braking experience, giving you the confidence to tackle steep, loose descents with ease.
Safety Tips and Practice Drills
Mastering braking techniques goes beyond just having the right gear – it’s about building reflexes and muscle memory through consistent practice. Safety drills are an excellent way to refine your skills, especially for handling steep descents.
Preventing Brake Fade and Skidding
A common mistake riders make is dragging the brakes continuously during a descent. This can cause the pads and rotors to overheat, leading to brake fade or even failure . Instead, use a firm braking approach: brake hard to reduce speed, then release to let the brakes cool.
Relja Novović, a mechanic, explains:
"The faster one goes, the more braking is done by the air, protecting brakes from heating up, wearing and working hard".
Adopting an upright position can increase air resistance, which naturally slows you down and eases the strain on your brakes. When braking, it’s also important to pick your surface wisely. Coach Levi Bloom advises:
"Brake only when you have a good braking surface… On the rough sections where you want to brake, you should not brake!"
Focus on braking on firm, stable surfaces like dirt or rock. Avoid braking on loose gravel, wet roots, or uneven terrain where your tires are more likely to skid . Instead of grabbing the brakes suddenly, use light, controlled pumps to maintain traction. If your rear wheel begins to skid, ease off the rear brake and shift your weight forward in a rowing motion to regain control. On technical terrain, try split braking: apply strong braking in clear areas, release completely when crossing slippery patches, then reapply once you’re past the obstacle.
Progressive Braking Drills
Start practicing on flat gravel surfaces to get a feel for maximum braking. Use an "L-shaped" movement: shift your hips back while pressing into the pedals to increase tire grip. From there, work on brake isolation drills. First, practice controlling your speed with only the rear brake on non-technical descents. Then, use just the front brake on flat terrain to understand its stopping power.
Another useful exercise is the "Speak Your Truth" drill. Shout "BRAKE" every time you brake to become more aware of unnecessary braking. For precision, set a target like a cone or rock and practice stopping exactly at that point. Gradually increase your speed and shorten your braking distance to mimic emergency scenarios.
Emergency Stops and Recovery
Emergency stops are a critical skill to master. When you need to stop suddenly, shift your weight back immediately to maximize the front brake’s effectiveness and reduce the risk of flipping over the handlebars . Keep your wheels straight during heavy braking to avoid skidding.
Relja Novović offers a valuable reminder:
"Never ride faster than you can see!"
Train yourself to look ahead instead of focusing on your front wheel. Fixating too closely on obstacles increases the likelihood of hitting them. On steep, tricky sections, follow this counterintuitive rule: "easy spot = brake; tricky spot = go faster." This helps you maintain balance and lets the bike glide over rough patches. Lastly, avoid locking yourself into a stiff, rearward position with straight arms – often called "passenger mode." This posture limits your ability to maneuver the bike effectively.
Conclusion
Mastering steep descent braking boils down to nailing the right body position, timing, and plenty of practice. The key lies in maintaining a centered stance – keeping your weight slightly back while staying relaxed and alert. This balanced posture is the cornerstone of controlling your bike when gravity takes over. And don’t forget: even the best brakes in the world are useless if your tires can’t grip the trail.
As Matt Wragg, freelance writer and photographer for Canyon, explains:
"Good braking is maybe the most important mountain bike technique you can learn… because if you can stop, you can stay safe".
Start small. Practice on flat, loose surfaces to get a feel for how your bike responds. Incorporate drills like hard braking, isolating each brake, and gradually applying pressure to the levers. These exercises will help you build muscle memory and confidence. Wragg emphasizes:
"By applying these techniques consistently in easy situations until they become second nature, you are building a skill so that when you do reach challenging situations you will be ready to handle them".
As you transition from practice to tackling real descents, focus on applying these skills consistently. Whether your bike is equipped with a high-end $400 hydraulic system or a more basic mechanical setup, technique always trumps equipment. Keep your eyes ahead, brake early, and stay active on the bike. With repetition, you’ll sharpen your reflexes and gain the confidence to handle even the steepest, trickiest descents with ease and control.
FAQs
How do I brake without skidding on loose or wet trails?
To keep from skidding on wet or loose trails, try using controlled, intermittent braking instead of keeping the brakes engaged the entire time. Press the brakes firmly for a moment to reduce speed, then release them to allow the tires to grip the surface again. Repeat this process as necessary. Also, shift your weight toward the rear wheel and stay in a low, balanced position. This helps boost both control and traction when navigating slick terrain.
When should I use split braking on steep descents?
When navigating steep descents, split braking is key to maintaining both control and momentum. Here’s how it works: apply the rear brake steadily to regulate your speed, while lightly pulsing the front brake. This prevents abrupt stops or a loss of balance.
Using this approach helps keep your bike stable, reduces the risk of skidding, and ensures better control – especially on challenging sections of the trail. The trick is to focus on consistent rear brake use while gently feathering the front brake for a smoother, safer ride.
What brake and tire upgrades help most on long, steep downhills?
Upgrading to high-performance hydraulic disc brakes is a smart choice for tackling long, steep descents. These brakes offer superior modulation, consistent stopping power, and better resistance to heat build-up, which is crucial on demanding terrain.
Pairing this with wider tires made from softer compounds and featuring aggressive tread patterns boosts grip and stability. This combination reduces the risk of skidding, especially on tricky, uneven surfaces.
Together, these upgrades give you greater control, help prevent brake fade, and make navigating technical terrain safer and more reliable.