When choosing bike lights for night rides, deciding between handlebar-mounted and helmet-mounted setups can significantly impact your visibility and safety. Here’s a quick breakdown:
- Handlebar lights: Offer a broad, steady beam that lights up the trail ahead. They’re easy to install, reduce neck strain, and allow quick adjustments. However, they don’t follow your gaze, making it harder to see around corners, and they can bounce on rough terrain.
- Helmet lights: Provide a focused beam that moves with your line of sight, ideal for navigating tight turns and spotting obstacles. They improve visibility in technical sections but add weight to your helmet, which can cause neck fatigue during long rides.
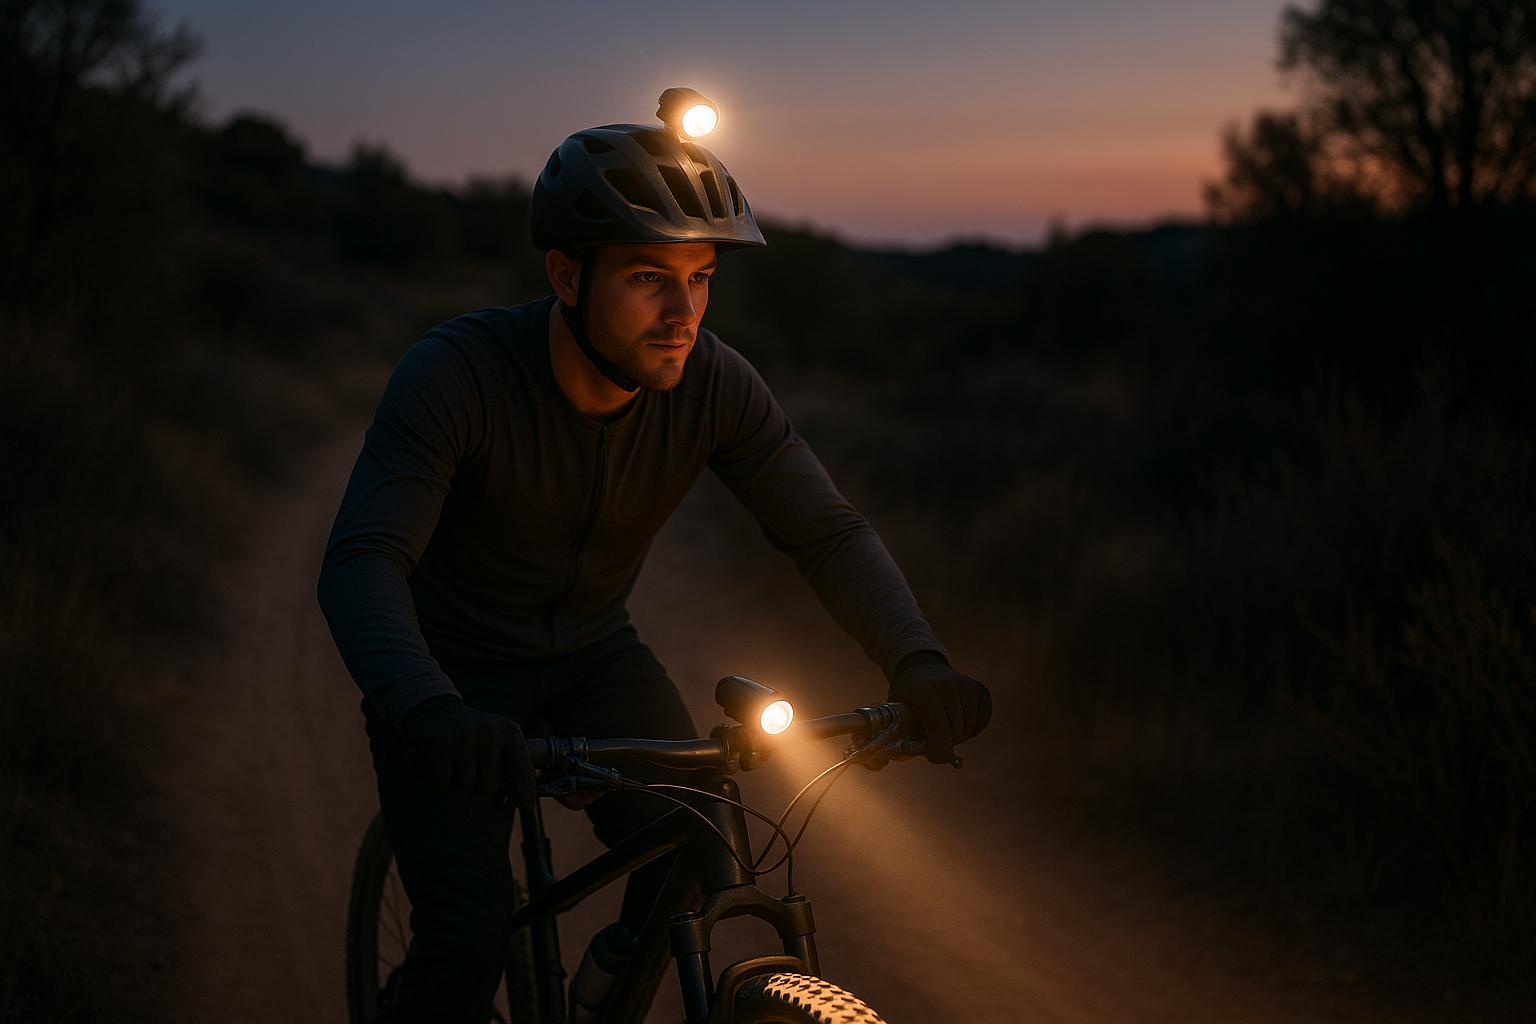
For the best results, consider combining both: a wide-beam handlebar light for general visibility and a focused helmet light for precision. Dual setups improve depth perception, trail coverage, and safety, especially on technical trails or solo night rides.
The Best MTB Lights in 2025 | And What To Look For! |
Handlebar Light Mounting: Pros and Cons
Handlebar-mounted lights attach directly to your bike’s handlebars, providing a steady beam that lights up the trail ahead. This setup is a go-to choice for many riders because it offers a reliable base for powerful lights.
How to Set Up and Install
Getting these lights installed is quick and straightforward. For hard-mount systems, start by unscrewing the bracket, sliding it onto the handlebars, and aligning it parallel to the ground. Once positioned, tighten the bracket by hand. For quick-connect systems, simply attach the mount, secure it with rubber straps, and ensure the hook clicks into the notch.
The essentials are the same for both methods: ensure the bracket fits your handlebar size, position the light so it points straight ahead, and tighten everything securely. Before hitting the trail, double-check that the light is firmly in place and doesn’t block access to your bike’s controls.
A proper installation means your light is ready to enhance visibility right away.
Benefits
Handlebar lights excel at illuminating a wide area in front of your bike, giving you a clear view of the trail. This broad beam helps you spot obstacles, rocks, and other trail features well in advance.
Another perk is comfort. Since the light is mounted on the bike, it reduces strain on your neck during longer rides. The placement also makes it super convenient to adjust brightness or switch beam settings without taking your hands far from the grips.
In September 2021, mountain biker Jrock100 praised the Outbound Lighting Trail Evo handlebar light, saying its lowest setting still provided an impressive field of view. This allowed for faster, more natural riding compared to older lights with higher lumens.
Drawbacks
One downside is the fixed beam direction. Unlike helmet-mounted lights, handlebar lights don’t follow your line of sight, which makes it harder to scan around corners.
Space can also become an issue. If your handlebars are already crowded with a GPS unit, phone mount, or other accessories, fitting a light mount might require some creative rearranging. It can also interfere with brake and shifter cables.
Handlebar lights are more prone to bouncing or shifting when riding over rough terrain. This can make the beam less effective, especially on technical trails. Additionally, the fixed beam angle may limit your peripheral vision, focusing mainly on the area directly in front of you.
Helmet Light Mounting: Pros and Cons
Helmet-mounted lights attach directly to your helmet, offering a lighting system that moves wherever you look. This setup creates a distinct riding experience compared to handlebar-mounted lights, with its own set of advantages and challenges. Like handlebar systems, helmet lights require proper installation and come with trade-offs.
How to Set Up and Install
Installing a helmet light involves balancing the weight and ensuring the mount is compatible with your helmet. Positioning the light at the center of your helmet is key to minimizing neck strain during extended rides. There are two main mounting methods to choose from: adhesive mounts and strap-style mounts.
- Adhesive mounts: These provide a firm, low-profile attachment that stays secure even during aggressive rides. They’re best suited for helmets with smooth, uninterrupted surfaces. If your helmet has vents that interfere with placement, adding an adhesive base may be necessary.
- Strap-style mounts: These offer greater flexibility, allowing you to easily remove or reattach the light between rides. For stability, ensure the straps are tightened properly to keep the light steady, especially on rough trails.
Benefits
Helmet-mounted lights shine exactly where you’re looking, helping you spot obstacles and hazards quickly.
Unlike handlebar-mounted lights, helmet lights follow your natural movements, making it easier to navigate tight turns, curves, and unexpected trail features. Another advantage is the eye-level positioning, which can make you more visible to other riders and pedestrians, adding an extra layer of safety during group rides or on shared trails.
Drawbacks
One downside of helmet-mounted lights is the added weight on your head. Even lightweight options can lead to neck fatigue during long rides, especially if you’re also using other helmet accessories.
The focused beam of a helmet light, while precise, typically offers less coverage than a handlebar-mounted system. This narrower light spread can make it harder to spot obstacles in your peripheral vision or get a full view of the terrain.
Additionally, the constantly shifting beam may take some getting used to. Managing the light’s battery can also be tricky, as it operates on a separate power source, making it less convenient to adjust or recharge during your ride.
Direct Comparison Table
Compare handlebar and helmet mounting options to decide what works best for your night rides. Here’s a breakdown of their key differences:
| Factor | Handlebar Light Mounting | Helmet Light Mounting |
|---|---|---|
| Illumination Coverage | Offers a wide and even light spread, boosting peripheral vision and helping spot obstacles directly ahead | Delivers a focused beam that moves with your line of sight, great for corners and technical sections, but with a narrower range |
| Comfort | Keeps weight off your head, ensuring natural balance and comfort on long rides | Adds weight to the helmet, which can become uncomfortable during extended rides |
| Ease of Use | Features easy-to-reach controls for brightness adjustments or switching on/off without stopping | Requires stopping or removing the helmet to adjust settings |
| Safety & Visibility | Lights up the immediate path and highlights trail hazards but may not illuminate areas outside the bike’s direction | Aligns with your gaze, improving visibility in technical terrain and making you more noticeable to others |
| Gear Interference | Can clash with other handlebar accessories | May not fit all helmet designs, especially those with MIPS systems, and could snag on branches |
| Beam Pattern | Uses a flood beam for broad trail lighting and better depth perception of obstacles | Utilizes a spot beam to illuminate obstacles directly in the rider’s line of sight |
Each option shines in its own way. Handlebar-mounted lights prioritize comfort and convenience, while helmet-mounted lights excel in providing precise, directional lighting, especially for technical trails.
For the best of both worlds, combining these setups can significantly enhance your trail visibility and riding experience.
sbb-itb-9d75ae1
Using Both: Dual Mounting Options
Combining handlebar and helmet lights provides a well-rounded lighting setup for tackling trails with confidence.
Better Trail Visibility
Pairing a wide-beam handlebar light with a focused helmet light significantly improves how well you can see the trail ahead. This setup helps you spot obstacles and choose the best lines, as the light coverage follows both the terrain and your gaze. Handlebar lights illuminate a broad area, while helmet lights zero in on specific details, like roots or rocks directly in your path. Placing auxiliary lights slightly off-center from the main beam can further enhance visibility, especially on rough or uneven sections.
Setup Tips
To get the most out of your dual lighting system, proper setup is key. Managing power effectively ensures your lights last through long rides. Adjust brightness levels depending on the situation – lower settings are ideal for climbs or technical sections to save battery life. Also, consider where you position your lights. Pay attention to your handlebar design and bag placement to avoid obstructing the beams. For added safety, offset auxiliary lights both from the main beam and from each other. A solid configuration is to use a primary headlight on your handlebars, complemented by a secondary helmet-mounted light. With these adjustments, your dual lighting system will be ready to handle any trail you take on.
Which Setup to Choose
When deciding on the ideal single-light setup, it’s crucial to consider your riding style and trail conditions. The right lighting can make all the difference in visibility and safety.
Best Options for Different Riding Conditions
Each mounting style has its strengths. On technical trails or twisty singletrack, a helmet-mounted light is invaluable. Since it follows your head movement, it allows you to spot obstacles and navigate corners more effectively than a fixed handlebar light.
For technical rides, aim your helmet light slightly downward for better focus on the trail ahead. Pair this with a handlebar light set to its widest beam to illuminate a broader area. If the terrain is particularly challenging, amber lens filters can enhance depth perception. For aggressive riding, opt for helmet lights in the range of 700–1,000 lumens and handlebar lights between 1,000–1,500 lumens.
Solo night rides often benefit from combining both helmet and handlebar lights. This setup enhances visibility and depth perception while ensuring stability and battery longevity. On group rides, however, etiquette matters. Avoid flashing taillights, as they can distract or even impair the vision of riders behind you. Ride Headquarters advises:
If you’re riding with a group, use the constant setting. It’s irritating at best, and dangerous at worst, to be riding behind a bright blinking light. It really messes with your eyesight and depth perception.
For commuting and road riding, handlebar lights are ideal. They provide wide, steady illumination, making it easier to spot hazards and improving peripheral visibility in urban settings. On the other hand, casual trail rides on familiar paths allow for flexibility – choose the setup that feels most comfortable and aligns with how often you ride.
Beam patterns are just as important as where you mount your lights. A wide beam (over 20°) works best on handlebars, while a narrow beam (10–15°) is better suited for helmet-mounted lights.
More Resources at Intermountain Bikes
Once you’ve identified your needs, check out Intermountain Bikes for more expert advice. They offer detailed reviews, setup guides, and tips on lighting and gear to help you get the most out of your rides. Whether you’re looking for recommendations on lights, battery management strategies, or other biking equipment, their resources can help elevate your biking experience.
Conclusion
Picking the right lighting setup for your mountain bike can make all the difference in your riding experience. Handlebar-mounted lights are great for offering wide, steady illumination, perfect for road rides or familiar trails where you need to see the broader path ahead. However, these lights can fall short when tackling technical terrain that requires you to see around tight corners or over tricky obstacles.
Helmet-mounted lights, meanwhile, are a game-changer for technical riding. They illuminate exactly where you’re looking, making them invaluable for navigating challenging sections. The downside? They add weight to your helmet and often come with a narrower beam. The best solution? Use both. Combining handlebar and helmet lights ensures maximum visibility and depth perception, especially on night rides.
Field tests highlight this advantage: a setup with a 450-lumen helmet light paired with a 450-lumen handlebar light outperforms a single 900-lumen light. The key is strategic placement – a focused beam on your helmet complements a flood beam on your handlebars, delivering both reach and coverage.
Good lighting isn’t just about seeing better; it’s about riding safer and more confidently. Poor lighting can lead to missed obstacles and slower reaction times, while the right setup helps you ride with precision and ease. Whether you’re commuting, cruising familiar trails, or tackling technical singletrack, investing in the right lighting system enhances both safety and enjoyment.
And here’s some good news: quality lighting is now more affordable than ever. What used to cost $250 or more for a high-end helmet light can now be found for around $80. This makes dual lighting setups accessible to most riders. Just remember to test your setup in safe conditions before heading out on challenging rides. The best lighting system is the one that fits your riding style and gives you the confidence to take on any trail.
FAQs
What are the pros and cons of using a handlebar-mounted light versus a helmet-mounted light, and how do I choose the best option for my rides?
When deciding between a helmet-mounted light and a handlebar-mounted light, it all comes down to your riding style and the conditions you face.
A helmet-mounted light excels on technical trails or areas with lots of twists and turns. Since it points wherever you look, it provides focused lighting, making it easier to spot obstacles or navigate sharp corners. The downside? It can feel a bit heavy on your head during long rides.
On the flip side, a handlebar-mounted light offers a steady, wide beam that lights up the path directly in front of your bike. This makes it a great choice for faster rides on open roads or trails. Plus, it keeps your helmet light and comfortable.
For the ultimate setup, many riders use both types of lights together. This combo gives you precise illumination from your helmet and a stable, broad beam from your handlebars. Think about your usual terrain, riding habits, and what feels most comfortable to you when making your choice.
How can I extend battery life for both handlebar and helmet lights during long rides?
To make sure your handlebar and helmet lights last through long rides, try using low brightness settings when you’re in well-lit areas or don’t need maximum power. Many lights come with power-saving or eco modes that can help stretch their runtime significantly.
For extended rides, it’s smart to bring along spare batteries or a portable charger so you’re covered if your lights start to dim. Choosing lights with longer battery life or rechargeable options can also cut down on how often you need to replace them. A little preparation goes a long way in keeping you visible and safe during your ride.
What are the recommended lumen levels and beam patterns for different types of biking trails or riding styles?
For trail riding, you’ll want a light with at least 1,200 lumens to ensure the path ahead, along with any obstacles, is well-lit. For urban or casual rides, a range of 200 to 1,000 lumens should be enough, depending on how fast you’re going and the amount of ambient light around you.
Beam patterns also play a big role. A narrow beam works best for high-speed or technical trail riding, as it focuses light directly in front of you, giving you better precision. On the other hand, a wider beam is more suitable for urban or relaxed rides, as it improves peripheral visibility, helping you stay more aware of your surroundings. Pairing the right lumens with the appropriate beam pattern can make a big difference in both your safety and overall riding experience.